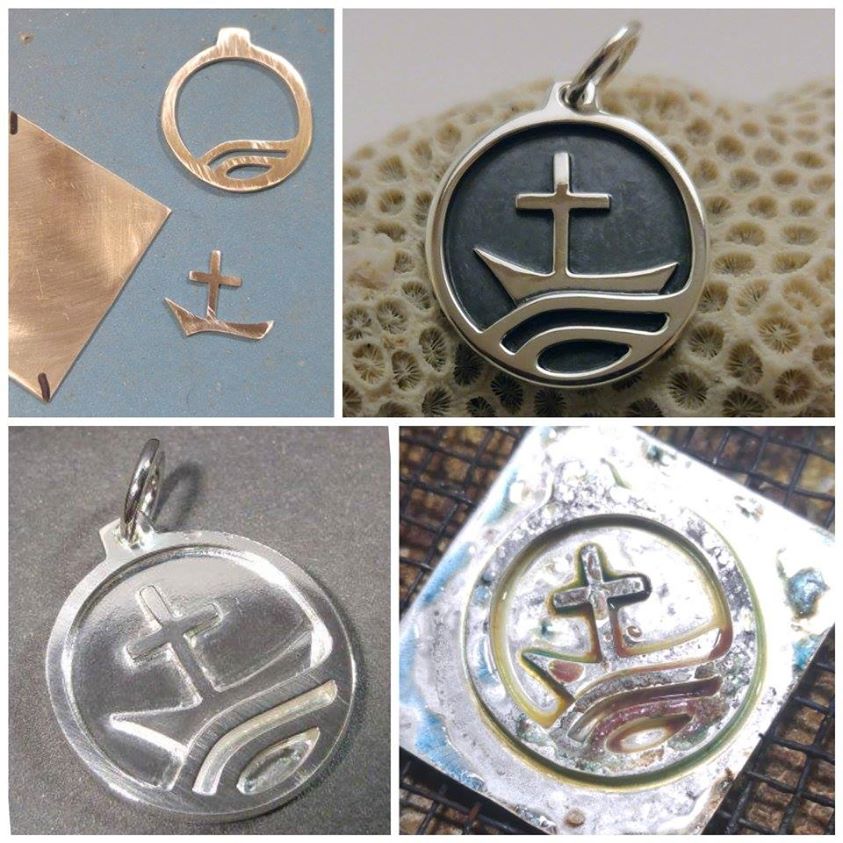
A semi-replica of a medal my brother had bought back in the 70’s, but had since lost when his boys were young. The original manufacturer ceased making them in the early 80’s, but ironically my brother had made a wax imprint of his back when he was silversmithing, too. I had been hauling that wax imprint around in a little box of other wax patterns with my silversmithing tools for the last 45 years, but never really thought about it.
He had mentioned having lost his medal years ago when he was visiting us earlier this summer, and had never been able to find another one. I remembered having that wax imprint, so I made a pattern of it since after so many years of jostling around loose in a box, it was definitely not suitable for use in making a casting from it any more, and fashioned him a new one from scratch.
The outer frame and waves overlay were pierced from 16 gauge sheet, and the boat with cross overlay were pierced out of 20 gauge sheet, all positioned and soldered onto a base layer of 20 gauge sheet. 16 gauge round wire was used for the O-ring.
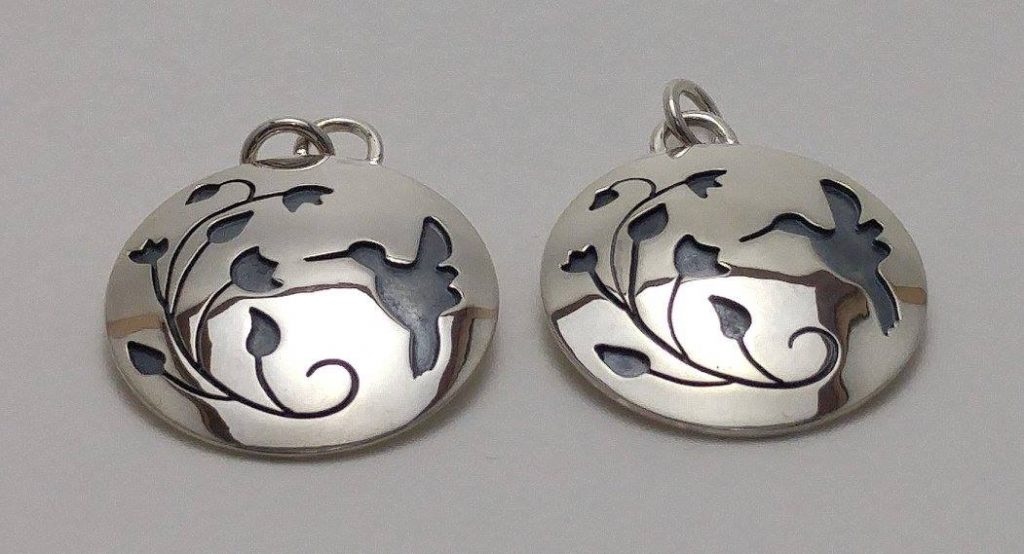
A pair of domed sterling silver overlay Hummingbird pendants, or possibly charms, that had been on my bench for months waiting for me to get around to finishing.
Made smaller than the Hummingbird I originally created in the past for my mother-in-law, these could be used as a small pendant, or even a charm on a bracelet (which is what one of them will be).
When a friend saw my first Hummingbird pendant, he wanted one for his mother, too. I told him I would be happy to make one for her, but he later mentioned that his mom had an allergy to silver. However, he said she could wear it on her charm bracelet, as she just couldn’t have it constantly resting against her skin, as with a pendant.
As the original Hummingbird pendant was really too large for a charm bracelet, I made these a little smaller, shrinking the design I created for the first pendant with a photocopier to the size I was wanting. I made two, in case I wasn’t happy with one of them, but they both turned out nicely.
I’m not sure which one my friend will choose for his mom, but whichever one isn’t claimed has already been spoken for by my wife (and how could I turn down my #1 customer?). 😉
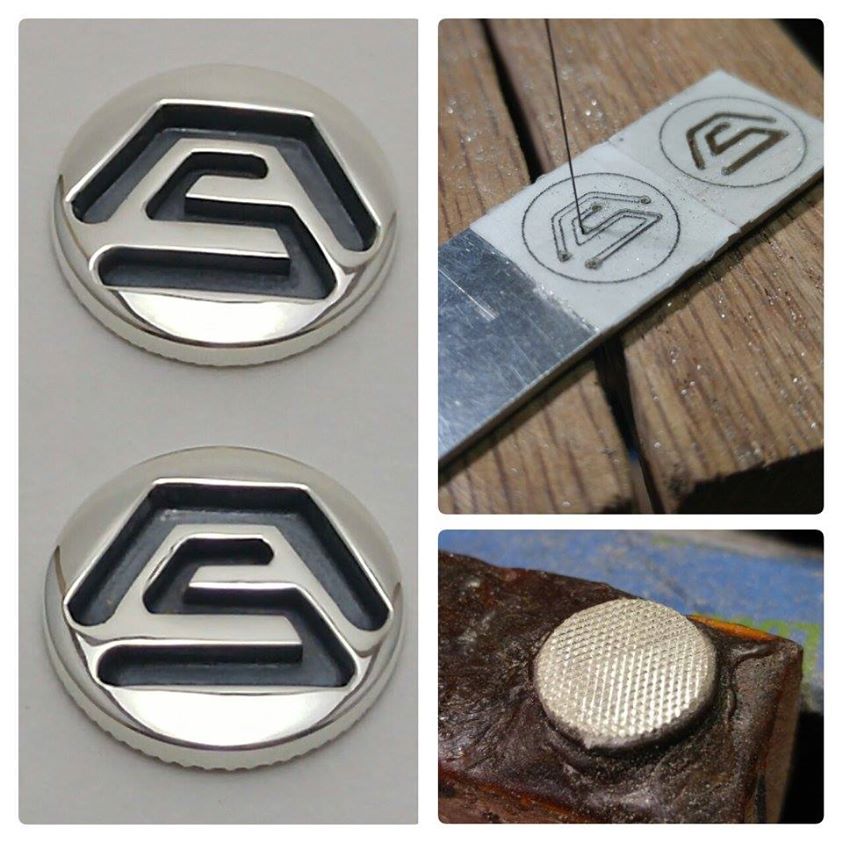
A pair of overlay medallions I created for my brother, Jeff, of our family’s brand used on the High Mesa Ranch in Alto, NM. Called the “Hip-Rafter ‘S'” brand, the design was reproduced by my nephew Shane in a scalable vector graphic format for other projects of his, but that format also allowed me to shrink it down to fit nicely within a 1/2″ circle.
The medallions are to be inset in a pair of grip panels on a Colt 1911. The craftsman making those panels recommended they be the same size as Colt’s medallions (1/2″), and Jeff suggested to also texture the backs for better adhesion to the epoxy used when inset into the grip panels.
The pierced overlay was cut from 16 ga. sterling sheet with a 6/0 saw blade, and when soldered onto a 20 ga. sterling sheet back, makes for a nice combined stack of about 12 ga. in thickness before the checkering on the back in done. After diamond-checkering the backs of the medallions with a cross-cut file to increase the surface area for better adhesion to the epoxy, the finished medallions came out to about 1.8 mm thick.
Being so small (and because checkering needs carefully repeated and aligned strokes to form the grooves), I set the medallion into shellac on a block, which is then held in a vise. After the filing is done, a little heat from the torch releases it, and a soak in denatured alcohol removes any remaining shellac. That’s also a good way to secure small stuff like earrings, making stone setting a LOT easier to do!
He later sent me a photograph of the 1911 with the grip panels mounted, and it looks just totally awesome. Oh, and the medallions inset in the grip panels look great, too. 😉
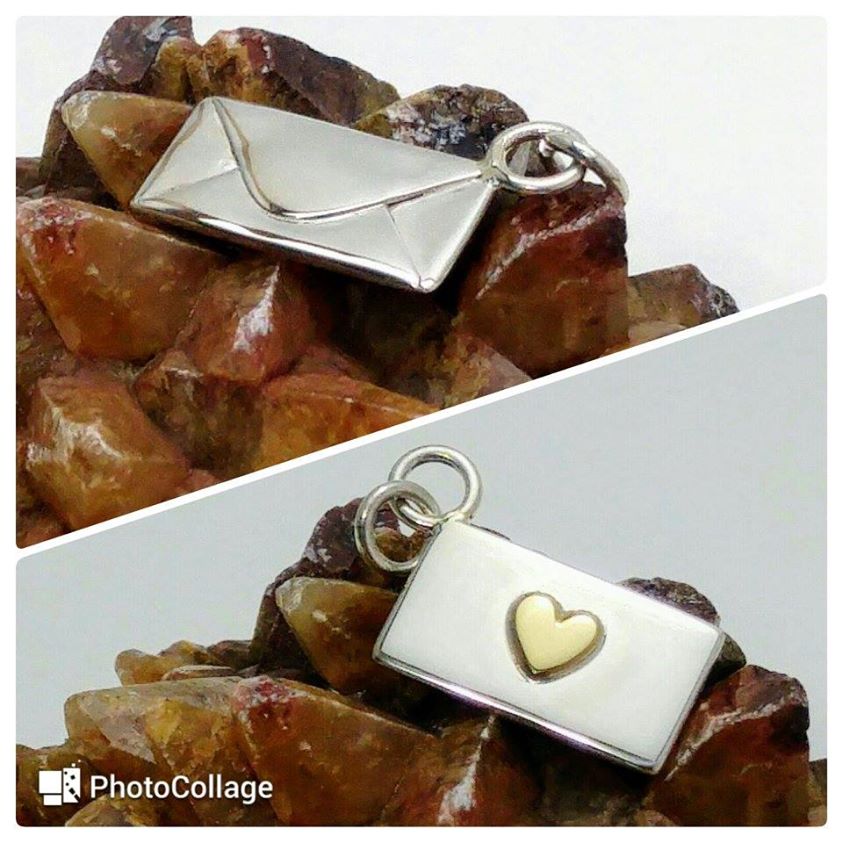
A Valentine’s Envelope charm crafted from 26 ga. sterling sheet formed and folded like a real envelope, then topped-off with an 18K gold heart soldered onto the front, this charm became a Valentine’s Day gift to my wife this year.
The gold came from a little piece of watchband chain that was shortened for my mom back in the 70’s, and I had been toting that little piece of scrap around ever since, just waiting for an occasion to use it on something special!
Melted into a ball, hammered flat and then filed into shape, I think it made for the perfect accent on this charm!
Here is one of the gifts I gave my wife on Valentine’s Day 2017…
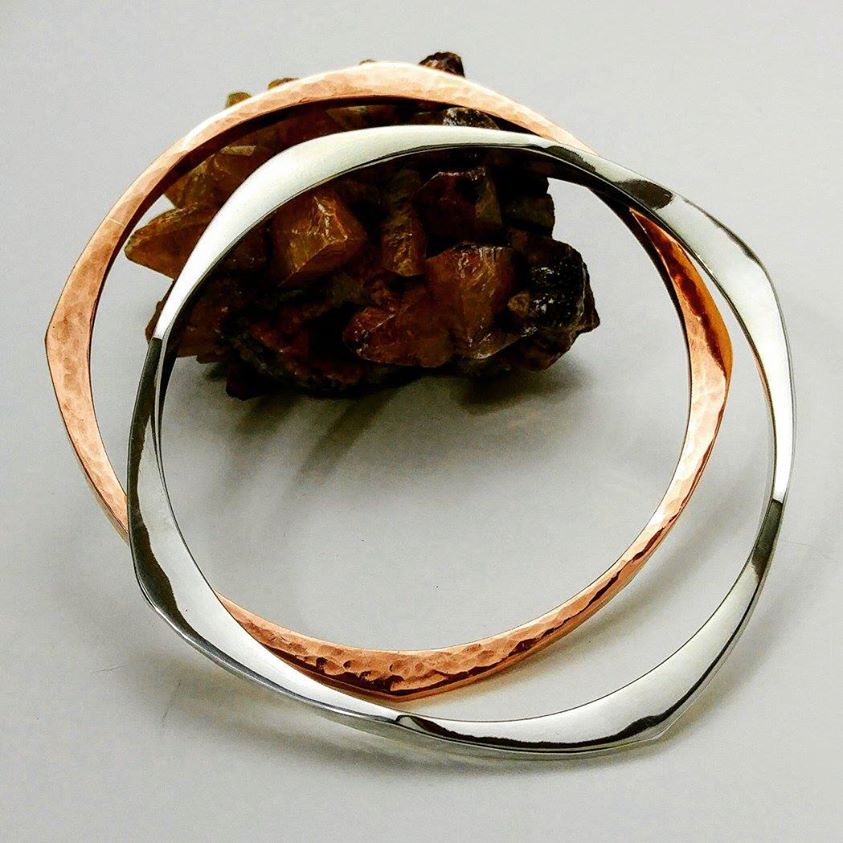
Sterling silver and copper radial-forged bangles
A sterling silver radial-forged bangle to go with the copper bangle I had made for her in the past (see the Copper Radial Forged Bangle post from back in May 2016 for pictures and information on that).
This one is slightly different though, as I filed, sanded and polished the side surfaces giving them a mirror finish, but left the hammer marks from the forging on the top surfaces as they were (I had left the hammer marks from forging on both the side and top surfaces of the copper bangle).
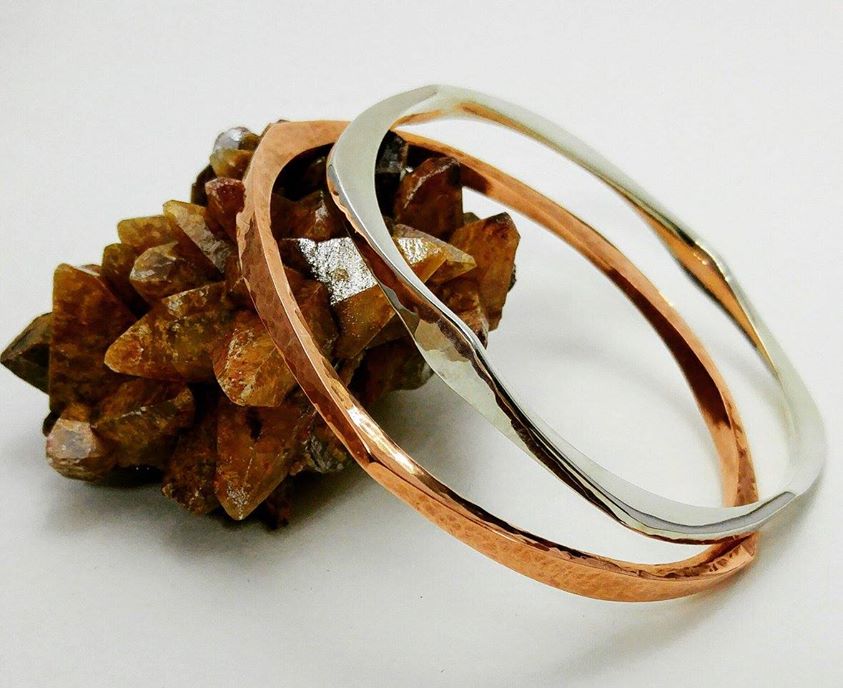
Here’s another shot of the sterling silver radial-forged bangle with a slightly different view…
Side view of sterling silver and copper radial-forged bangles
Even though the 6 ga. copper wire costs about 85 cents at the hardware store, and 6 ga. sterling silver wire ten times that much, the same work and amount of effort went into forging both bangles.
Yet, oddly enough, you would be surprised at the number of people that won’t flinch at the $200 price tag in a retailer’s catalog for the silver bangle, but would try to argue you down to $20 for the copper version just because it is copper.
Somehow they reason that if the metal is cheap, the price must be, too, no matter how much work went into creating it. :-/
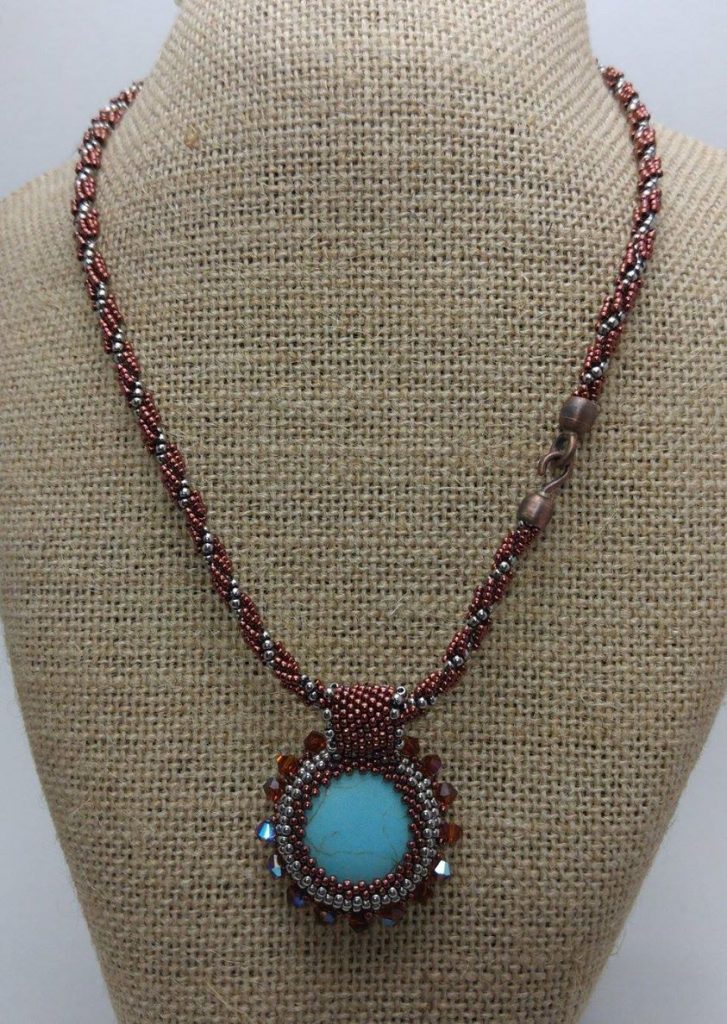
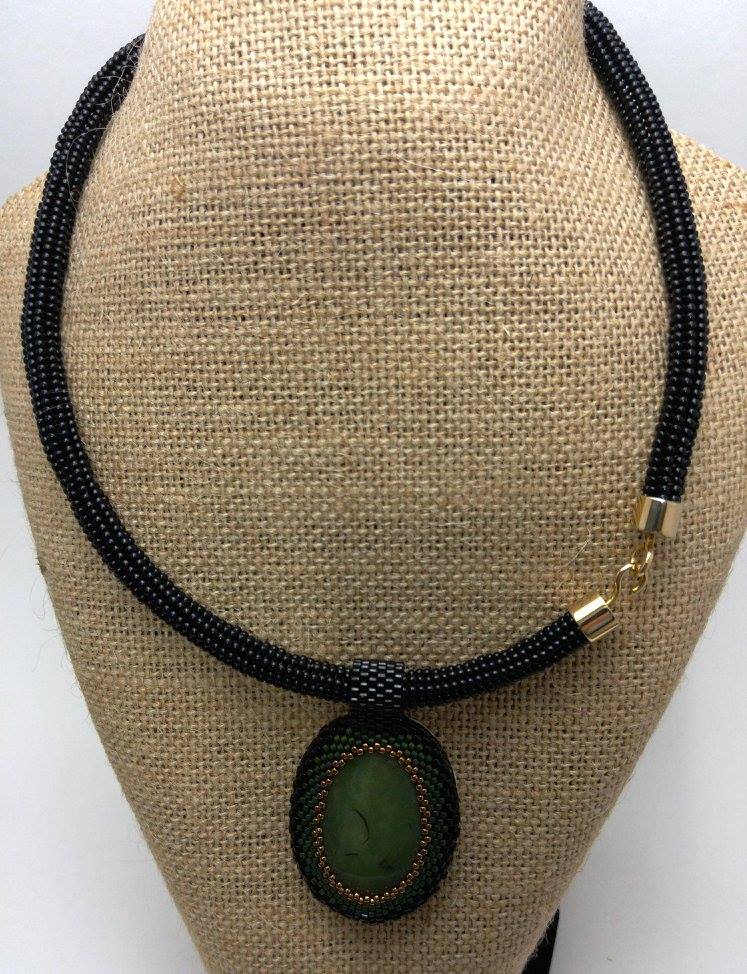
My talented wife does beautiful bead-work, and needed some hook & eye clasps for a couple beaded necklaces she had created complete with faux stone pendants (faux Turquoise for the copper necklace, and faux Jade for the black necklace), that she had created from polymer clay… amazing work!
The copper necklace of course needed an antiqued copper clasp, and the black peyote stitch tube necklace was complemented with a brass clasp. The hook on the brass clasp is rotational so the tube necklace won’t bind and will roll freely with the movements of the wearer.
For both clasps, the copper or brass tubing was created from 24 ga. flat sheet, then cut to size and capped. The copper clasp was adorned with domed caps to match the barrel shape of the tubing ends. The hooks and eyelets were made with wire stock.
I had created these clasps 2 or 3 years ago when Kathy created the necklaces, but no photos of them had been taken until now.
Here is the copper-colored bead necklace Kathy made with the faux Turquoise pendant, and with the necklace rotated to show the copper clasp…
Copper Hook & Eye tube clasp on necklace
And here is the black peyote stitch tube necklace Kathy made with the faux Jade pendant, again with the necklace rotated to show the brass clasp…
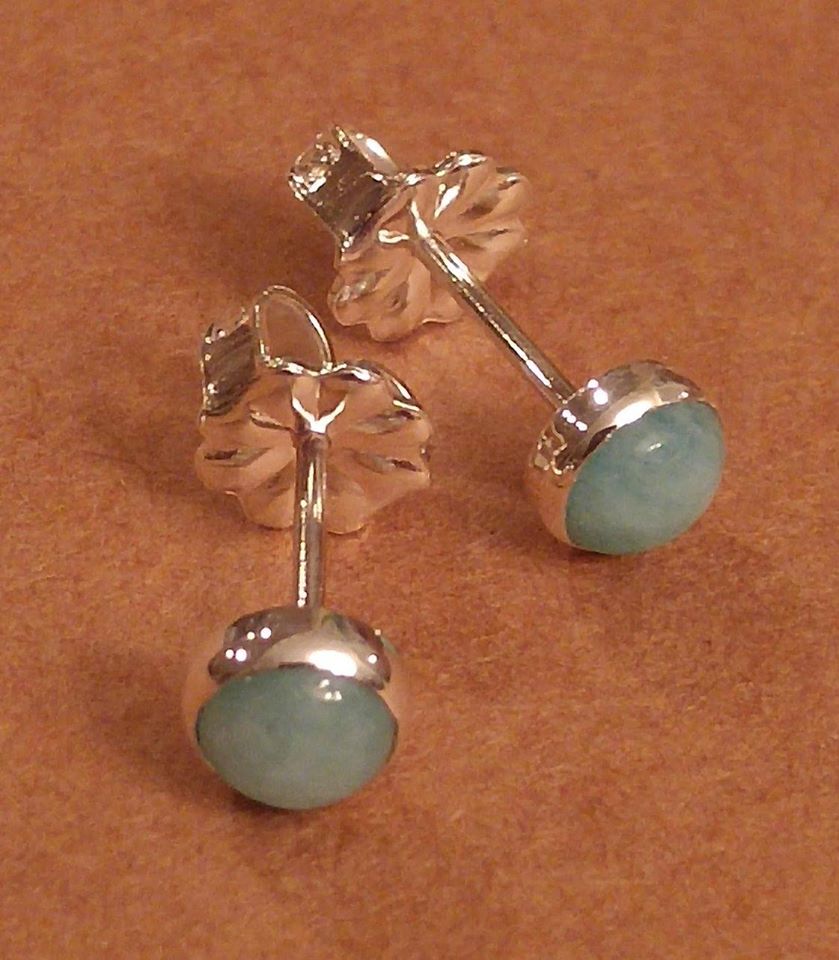
A pair of sterling silver and Amazonite cabochon earrings I created back in 2016 for a friend to give to his daughter that match the stacker rings (also with Amazonite cabochons) I had previously been asked to make for him to give her on her birthday.
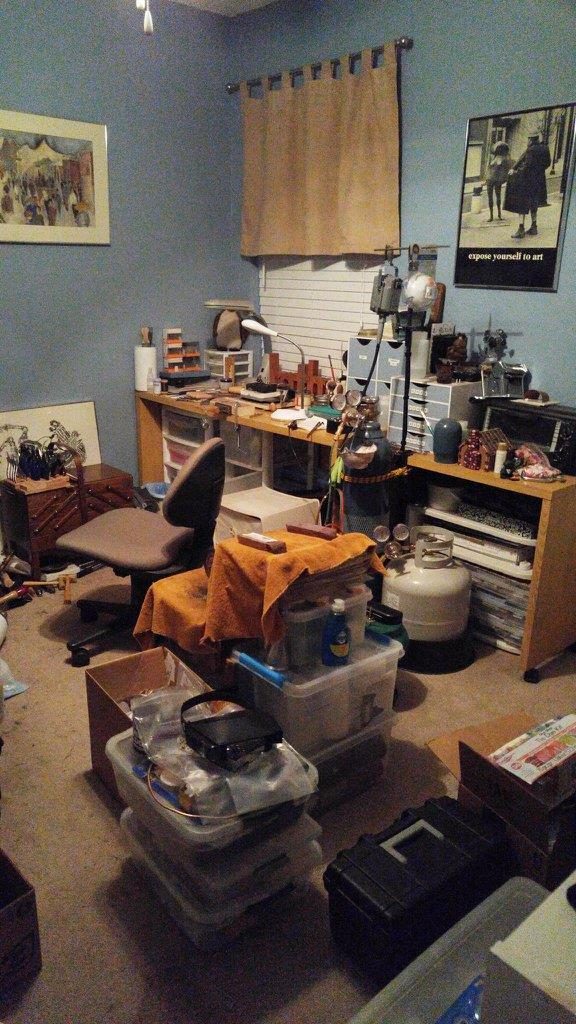
After almost a year after I started back with the hobby, the “I just need a little space” in Kathy’s craft room wound up being most of the room. And, with everything accumulating a super-fine layer of red polishing rouge, we decided I needed to move the operation out to a storage shed.
Below is what Kathy’s craft room became to look like before that move was made…
Kathy’s craft room turned into my silversmithing work area.
But, the storage shed didn’t even have a workbench yet, so we got busy that winter…
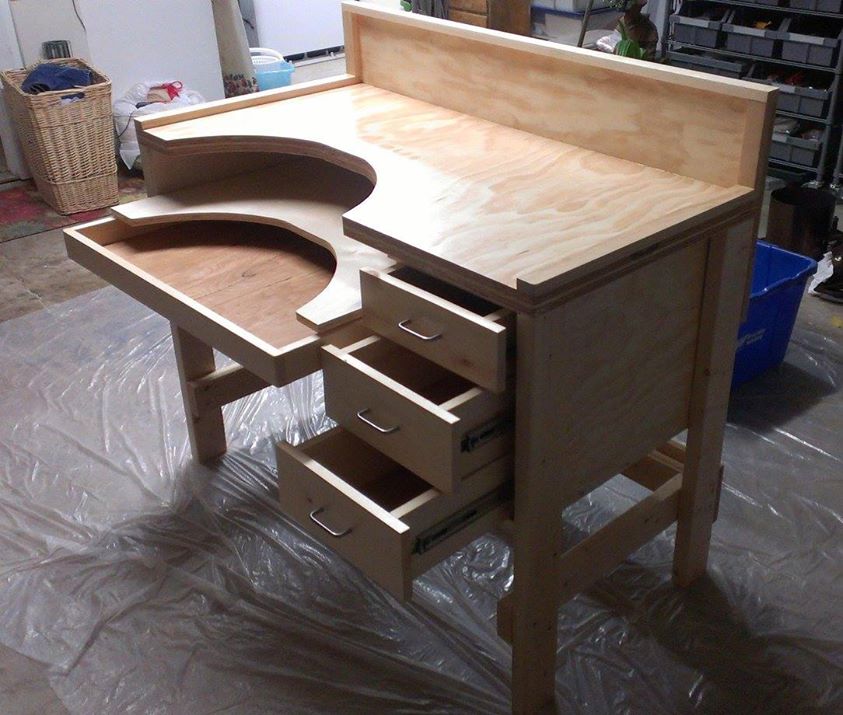
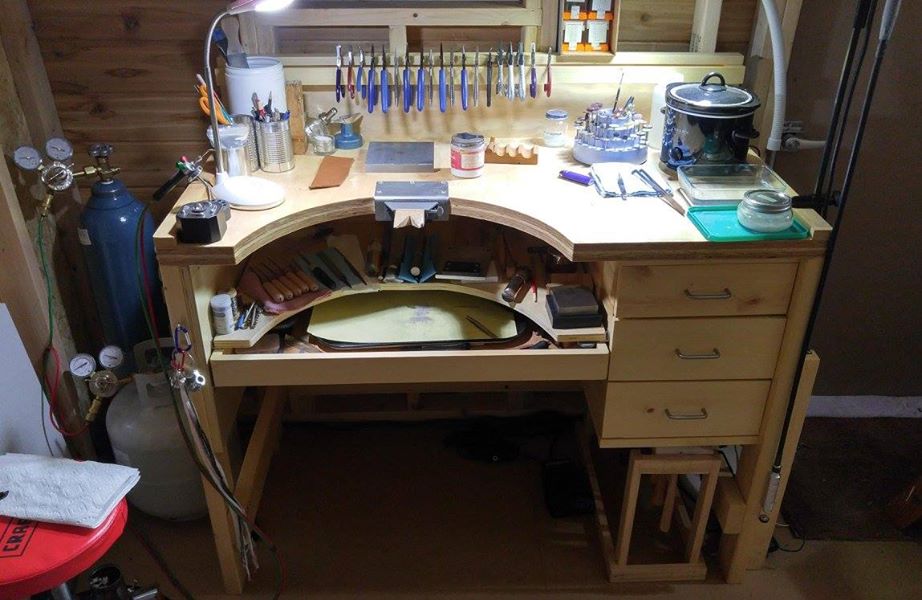
Jeweler’s bench hand built from scratch in garage
When my brother and I did our silversmithing back in the 70’s, we never had a fancy jeweler’s bench to work on, just an available work-desk in the stable’s office that we mounted the bench pin and polishing lathe onto when we were working there. By the way, that lathe, close to being worn out but still spinning, is hiding behind the rust-colored towel sitting on containers of tools and supplies in the first picture (Kathy’s craft room). The towel was used to at least alleviate *some* of the mess from polishing.
Since Kathy and I had done previous wood-working projects (wall-to-wall book shelves, and a king-size bed frame with head/foot-boards to name a couple), we figured that a workbench was in store. What started out to be a very simple jewelry workbench actually wound up morphing into a true jeweler’s bench. We picked up the lumber and parts as the build progressed, but don’t have more than perhaps $135 into it at this point (the most expensive parts were the drawer slides).
The basic plans actually came out of an old metalsmith book by Tim McCrieght, and it wasn’t until *after* the pieces for the drawer unit were cut that I realized the measurements in the plans for the drawers just would not equate to what was pictured in the book, but a little jury-rigging fixed that.
We also added things that were not part of the original plans in the book (a sliding catch-tray drawer, a sliding tool shelf right above that, and edging to the sides of the top surface to keep things from rolling off the bench onto the floor). In the end I think that the bench we built from scratch rivals some of the commercial benches I’ve seen out there costing several hundreds of dollars more. Having this bench to work on makes fabricating and repairing jewelry soooo much easier, and little customizations to it are still ongoing. 😀
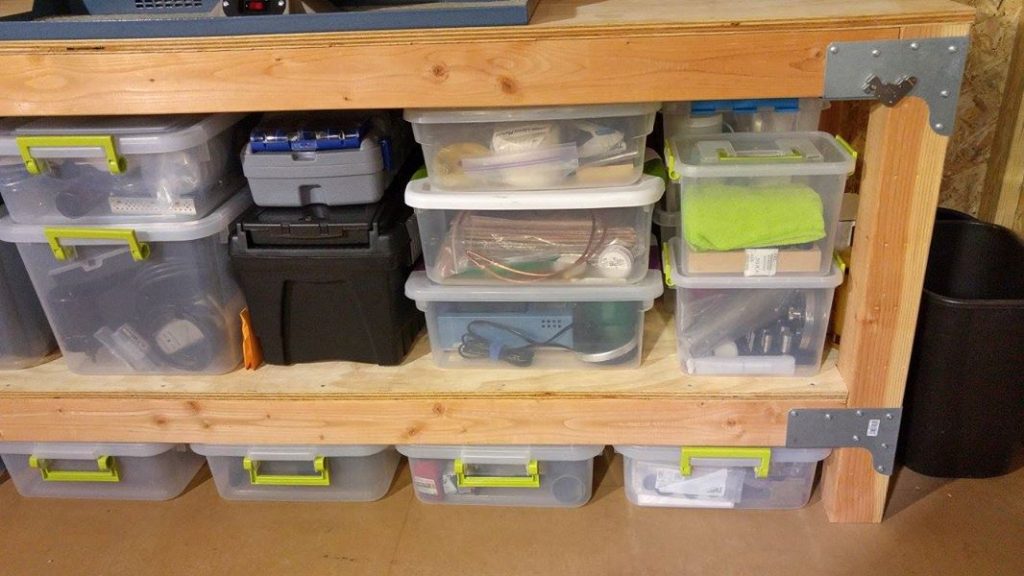
We also built just a regular workbench for the shed as well. Built with one 4×8 sheet of 3/4″ plywood cut in half length-wise, a couple 4×4’s and six 2×4’s all held together with screws and Simpson Strong-Ties, it’s super strong, and doesn’t budge an inch.
Workshop workbench
Here’s a shot of the jeweler’s bench set up in the shed. After the bench was first built, I’ve since added a wood strip on the top to rack my pliers on, and as a small rack that I built for my hammers long before the bench was even thought of happens to fit perfectly underneath the drawers, I plan to eventually rig drawer rails to it somehow, too, so that it will slide out. Right now the hammer rack just sits on the floor and I pull it out when I need to get to a particular hammer or mallet, and push it back under to keep it out of the way when I’m done.
Hand made jeweler’s bench set up in workshop
With all my junk moved out of Kathy’s craft room, and everything including the walls cleaned of the fine layer of polishing rouge, she was finally able to get back to working on HER crafts for a change. 😉
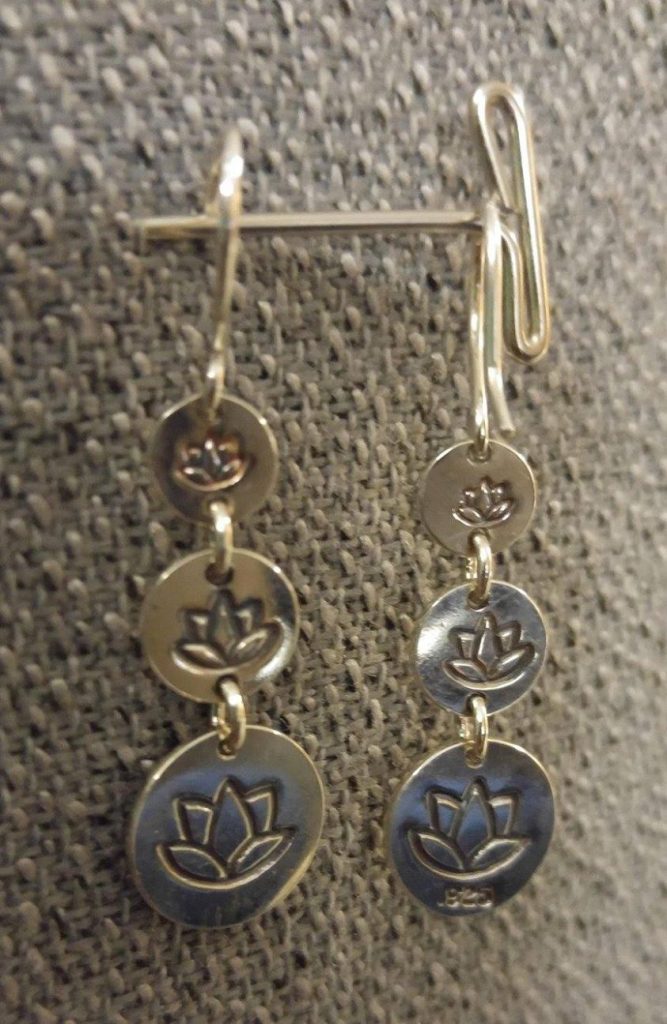
A pair of Lotus Flower stamped dangle earrings. Both sides are stamped on sterling silver discs, which are then aligned and sweat-soldered together (though only the back side has the .925 stamp).
By linking the soldered and drilled discs with jump rings, and graduating the sizes of those discs, a nice pair of dangle earrings can be made.
For these I also had graduating sizes of the Lotus Flower stamp from previous projects (earrings, stacker rings and charms) which fit nicely, but plain hammered or textured discs would look great, too. Ignore the T-pin in the picture used so they hang vertically, I didn’t have anything else handy at the moment. 😉
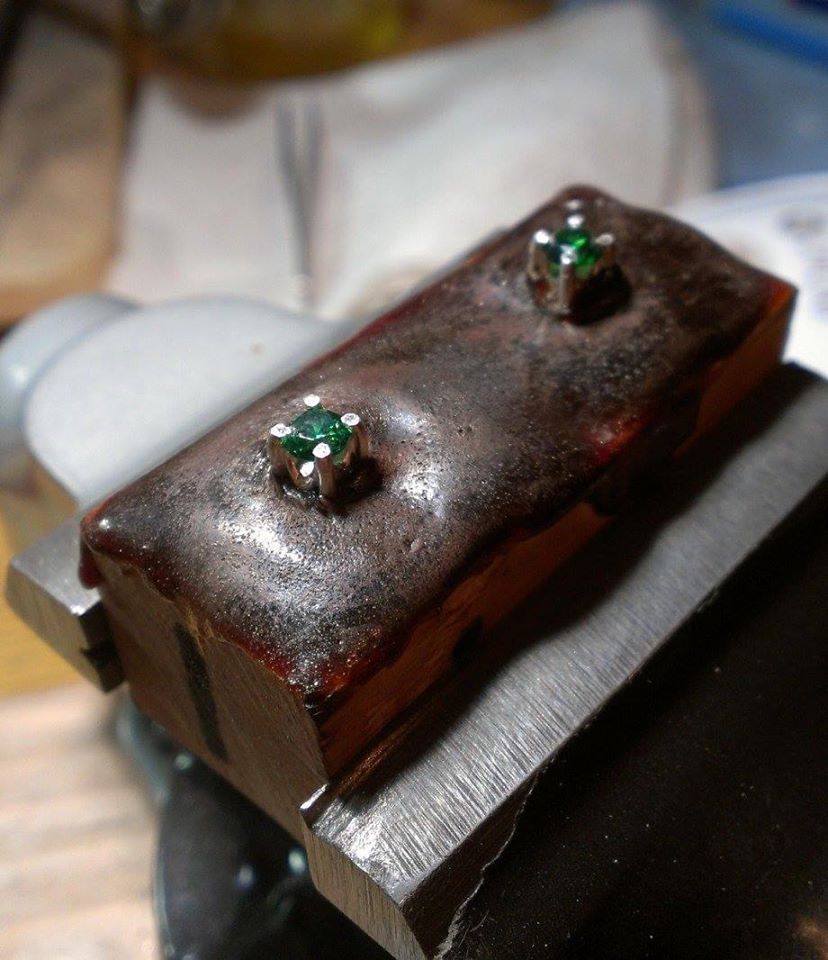
Green CZ and sterling silver earrings, prong setting.
Another pair of earrings on the bench getting their prongs finished off. These earrings are set with faceted 4 mm green Cubic Zirconia stones.
I use a small block of 1″x1″ wood with small holes drilled to accept the earring posts, then fill the holes and surface with melted shellac to anchor and keep the earrings stable while I set the stones and finish the prongs.
With the block set in a small vise that rotates, it makes for a great way to set stones in earring prong settings without bending those posts! 😉