Here is a shot of my very first attempt at chasing/repoussé. It’s definitely on the crude side, but I am a bit stoked at how at least some of it turned out!
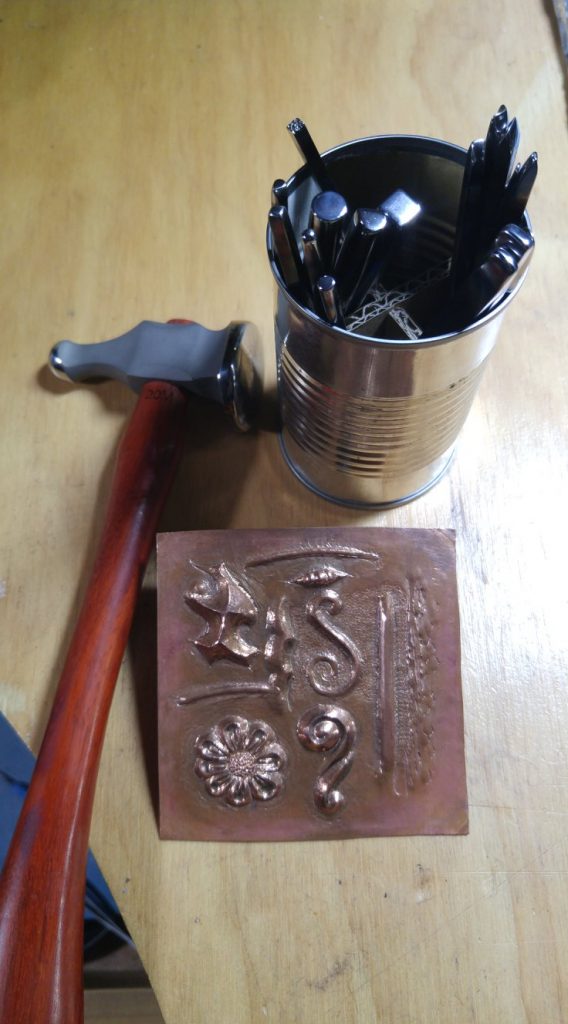
Some work on it I left more or less “unfinished” as I was mainly just experimenting with the punches I had made, used in various ways, but some of the doodles I took further and surprised myself as they turned out to be not quite so “butt-ugly” as I fully expected them to be!
Heck, Kathy even requested a few of them be cut out so she could use them on some of the albums she makes. 😉
I took a 3″x3″ piece of 22 ga. copper sheet and basically just drew some freehand doodles loosely based on patterns in one of the videos the artist and toolmaker, Saign Charlestein of SC Studios, LLC (metalsmithing-tools.com), showed on a practice piece when talking about tool control.
I had absolutely no idea how the doodles would turn out and figured I would just let them “go where they will” as I worked through the small handful of punches.
I first ran across Saign’s chasing/repoussé videos on Vimeo (vimeo.com/scstudios) a few years ago and they really intrigued me (he has them on YouTube now, too).
I knew practically nothing about repoussé at that time… not much more than what it was generally, and an art form that dated back several thousands of years.
After watching Saign’s videos I knew it was something I would have to try though, especially since I love working with metal in shaping, forging and forming it into jewelry, etc.
Since I didn’t know if I would like it (the process, not the end result, which can be truly awesome and beautiful pieces of art, jewelry, utensils, etc.), or even be able to produce anything that would keep my interest in it going, I wasn’t going to spend a minor fortune to find out as the many punches needed for chasing and repoussé work can be quite expensive if you don’t make them yourself.
I already had a couple chasing hammers I use for my silver work, and had made many of my own stamps so I figured that I would try to make my own chasing/repoussé punches as even a basic “set” of inexpensive ones can easily cost over a hundred dollars or more, depending on the number of punches in the set and their quality in material and finish.
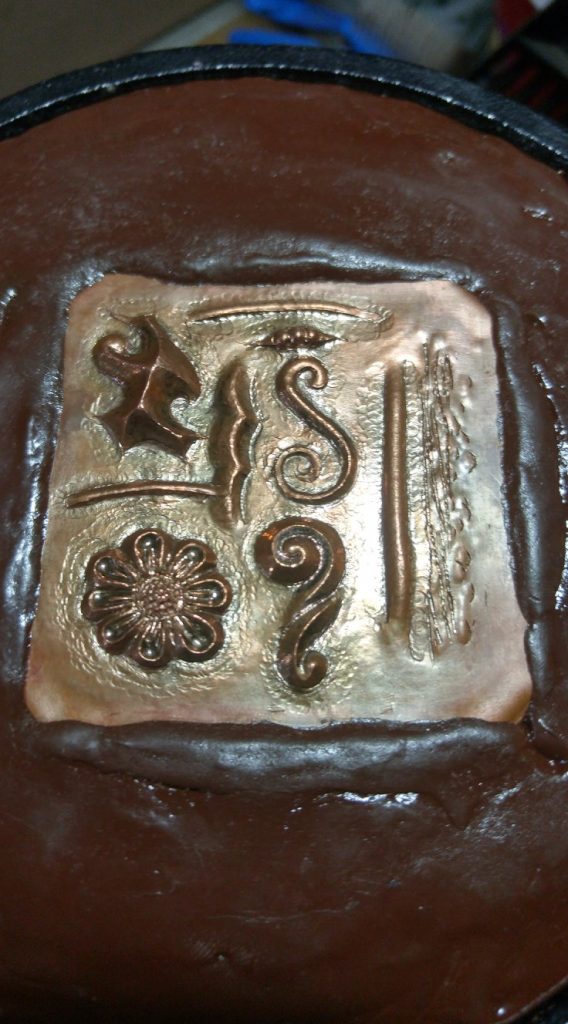
Aside from a hammer and the punches I would make, a bowl filled with pitch is about all I lacked in that area. So, for under $75 (S&H included) I picked up a cast iron bowl with rubber ring base and a few pounds of red pitch to fill it with.
I think if I had seen Saign’s video on pitch trays before then I probably would have made one of those instead of buying the bowl (yeah, I’m cheap in some ways, but I do enjoy making my own tools and equipment when I can).
I’m actually glad I got the bowl and its accompanying rubber ring it sits in though, as that setup allows you to turn and position the bowl holding the piece you’re working on at the many angles you need to best approach it (and the bowl is heavy enough to keep it there). From what I’ve seen, a sand bag or even a small rimless tire the size used on dolly’s, carts or wheel barrows would work well to keep a tray or bowl steady at various angles, too.
It took me a lot longer to get started with chasing/repoussé than I had originally thought, as I began making the punches back in 2015 but ran into one delay or brain lapse after another and only got around a couple weeks ago to completing a very basic set of 16 punches that I had listed out to make for myself.
That’s the thing about chasing/repoussé… I heard you use a LOT of punches, and I’m beginning to see that now!
I think part of the delay may also have been that all of the stamps and punches I’ve made so far have been shaped and filed by hand. I use various files to get the shapes formed, then various grits of sandpaper to bring them to the polishing stage. I may look into picking up an inexpensive light-duty belt sander to help speed up the process of getting the basic forming down, as even with annealed steel it still takes quite a bit of filing and shaping to get there sometimes!
You could use a regular ball-peen hammer if you don’t have a chasing hammer, make your own “bowl” or tray for the pitch from plywood and board (some have suggested a cast-iron cooking pan or pot, but we don’t have any cast-iron cookware that’s not used for cooking!), and even make your own pitch compound if so inclined (recipes are out there), but the range of liner, embossing, planishing and texturing punches you will need is what can easily break the bank if you don’t make your own it seems.
A good example is this very “doodle sample” project. Even though I used every one of the 16 punches I’ve made so far (not including a regular nail punch and a dapping die that were used on the flower’s center), I discovered in working those doodles that I really needed to make myself at least 6 more punches at minimum to accomplish some of the very basic tasks I wanted to do.
Although I started out with a mind to “try” every punch just to test it and see what it could do, I wound up needing every one of them at one stage or another, and if I had those 6 other punches I surely would have used them, too!
And, that’s not even counting texture punches in various sizes and shapes… I have only made one square texture punch in 1/8” square bar stock, but really needed at least a small teardrop-shaped texture punch as well to get into some of the tight places and shapes the square punch couldn’t reach.
I truly am very thankful to Saign, as if I had not viewed his “Tutorial Tuesday” videos I doubt if I would have even made the attempt at giving chasing/repoussé a try, but most of all that he cared enough to produce the videos going through the process basically from start to finish in detail.
After I had “discovered” his videos, searches on the Internet brought me more information on the art, but really nothing as complete in video format that details so much of what is done when working a piece all the way through the numerous steps and stages, starting with flat sheet and ending with a dimensional piece of work ready for display.
If you can’t or don’t want to make your own punches, you’re not out of luck. You can buy lower-priced punches, but from what I understand you will need to put in the time and effort necessary to get them to a work-ready state (assuming they were at least made out of good-quality tool steel to begin with), or pay the price to have them made that way from the start (so those lower-priced punches are not really the savings they appear to be).
You can usually tell quality punches apart from their “economy” counterparts just by looking at the tips of the tools if the vendor shows an image that can be zoomed in on those working areas, as they will likely have sharp edges that can too easily cut your metal, blemishes that will mark your metal where you don’t want it to, or have unpolished faces when they should be highly polished.
Even if you do go that route, keep in mind that you will eventually want to learn how to make your own punches, even if you only make a few. It’s really not all that hard, and I heard that most chasing/repoussé artists make their own punches much of the time for particular project needs anyway, and after my very first “doodle” I can certainly see how true that could be!
I had bought some W1 steel bar stock and drill rod in various sizes a few years ago to make my own stamps and punches (still WAY cheaper than even buying the “inexpensive” punches), but picking up used punches, chisels, Allen wrenches or other tools made out of carbon steel that can be annealed, re-shaped then hardened and tempered can provide you with a lot of material to get you going on the cheap if you would like to give chasing/repoussé a try for yourself.
Although I don’t own any of Saign’s tools or punches at this time, I can assure you that they are without a doubt some of the finest tools and punches I have seen manufactured and for sale for this craft. Although the punches I have made come nowhere close to the quality, finish or completeness in workmanship that his do, his selection of various punches has been the basis for what I *attempt* to model mine after in form and quality (and thank him greatly for that, too!!).
Another good vendor for punches, tools and supplies is Nechamkin (nechamkin.com), as what I’ve seen and heard about their tools for the craft has also been very positive.
Since I first ran across Saign’s videos I know I’ve probably watched them all half a dozen times or more at least, and feel it definitely paid off in knowing more on what to do and expect as I work through the processes. I thank Saign greatly for all he has taught me in those videos and on his web site, and I hope I haven’t done too much damage to his name by showing this piece!
What I Learned:
* Although I need to practice using *all* the tools, I need the most work on doing the initial lining. Fortunately as this is usually the first step on working the metal, my many mistakes have a better chance of being corrected or covered up (at least somewhat) by completion, but I think lining is definitely my weakest skill at this point.
* I continue to grip the punches too tightly (especially when doing the initial lining). I don’t think my thumb has ever been so totally numb before! I’m getting better (thumb, too), but I still catch myself seemingly trying to pinch the life out of the steel punch (like that’s going to happen!), so I still have some work to do there. 😉
* I need more liners, punches and texture stamps. Seriously. I had a blast working metal this way!
* A silicon kitchen spatula is great for working with melted pitch, as when it cools it peels right off the utensil! If you need to push some melted pitch around in your bowl or tray, this is the thing to do it with. By the way, melted pitch can be VERY hot, highly flammable and sticks to just about anything (including you), so if you’re working with it, it’s best to keep a bowl of cold water nearby. Think of pine tree sap with brick dust mixed in to give it some body. and you basically have pitch.
* Lighting is important! One of the things I currently lack in my shop (shed) is good “general” lighting. I have a couple LED and bulb lamps, but you really need good overall bright light coming from various angles, otherwise much of the time your hands/arms/head will cast shadows on the piece, making it difficult to see your work clearly.
* I really like working with metal this way (didn’t I say that already?), don’t think I’m too awfully bad with it (I rarely surprise myself, but this was one of those times), and plan to do a *lot* more of it (and therefore will be busy making punches, etc., too, for a while).
UPDATE:
Since first writing this post, I have since picked up an inexpensive combo belt/disc sander at Harbor Freight for about $70 that has already saved me numerous hours of filing by hand to get stock roughed out for punches and stamps. I use a bench grinder I inherited from my dad for larger stock (1/2″ bolt-size or larger stamps), but as it was sometimes a little too easy to remove too much material from the smaller 1/8″-3/16″ stock with the wheels that are on it, I would usually opt to just file the smaller stock by hand instead. Since most of my perceived chasing/repoussé will be for jewelry utilizing the smaller punches most of the time, this piece of equipment will no doubt be seeing a lot more use down the road!
Here are a few shots of some of the “doodles” that were cut out and used for one thing or another…
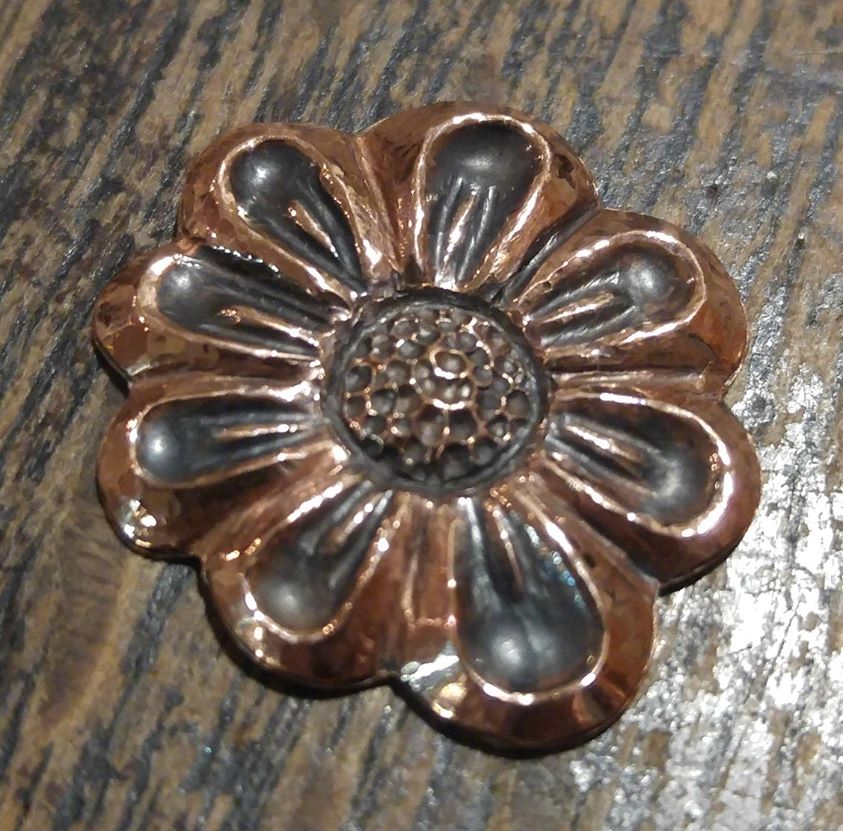
Copper Flower. Kathy used it on one of her hand-crafted albums that it went with very nicely. Now she would like me to do a similar one in silver as a pendant for her. 🙂
And these guys… they truly were just the result of practice lines drawn on the copper sheet. I had no idea how they would turn out when I first drew them…
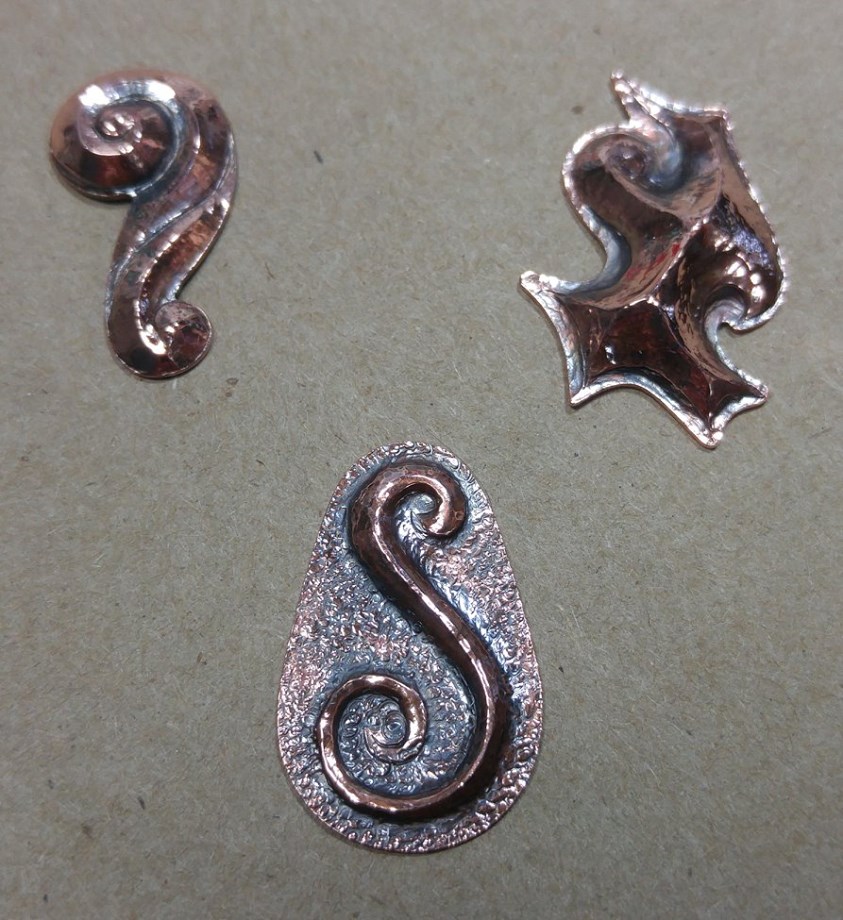
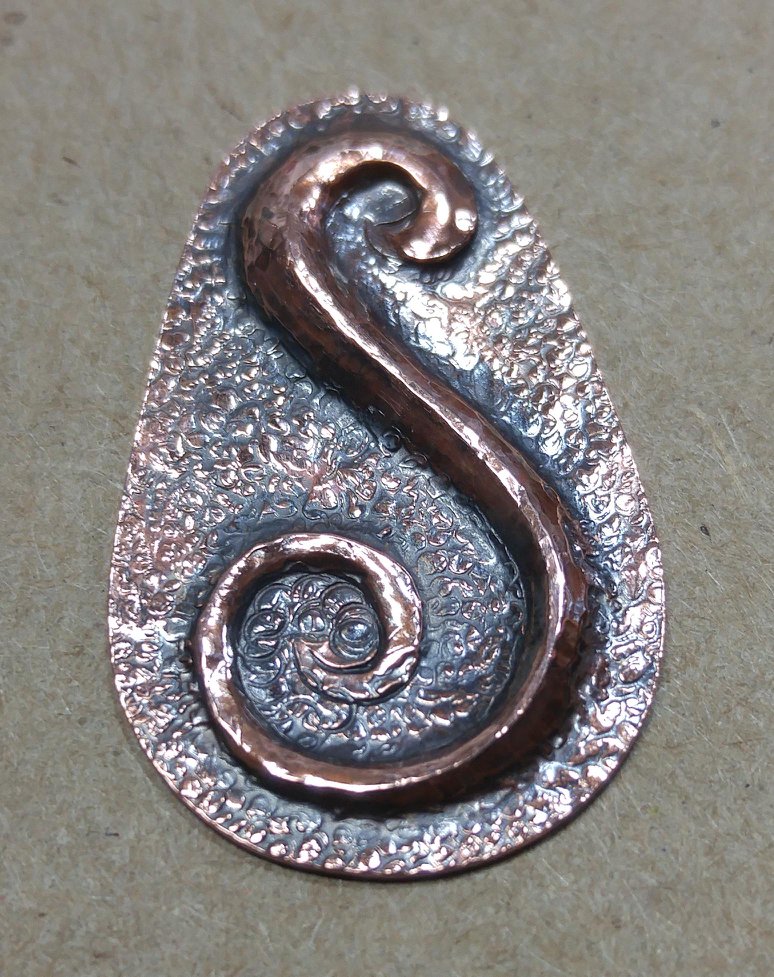
An “S”. Since this scroll doodle turned out looking like the initial “S”, it was cut out and is slated for a key-chain fob. I may inset the piece with cold connections in a sterling setting to give it a little more weight (and that way if I ever get tired of it, it can be easily removed and the silver melted down and used for something else).
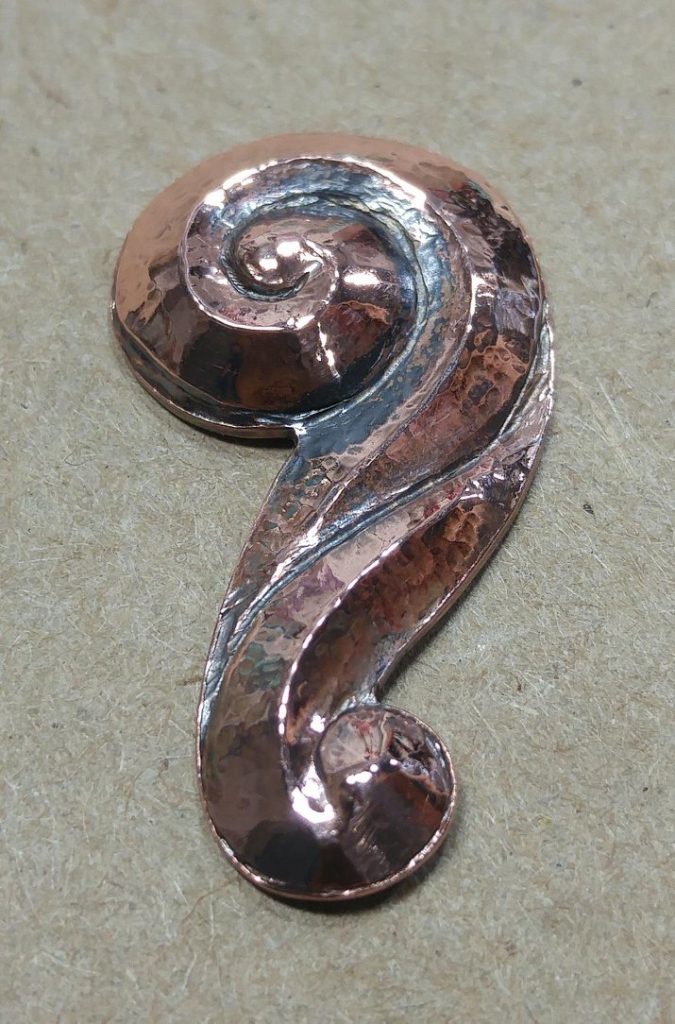
A Question Mark. Although it was just another scroll doodle, it ended up looking an awful lot like a question mark so it, too, was snatched up to be used on one of Kathy’s future albums.
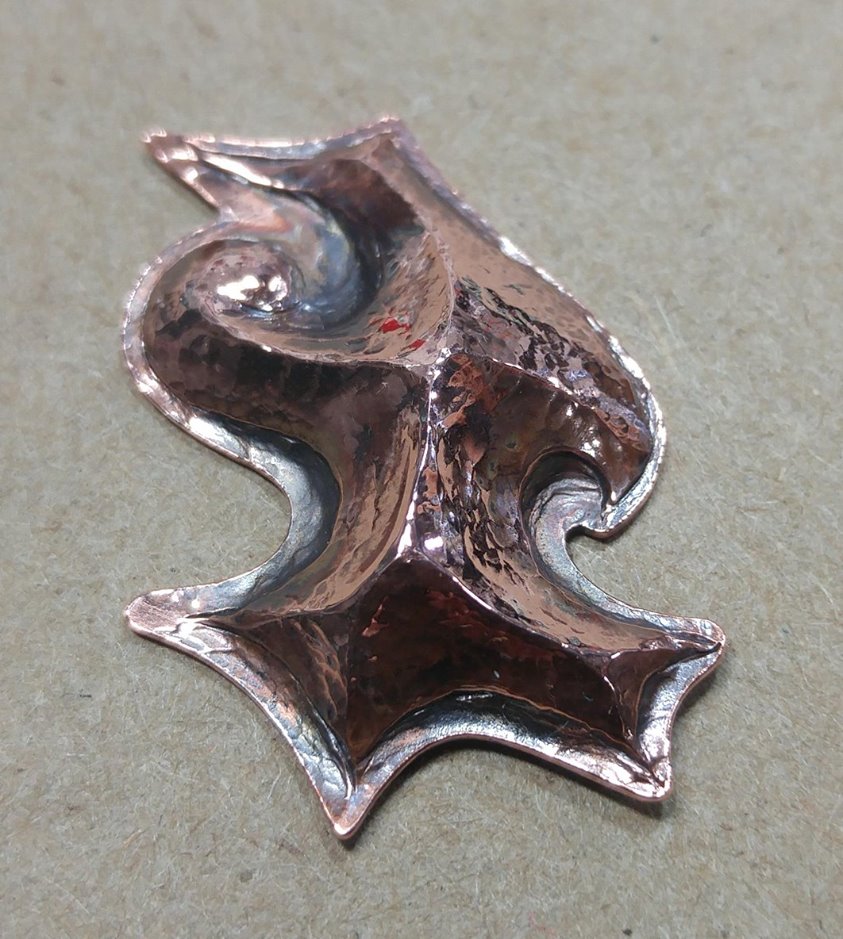
Well, I’m not sure about this one… it’s just a dimensional “thing” that was fun to do, and looked a little cool I guess, but will likely just lay around collecting dust somewhere as a “copper-doodle“. 😉