
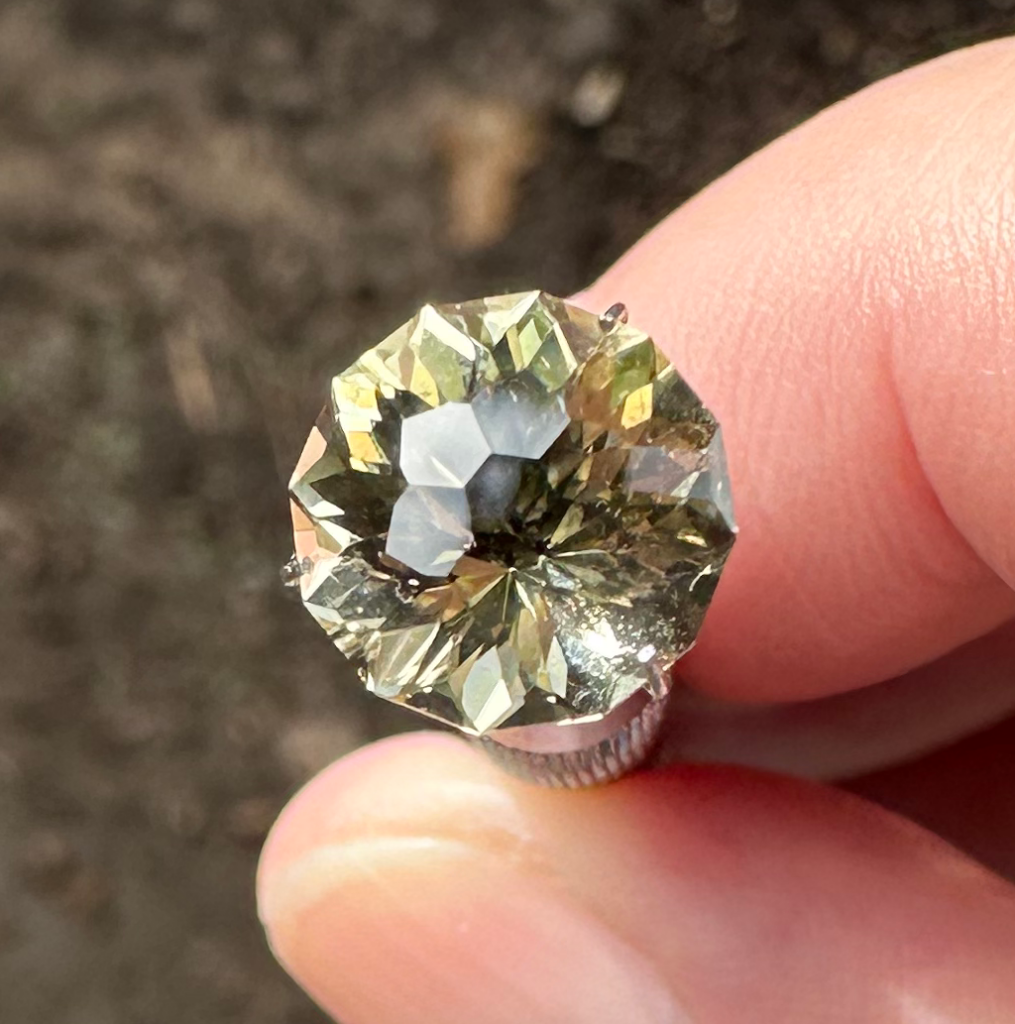
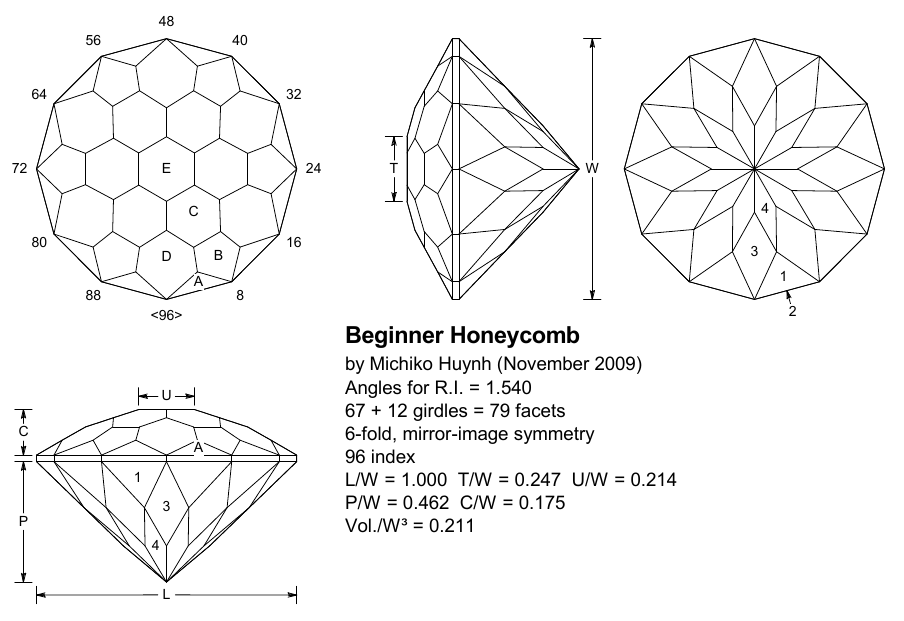
Wow… how have I missed faceting! Over two years ago I actually had this Citrine Quartz stone on my my faceting machine’s spindle. It started out as a Beginner Honeycomb design by Michiko Huynh. I remember that I was working the facets on the crown and pulled a beginner snafu and started pre-polishing a facet where there wasn’t one. 😱
It’s easy to do if you’re not paying attention to what you’re doing, as on a faceting machine’s index gear there are notches that go around the diameter of the gear, and what notch you lock your spindle into determines where on the stone the facet is cut.
On this particular index gear (which is the standard ’96’ that the majority of faceting designs use), there are 96 notches, and in the picture below you can see that the main “tooth” (painted white) of the index gear is fixed at the 96th notch. That means that if I were to lower the spindle with the stone seated on the dop onto the lap, with ’96’ at the top position the facet would be cut on the opposite side of the stone, and at whatever angle you have your spindle set to.

One notch too far to the left or right and you miss your mark. Or, if you look at the wrong line on the design’s instructions that list the indices to use for a particular facet and the index is different from the facet you’re working on (which is exactly what I did), the results can be disastrous. Needless to say I learned real quick that a blank sticky note to mark what line you’re working on is a good thing to have when you’re faceting. 😉
As my heart sank I was wondering what to do since a new facet had been made (literally, and it would definitely be noticeable, even when done with a pre-polish grit). I was faced with a couple choices… one, re-cut the entire stone (which would reduce the size of finished the gem), or two, see if perhaps I could somehow work the mistake into the design.
As I had done what I considered to be a really nice job (for me) on the pavilion, I was not wanting to re-cut the stone as it was 9.50 mm in diameter with the pavilion and girdle already polished. Besides, I had already cut my ‘A’, ‘B’ and ‘C’ crown facets in and was working with the pre-polish grit when I made the mistake, so all the facets with the exception of the table had been cut.
I opted instead to see what I could do to work the mistake into the design. If you take a look at the original design below (and see how it should have been cut), you will notice that at the tip of the ‘A’ facet, the ‘B’ and ‘D’ facets have a common edge leading to a point on the ‘C’ facet. Well, right on that edge is where I dropped my new facet, and at the same angle of the ‘D’ facets (since that is what I had been working on). Instead of locking in on the 96 index, I looked at the wrong line in the instructions and locked in on the 92 index (which is where one of the ‘A’ facets would have been cut on).
My “fix” was to repeat that same mistake on the other side of the ‘D’ facet with the same indices and increments used for the ‘A’ facet, working around the stone doing the same on both sides of every ‘D’ facet and with a width that brought some points together, and disposed of others (basically a free-hand job, but hoping for the best). If the spirit of Bob Ross had been standing over my shoulder at the time, he would have whispered that it wasn’t a mistake, but a “Happy Accident”. 😉
This actually gave the crown a very unique cut, with the tops of the ‘A’ triangle facets having a flat top, the ‘B’ facets extended up and becoming kite-shaped (with wings!). The ‘D’ facets also extend up into the ‘C’ facets, and with no table cut yet the ‘C’ facets appear as a six-petal flower pattern that you can somewhat make out in the pic below.
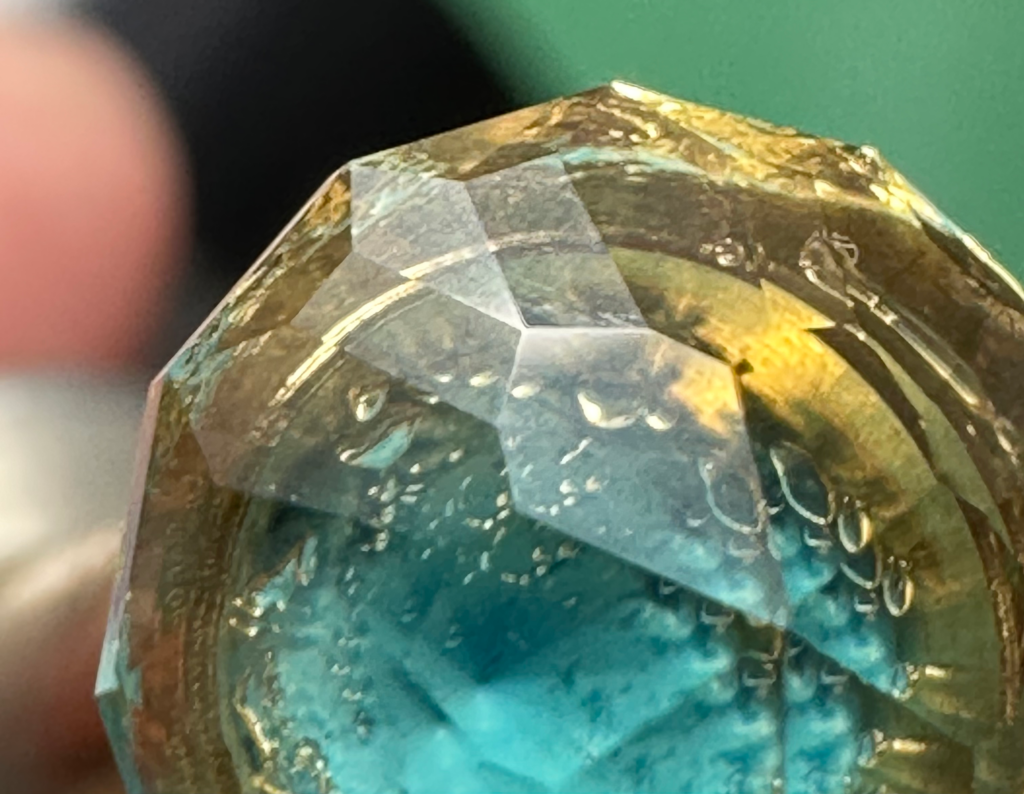
That destroyed the original honeycomb design, but at least it wasn’t a total loss or having to be re-cut smaller than it was. By the way, what looks like bubbles in the pic above are not in the stone, but in the epoxy used to mount the stone to the dop with, and the blue color is actually a tiny amount of adhesive putty down in the bottom of the cone dop to protect the tip (culet) of the pavilion.
I picked up the trick with the putty from a YouTube channel to prevent the pavilion’s culet from breaking off when removing the stone from the dop, but from what I’ve found, no one else I’ve seen bothers doing that so I doubt I’ll be bothering with it again going forward either (hopefully I didn’t just jinx myself by saying that!).
Right about that time we had relatives coming to visit and stay with us for several days, so I had to take a break from faceting and move the faceting machine out of the living room where I usually facet and into a room I use for my office. After they left I was then hit with multiple BIG projects at work, all in succession, and together with everyday life many of my hobbies had been put on a back-burner since then.
With the faceting machine tucked away in an office corner, and combined with the fact that I forwent spending $39 on a frosted vinyl cover for the faceting machine when I purchased it and instead use a large black garbage bag (which works just as well and is a LOT cheaper), that kept the stone conveniently out of site and didn’t help one bit in reminding me of an unfinished faceting project, either. 😕
As working on the stone took a back seat to life and then was forgotten for a time, I am so glad I kept notes! One of the things I picked up in Tom Herbst’s book “Amateur Gemstone Faceting Volume 1: The Essentials” is to ALWAYS take notes on your faceting projects, and it’s so true. This turned out to actually be a testament to taking good notes when faceting stones, as I had to go back and final-polish those facets after a two-year memory lapse.
If I hadn’t noted what indices to set my gear on or what angle to use for those freehand facets, etc., there would have been a lot of trial and error (and at my skill level, more error than trail I’m sure!) when trying to go back and match the facet’s planes to the lap, and would have likely ruined some of the meet-points when working in the final polishing.
Although I still have a lot to learn about Gem Cut Studio, I was able to mock up a design that incorporated the changes that I had made to the crown pretty closely and gave it a new name of Custom Hybrid, crediting Mr. Huynh for the pavilion taken from his Beginner Honeycomb design.

One thing to note is that Mr. Huynh’s design was created with GemCad (an older gem design software program that set many of the standards for faceting software) where pavilion and girdle facets are numbered, and crown facets are lettered. With Gem Cut Studio facets are numbered, but also identified with ‘P’ for pavilion, ‘G’ for girdle, ‘C’ for crown and ‘T’ for table.
After polishing all the crown’s facets, the next step was to cut and polish the table, but I adjusted that, too. When I imported the original design into Gem Cut Studio, one of the tools it offers is a rendering of light refraction for a given stone’s refractive index (Quartz is 1.54). What gives faceted gems their sparkle is light coming into the crown, going down and hitting the angles in the pavilion and being reflecting back up through the crown.
With the new facets I had added to the crown’s design, I found that adjusting the table size just a tad smaller than what was displayed in the original Beginner Honeycomb design maximized the amount of light emitting from the crown, so that’s what I incorporated into this “new” design.
However, as things turned out the table still came out slightly larger than I had planned, as in the final polishing a scratch became visible (which sometimes happens with quartz, no matter how gentle your touch is). Working that scratch out took the table to a larger size than I had wanted, although it still looks similar to the center of a flower and not too much sparkle was lost.
I have seen some stones cut with designs where portions were left “frosted” so they stand out, as the focus of the design is the frosted facets more than their sparkle. I figure that could definitely be a possibility with the petal-shaped facets on this design, but since I had already taken them through the pre-polish phase I didn’t want to over-cut them by backing down to a lower grit just to frost them.
Anyway, the stone started out at 16.27 carats rough, and ended up being finally completed over two years later at 2.75 carats (9.50 mm in diameter), and with 91 facets instead of 79 as in the originally planned Beginner Honeycomb design (43 crown facets instead of 31). In all, the light yellow Citrine Quartz with not a single inclusion and cut in the design with the “Happy Accident” turned out very well. 🙂
The color in this Citrine stone is a very light yellow, so I think I will try cutting the Beginner Honeycomb again (only correctly), and in a slightly darker golden Santa Ana Madeira Citrine which would definitely look pretty cool with that stone being more of a real honey color!