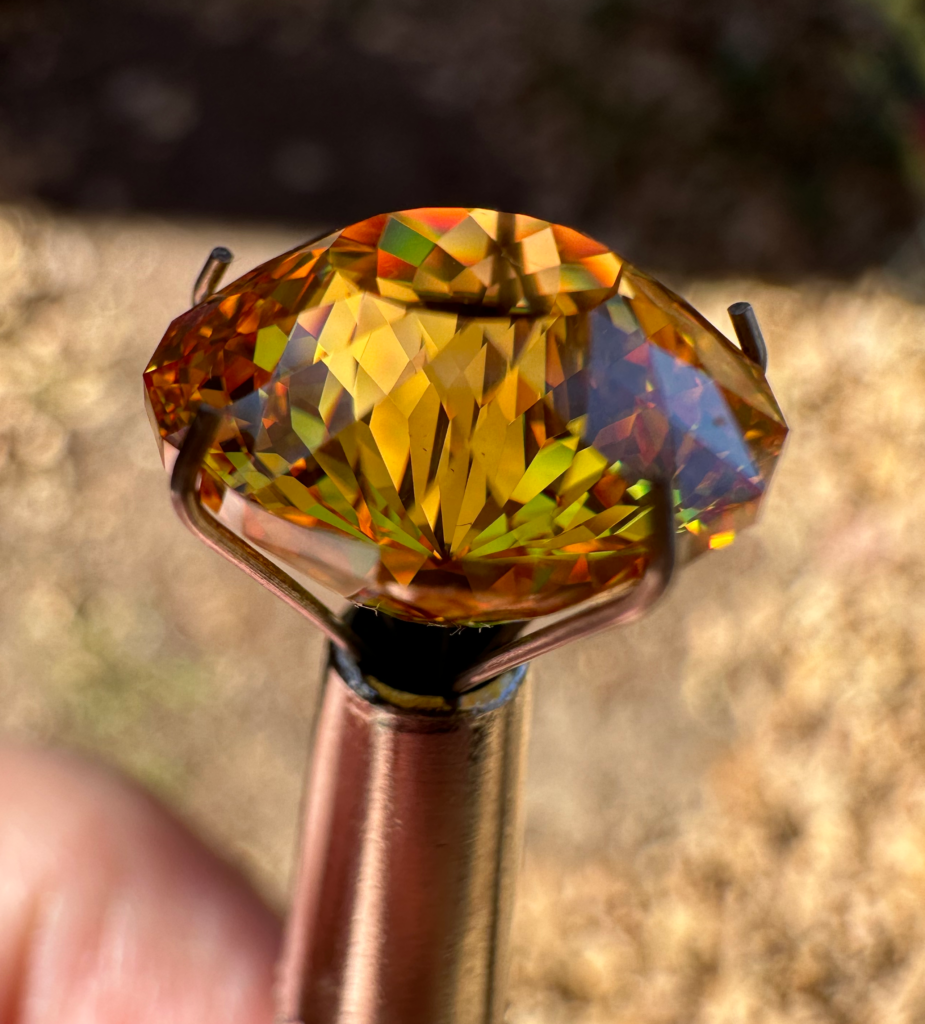
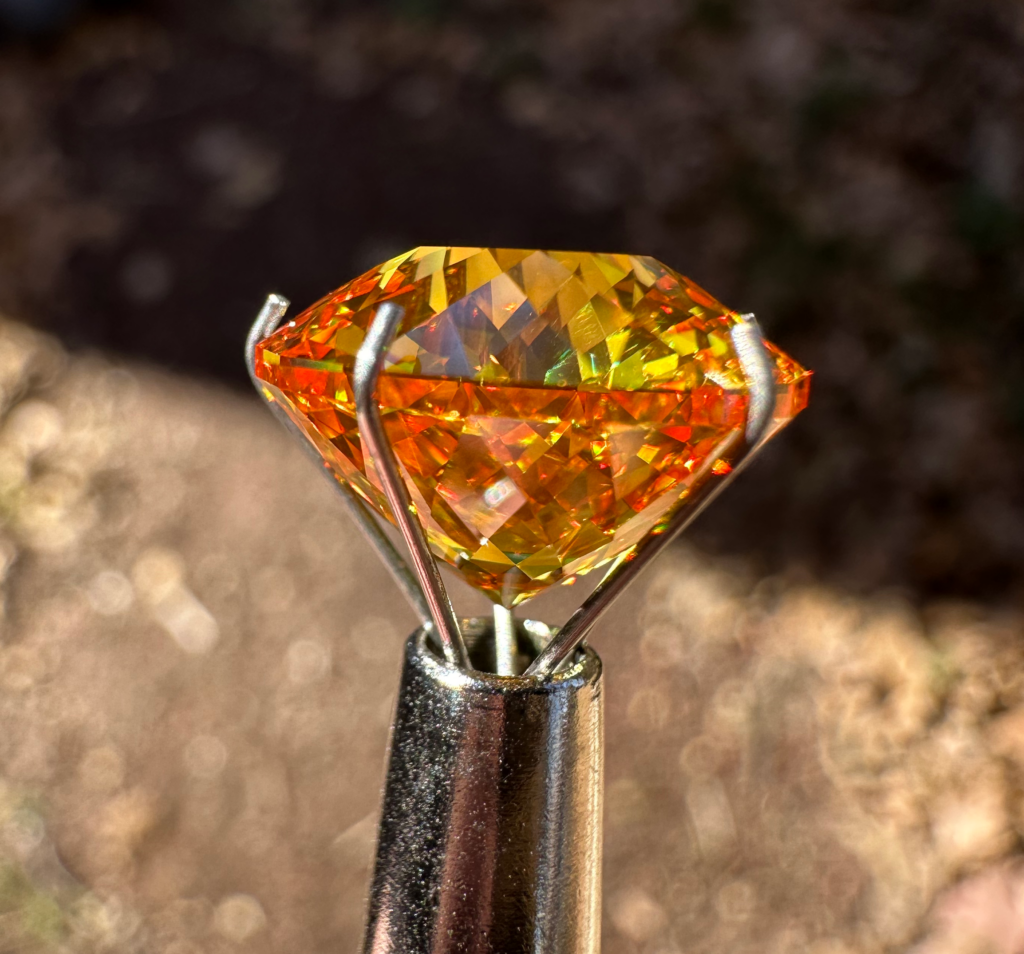
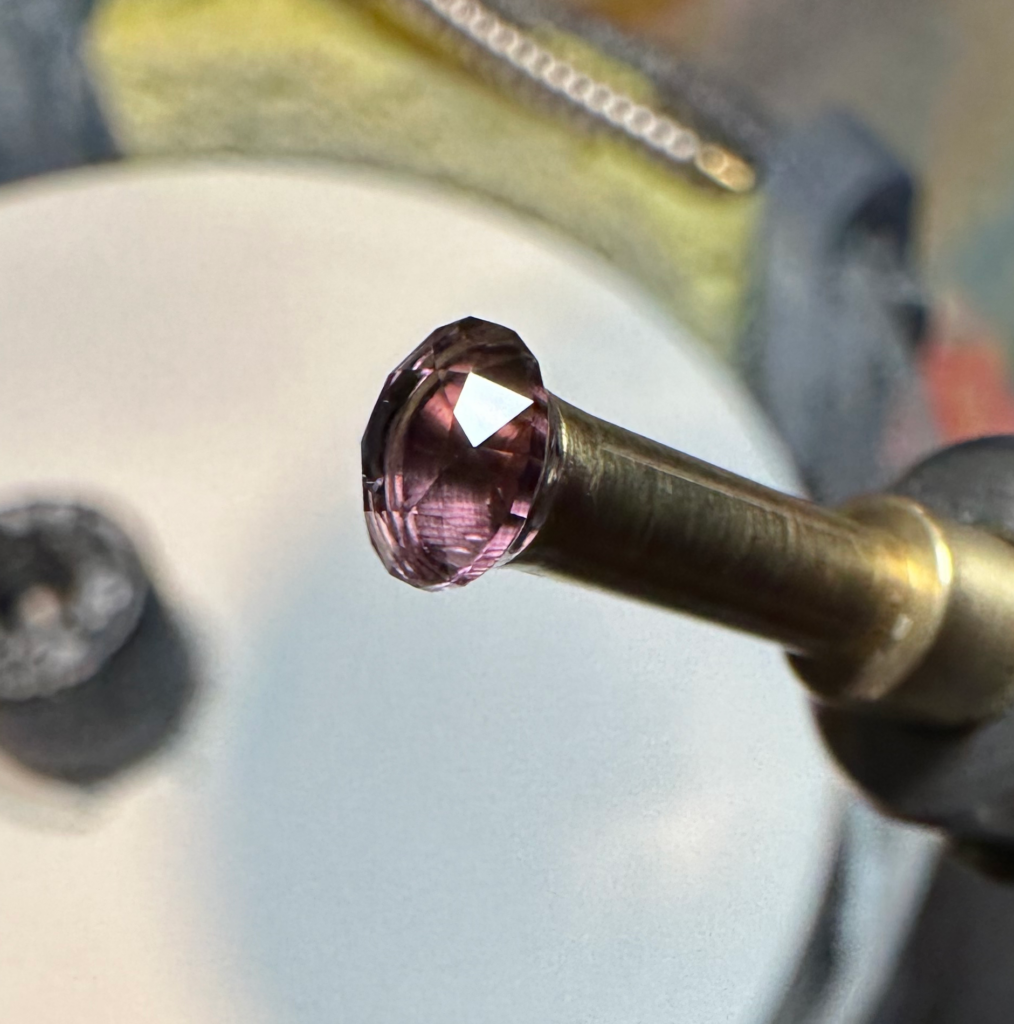
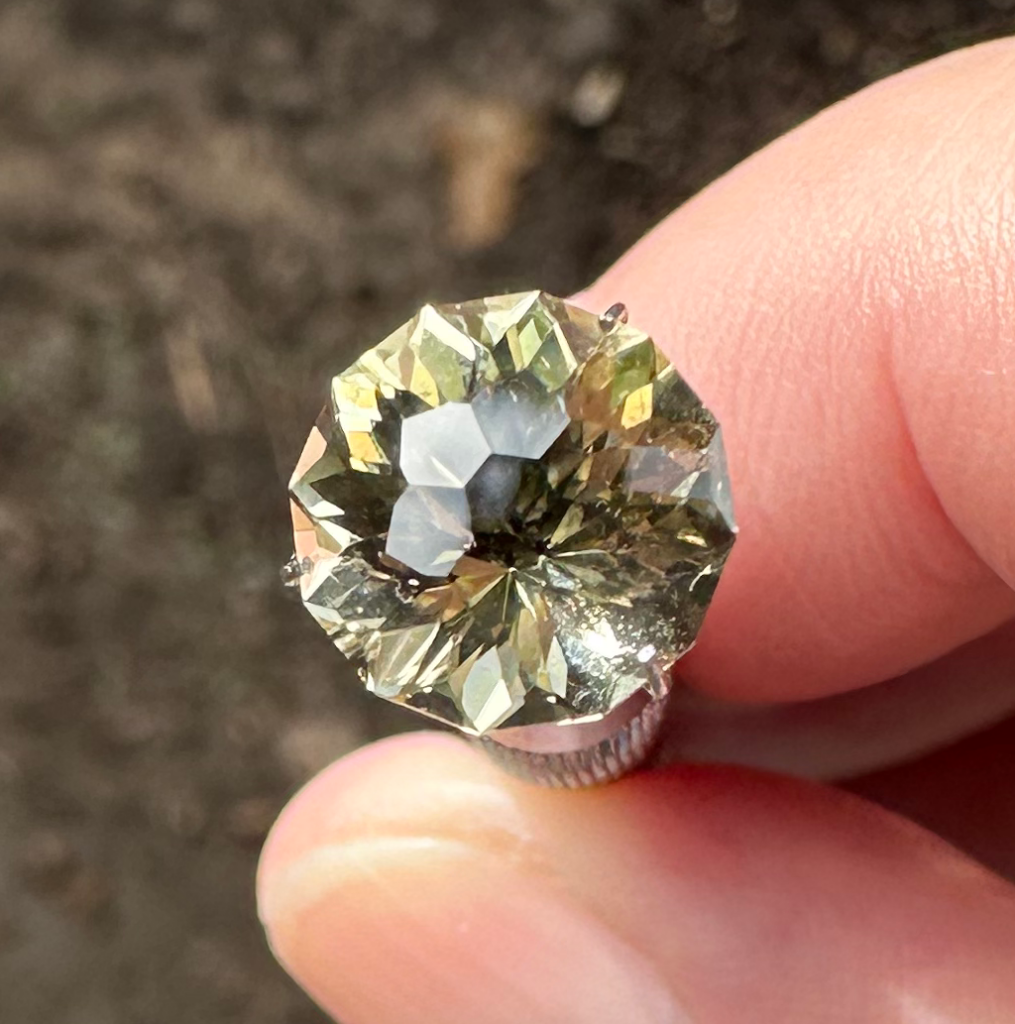
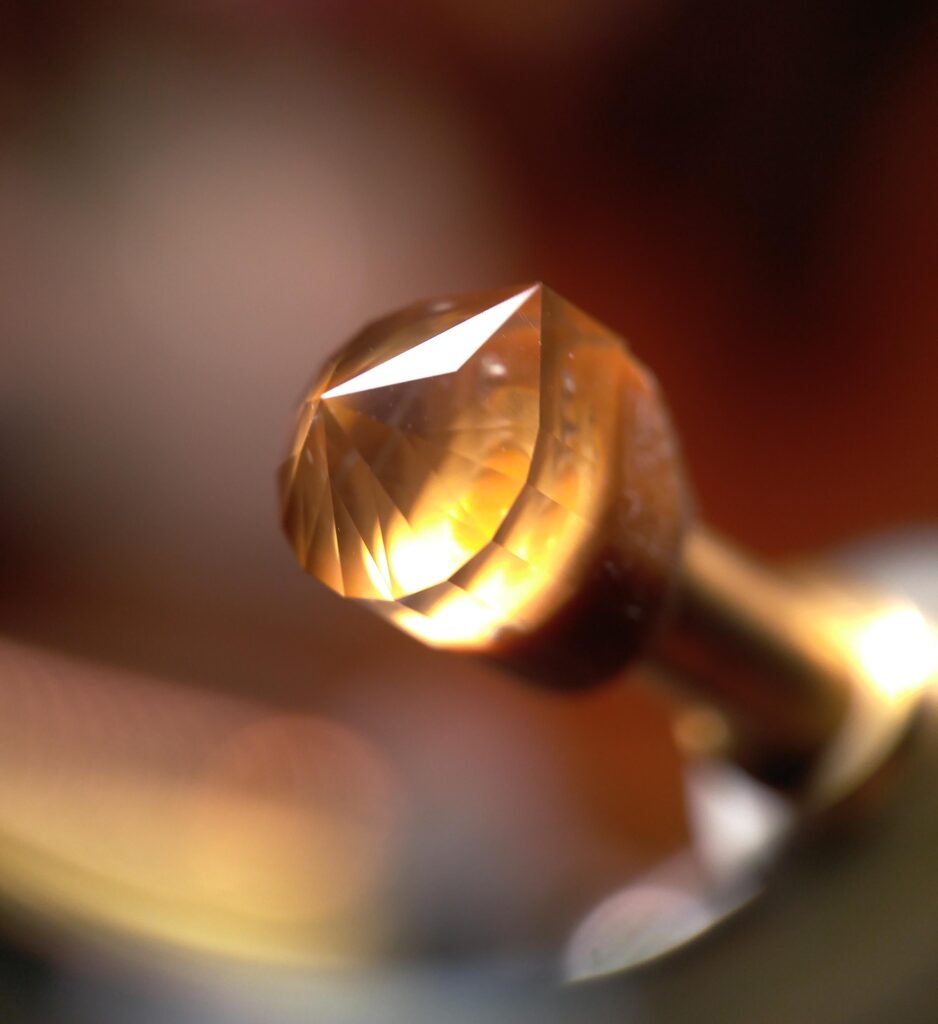
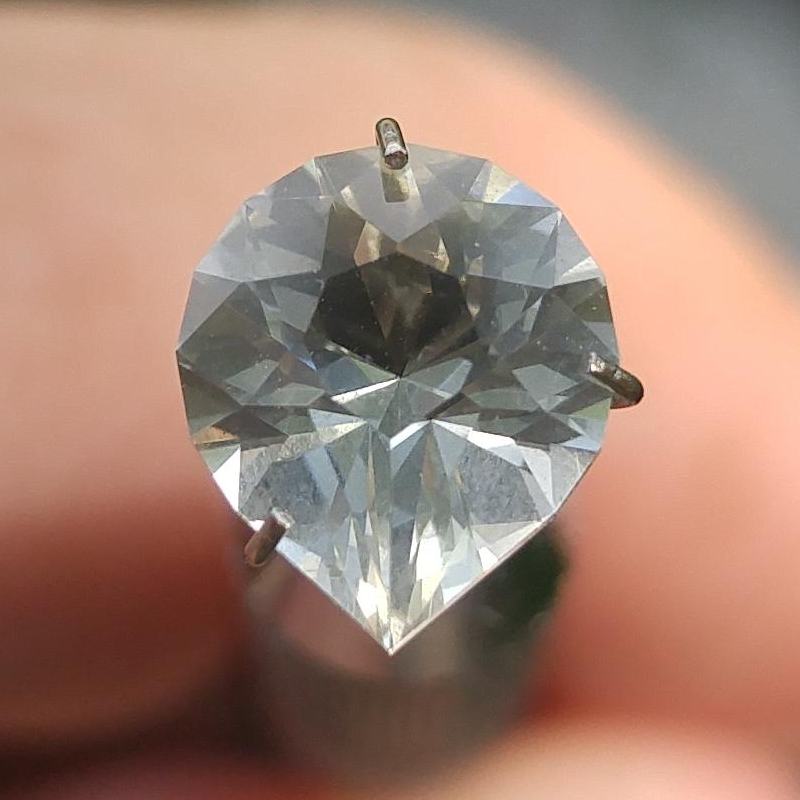
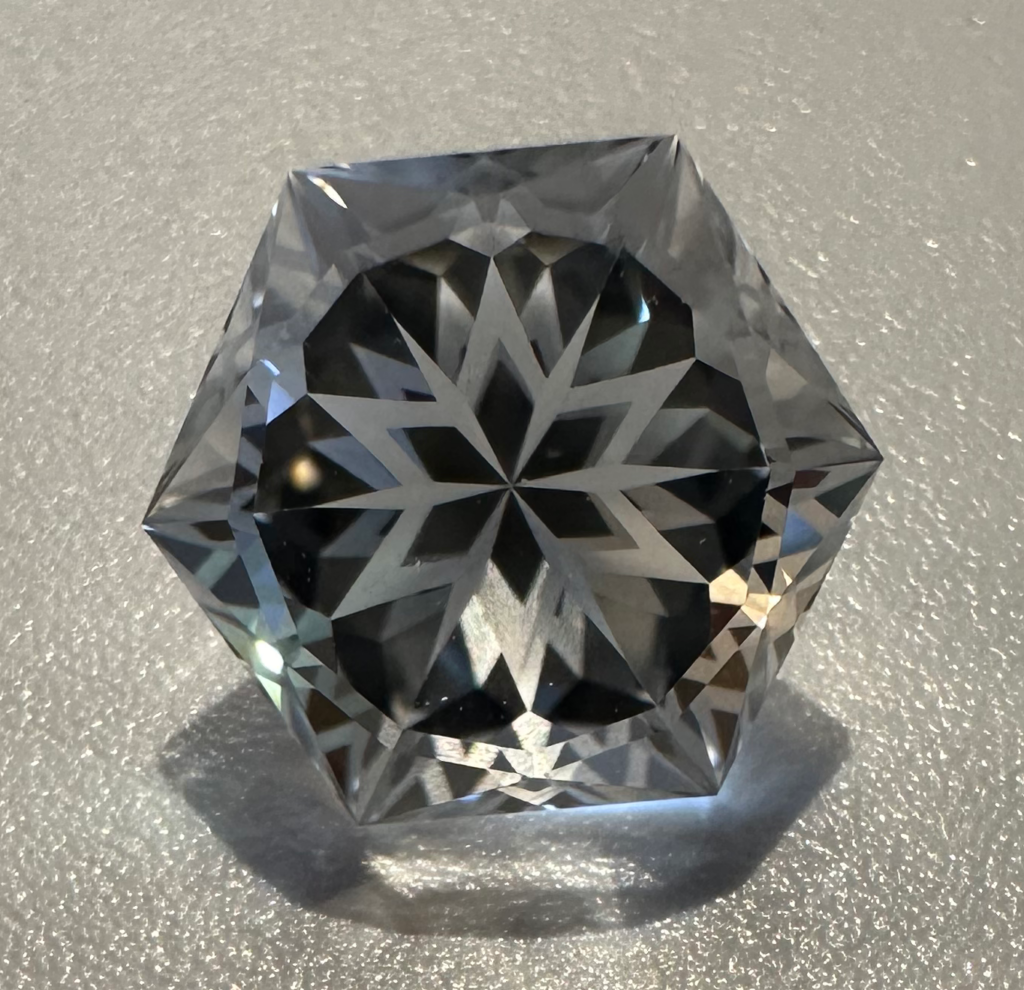
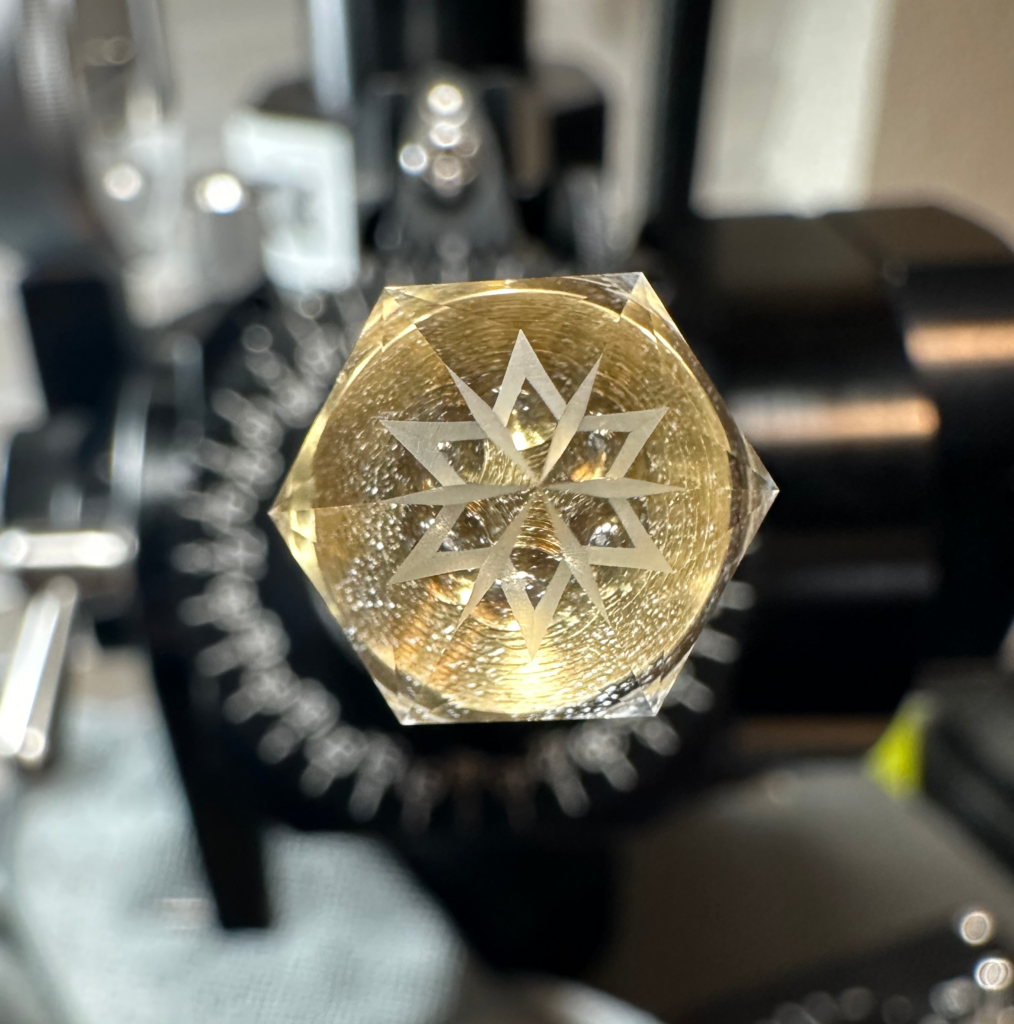
Quartz Frost Star Hex

The completed “Frost Star Hex” design by Andrew Ian Brown, showing the frosted star pattern on the pavilion reflected among the facets and back up through the table (pardon the specks of dust!). The finished gem came in at 6.05 carats and 12.25 mm in diameter (11 mm across the hexagonal flats).

Table view of the Quartz Frost Star Hex, showing the frosted pattern reflections from the pavilion facets.

A few weeks ago I ran across a free e-book called “Twelve Easy Gemstone Faceting Designs – A guide for the beginner Gemcutter” by Andrew Ian Brown and Mark Oros that was published last year, and had some interesting designs geared for beginning faceters. I knew Andrew Brown published several other faceting design books where print versions can be purchased on Amazon (along with the one mentioned above), but this book he makes available in PDF format free to download, which I think is a fantastic idea.

When I first started faceting in 2021, I had watched numerous videos on YouTube, read (and re-read) Tom Herbst’s book “Amateur Gemstone Faceting Volume 1: The Essentials” which had one beginner design to start me off with, and then I had also purchased Jeff R. Graham’s “Gram Faceting – The Right Way to Get Started…” which is not only a great, though somewhat thin, booklet that includes 5 beginning designs (which were the next designs I faceted, right after Tom Herbst’s GeM101 design), but also includes tons of fantastic information for a new faceter like me who was just starting out.

For other beginner designs to try I found Jeff R. Graham’s designs archived on the Internet “Wayback Machine” (which pretty much settles the argument that “What gets posted on the Internet stays on the Internet”). The domain he used where he provided a lot of his free designs and faceting information on, faceters.com, is now owned by the International Gem Society (which he also wrote a lot of content for) and redirects you to their site. But, the Wayback Machine lets you go back in time on the Internet to when it was his and has his free designs and many articles posted there from 2012 and prior (though he passed away in June of 2009).

There are also scores of other free faceting designs that can be downloaded from sources such as facetdiagrams.org and gemologyproject.com (to name just a couple), but you have to search for “Beginner” or “Easy” to get those designs that would be good to start off with. It didn’t take me long after faceting those five designs recommended by Mr. Graham that my desire to challenge myself with some of the more complex designs I had seen took me beyond some of those beginner designs, but I do plan on working many those designs in the future as even though they may not have very many facets, they are perfect for those extra-small stones that really need fewer facets to be workable.

However, when I saw design #12 in Mr. Brown’s “Twelve Easy Gemstone Faceting Designs – A guide for the beginner Gemcutter” e-book with the frosted facets (which is also shown on the cover of the book), I figured I just had to give that one a try. I had seen other designs with frosted facets, and this one was very pretty with its star/snowflake-like pattern that fit the season, so I figured I would give it a shot and see how it turned out.

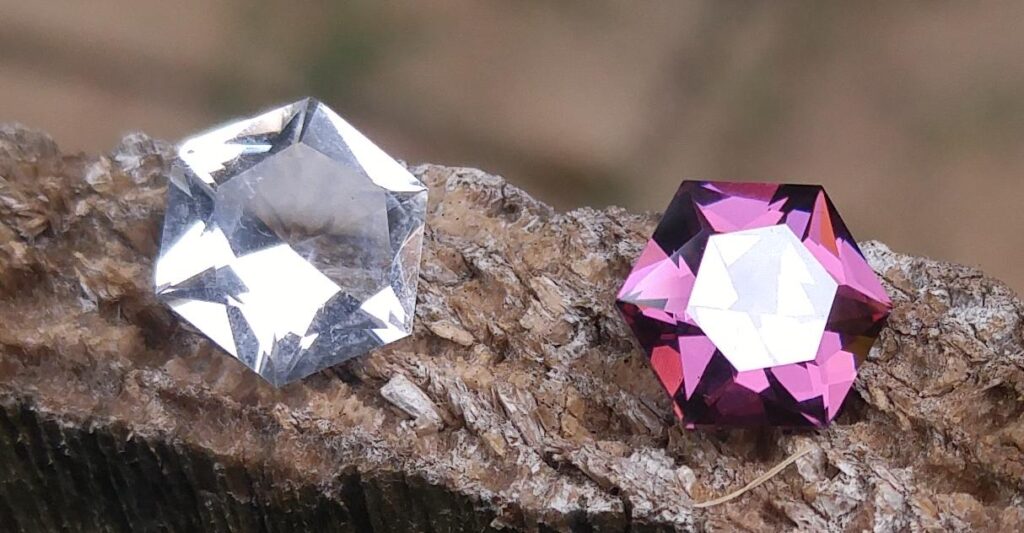
Gems with frosted facets often have larger than normal tables to show off the frosted design, and are usually cut in material that doesn’t detract from the focus of the gem (being the frosted facets), so Cubic Zirconia with all its flash and dazzle is likely not the best choice. Instead I opted for clear Quartz on this one. I have other nice Quartz material (Prasiolite or Citrine for example) that would also be great worked in this design, but for my first attempt at frosting I wanted to go with something inexpensive (which the clear Quartz I have definitely is, which cost me $0.05/carat for what I have on hand).

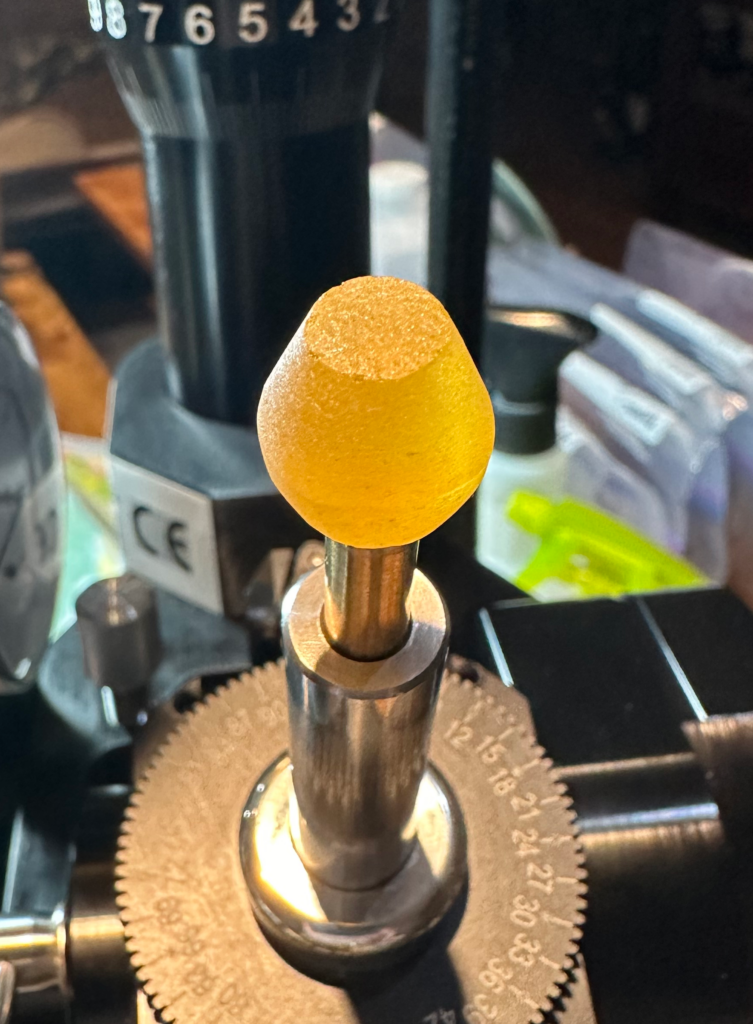
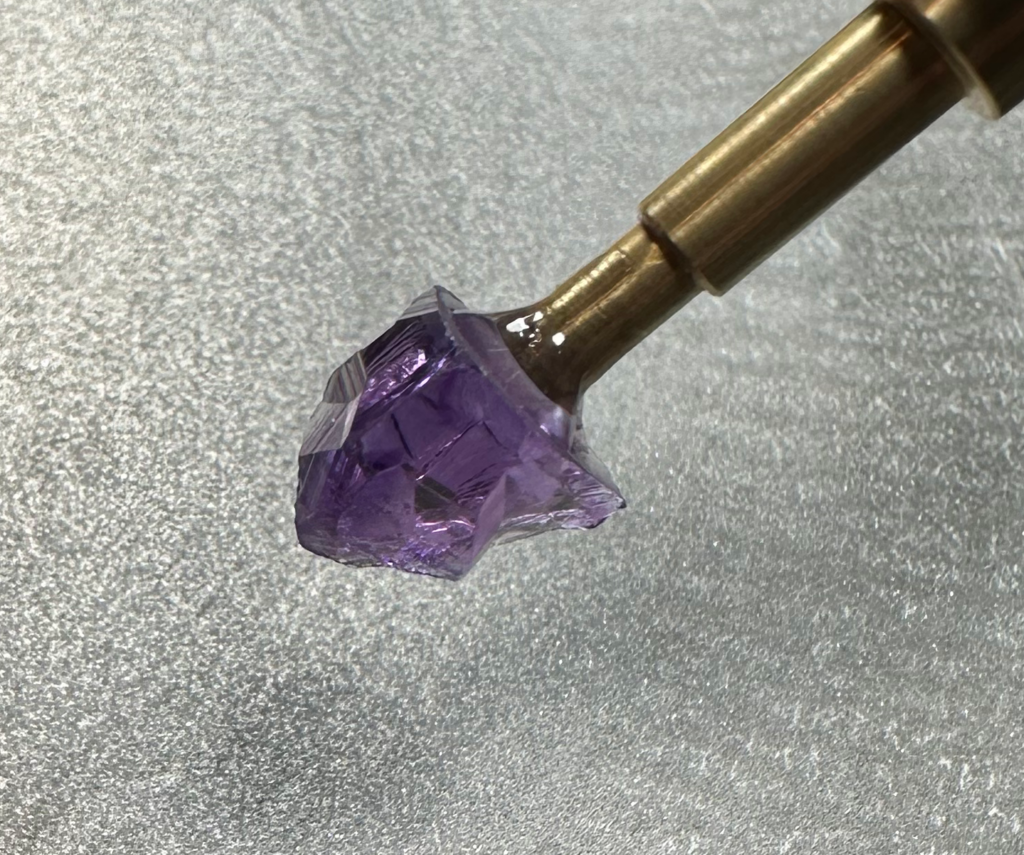
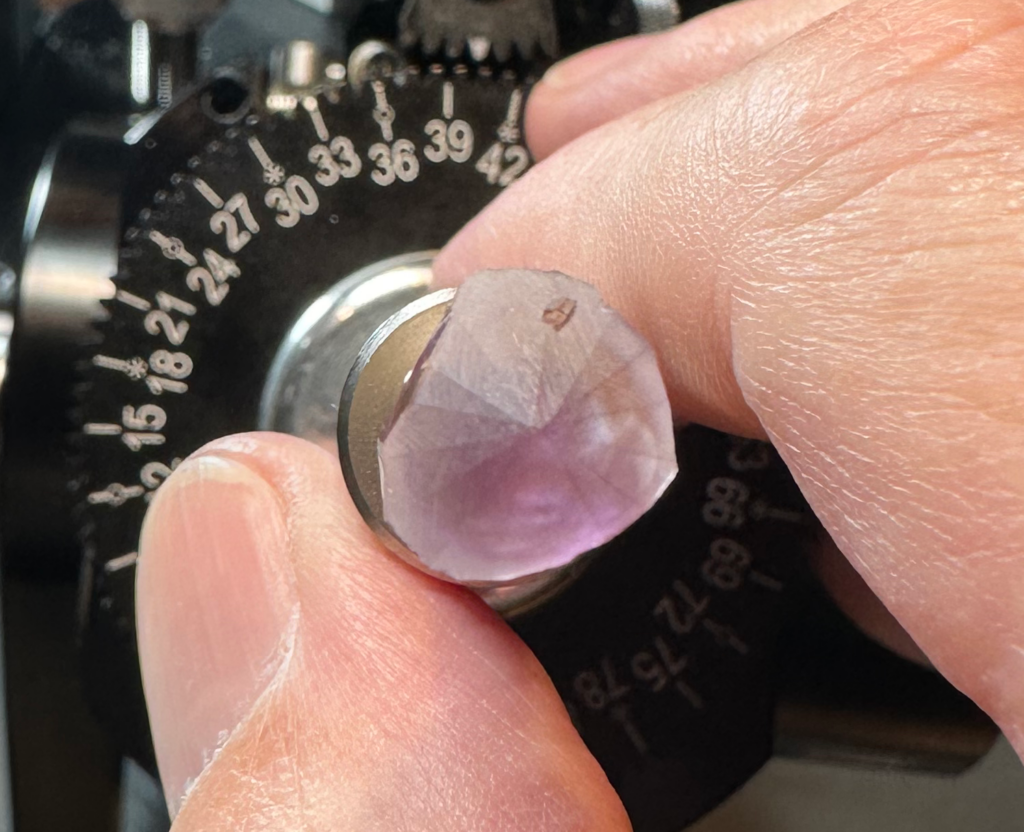
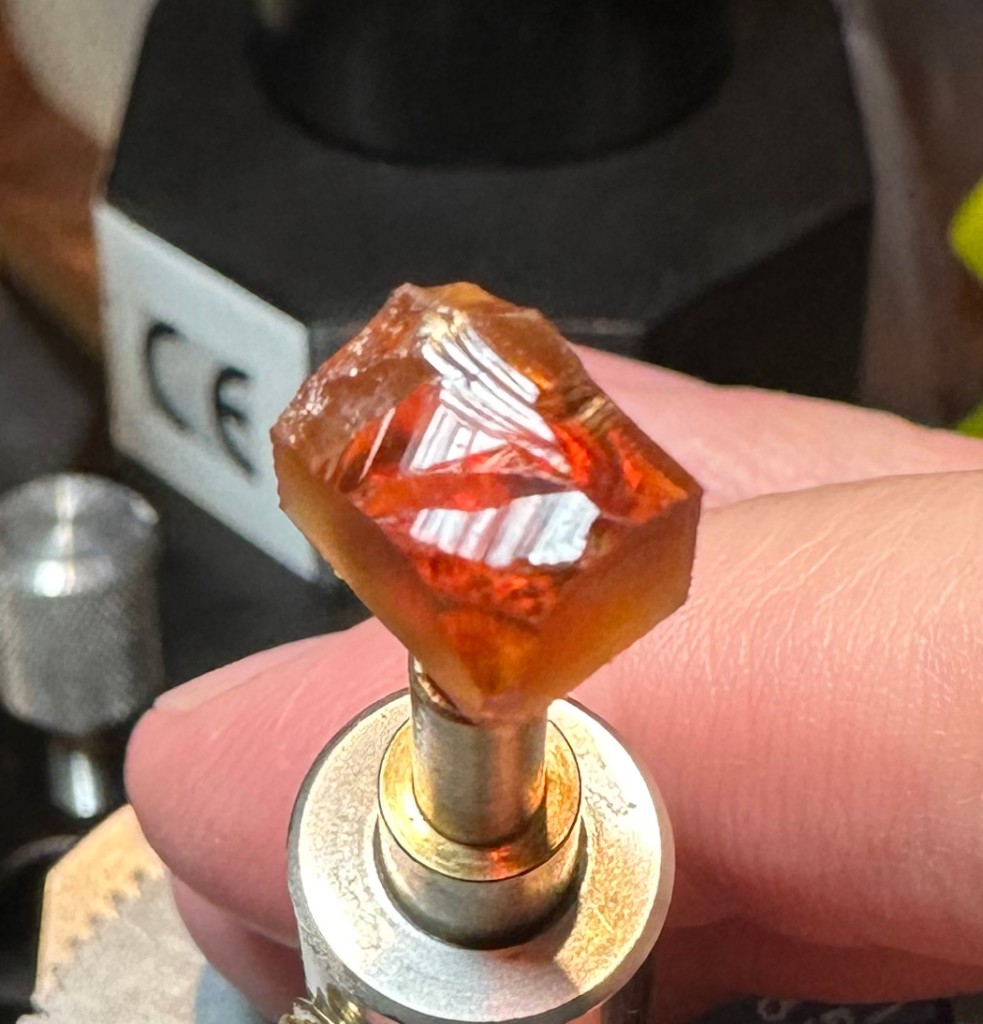
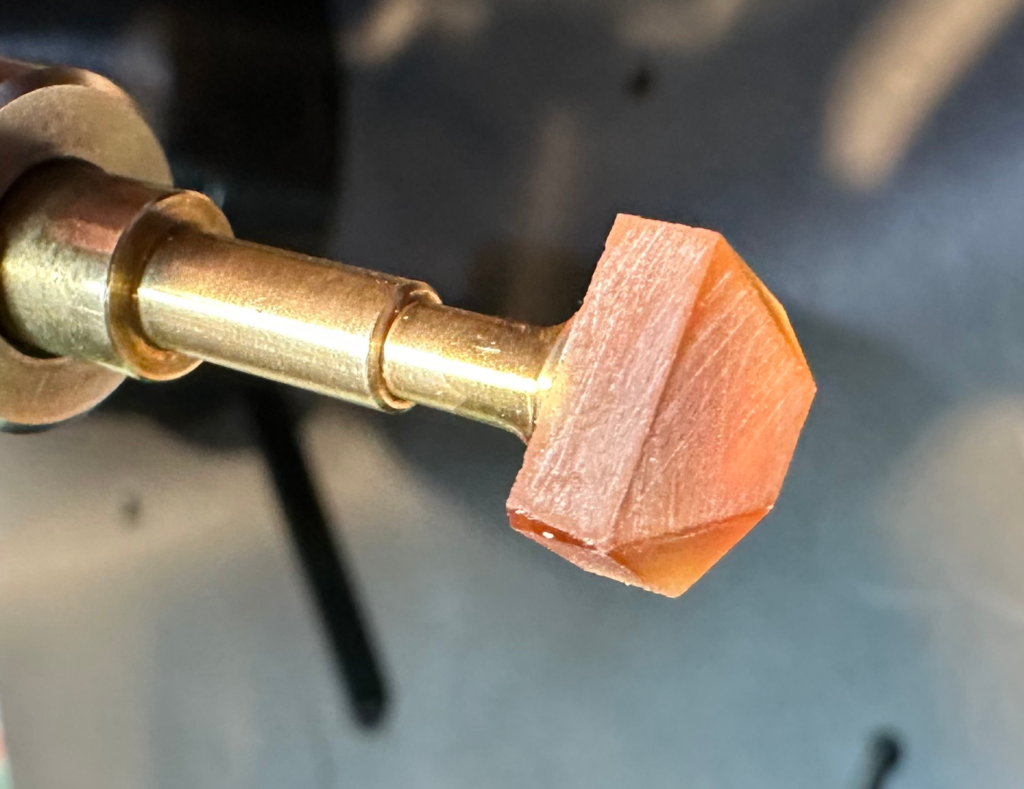
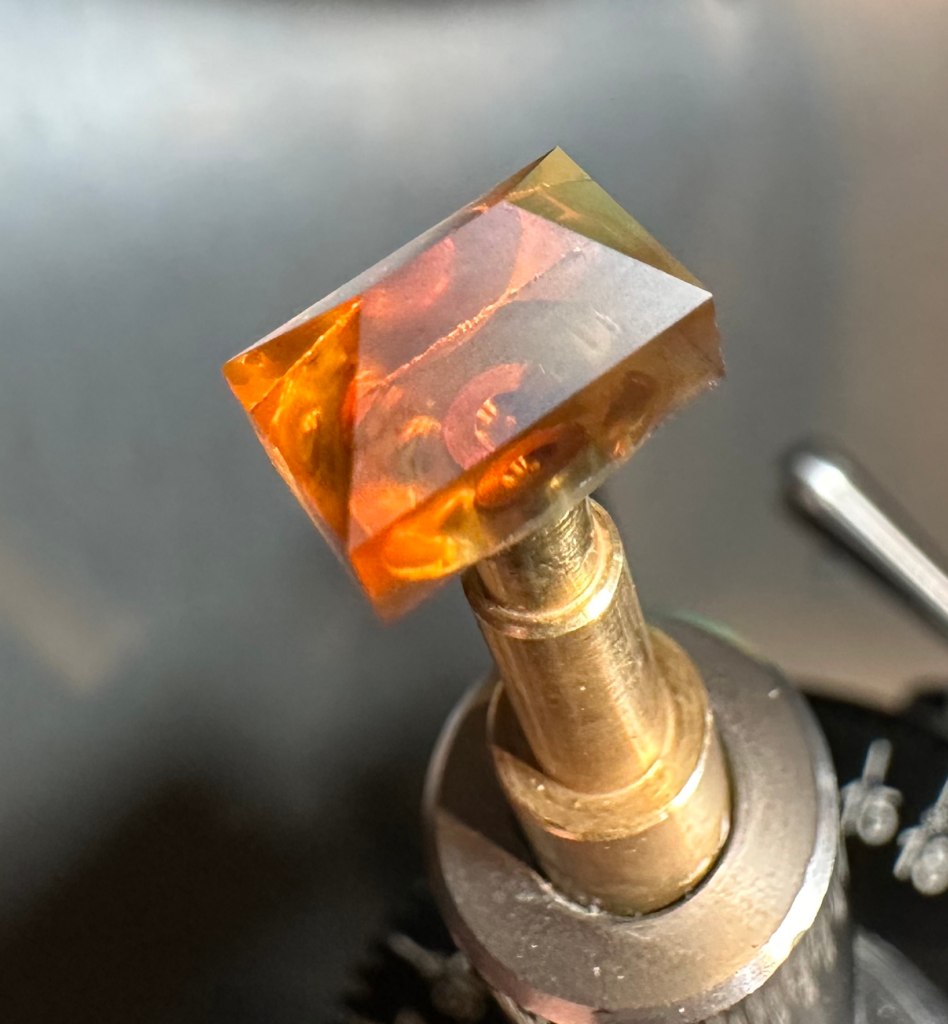
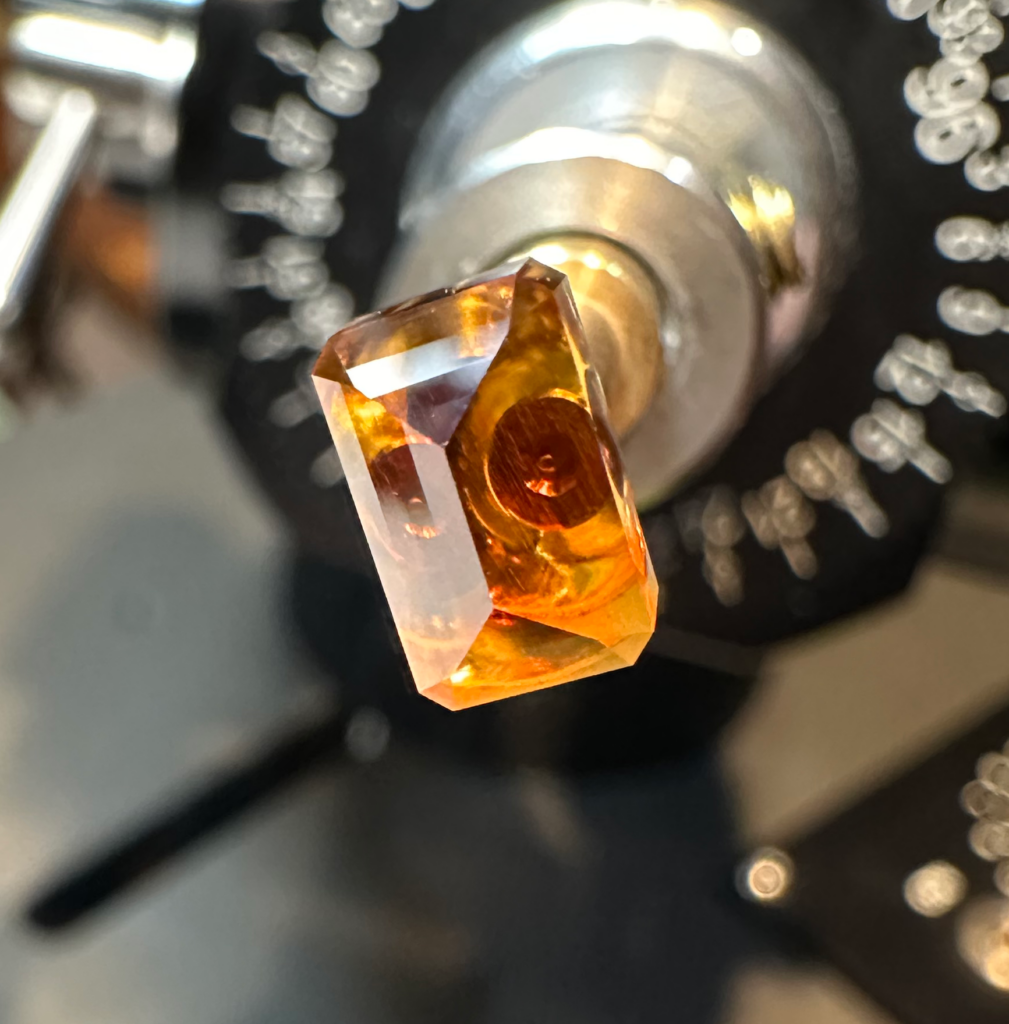
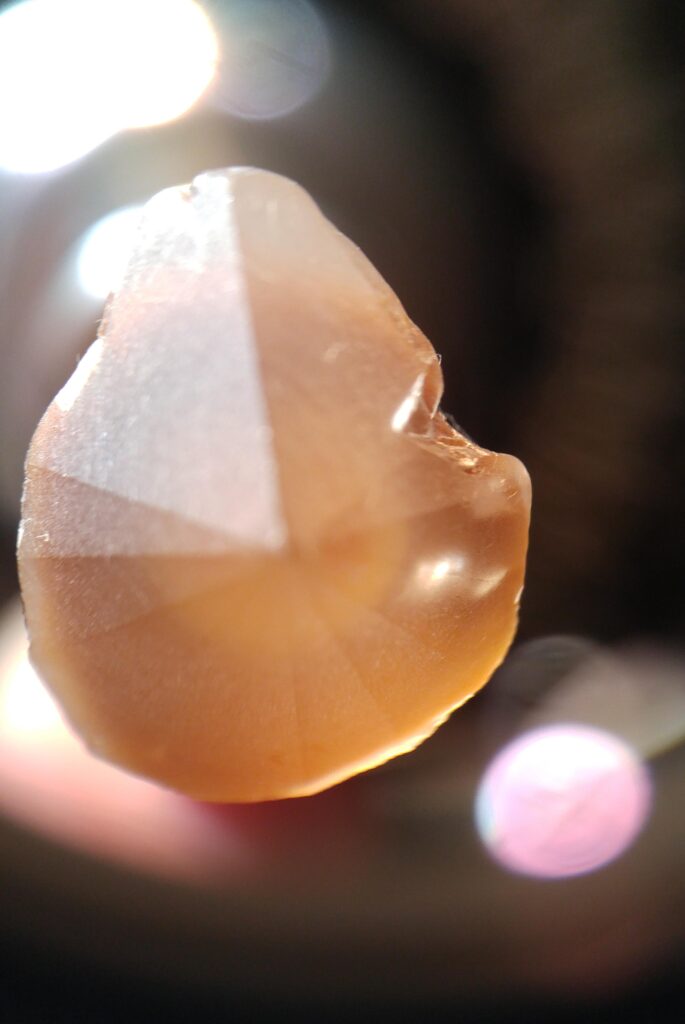
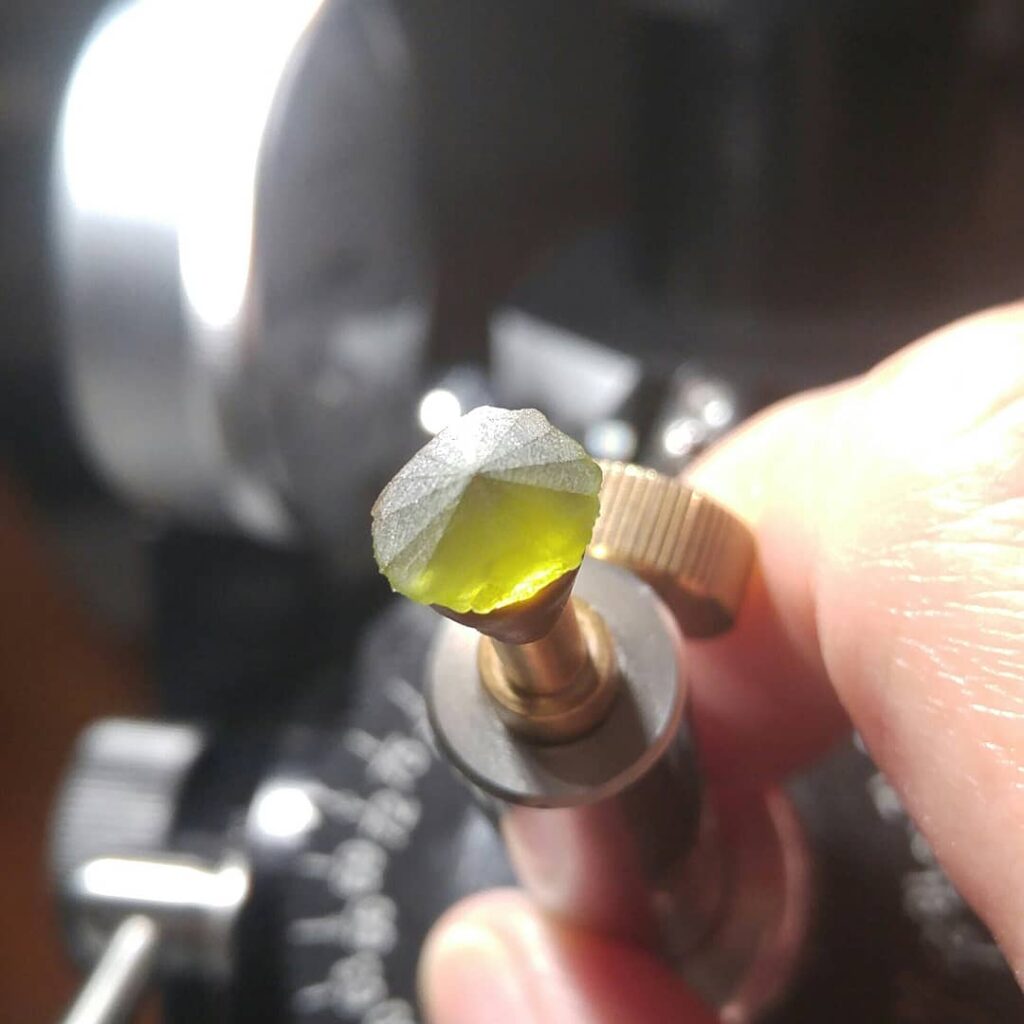
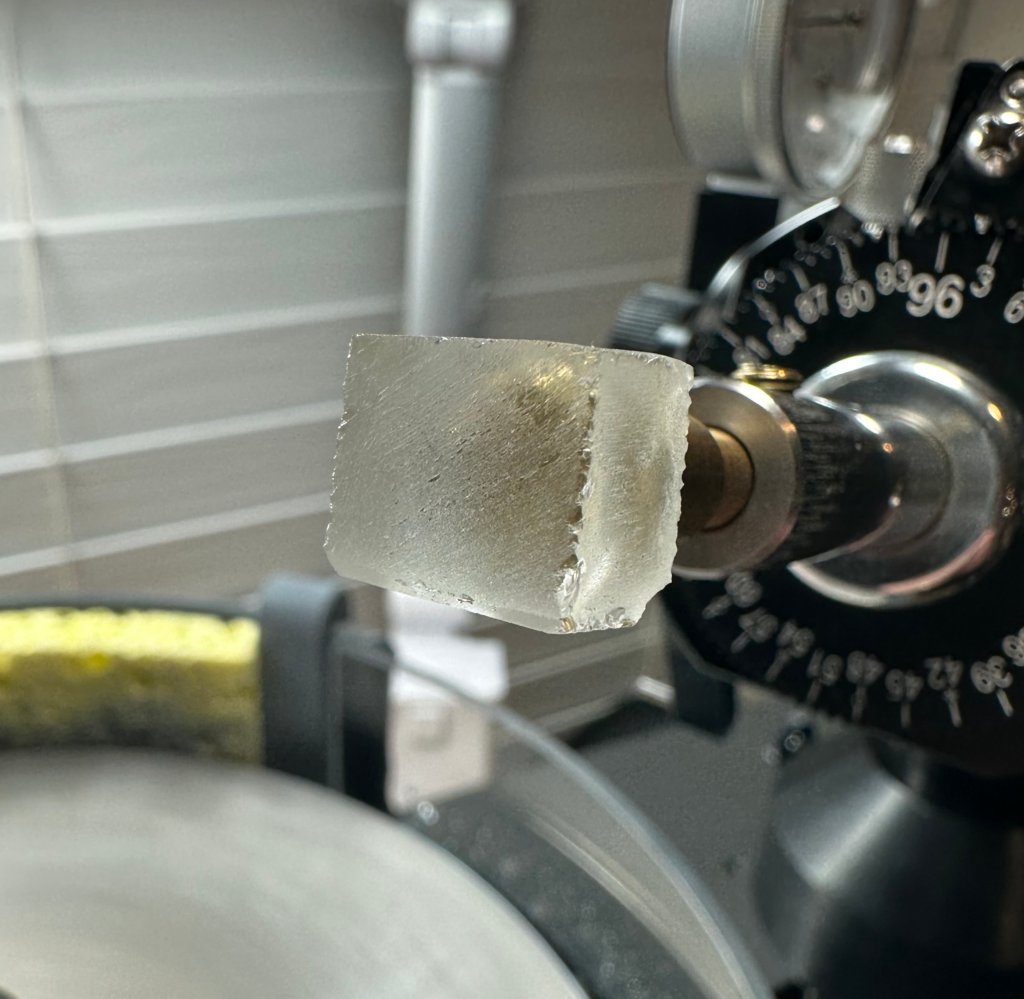
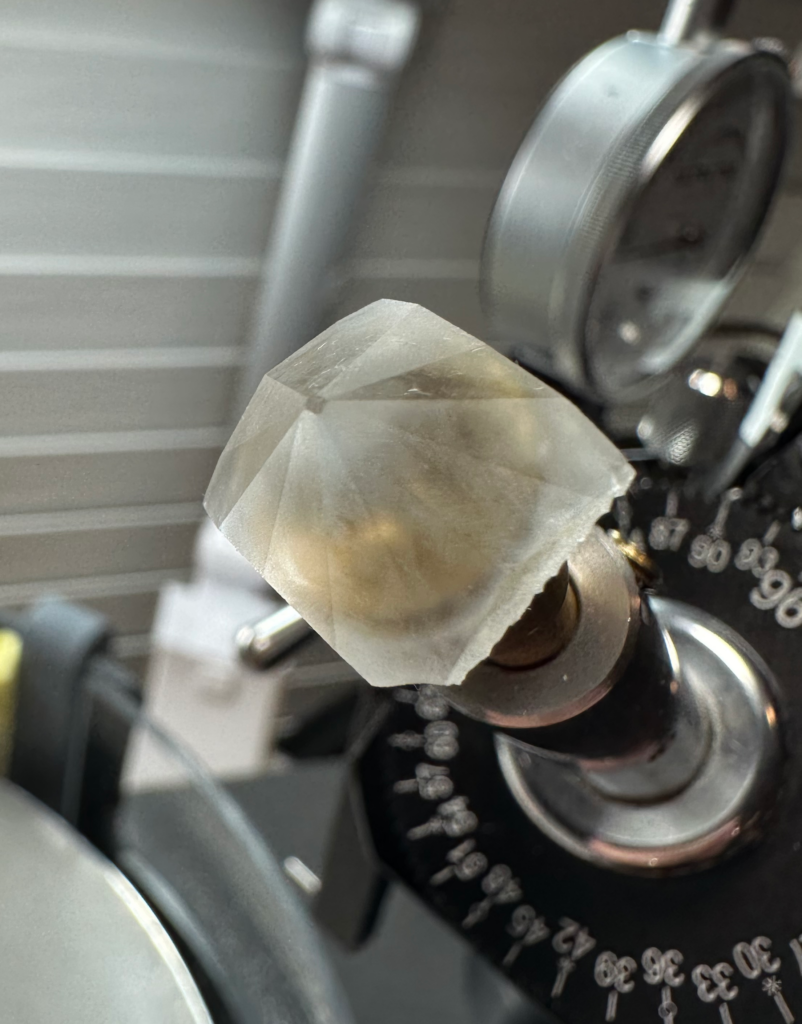
I started off with a chunk of clear Quartz 21.0 carats in weight that I had cut from a much larger piece a couple years ago, and figured it would be a good size for the design with it being big enough to easily see the design through the table, and definitely not too dark, either. Here’s the piece of Quartz dopped and ready to facet…

21.0 carat Clear Quartz block ready to be cut into the Frost Star Hex design.

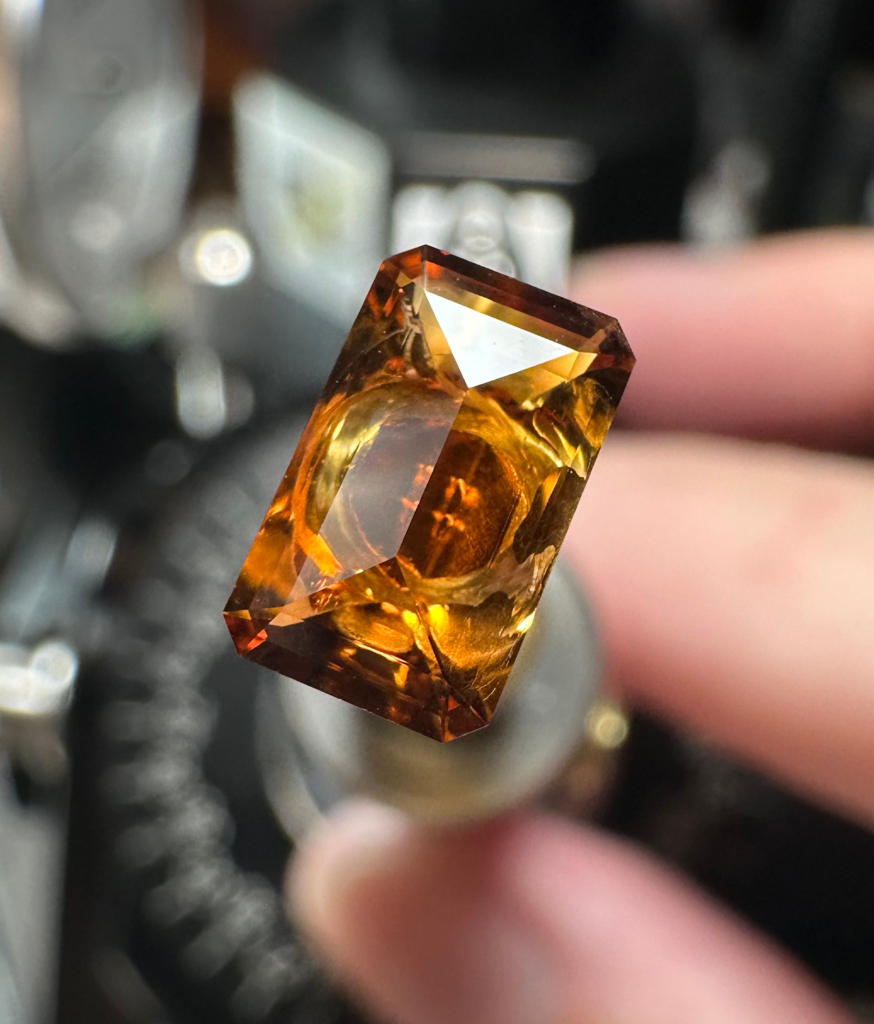
Once I have the rough or pre-formed stone dopped, I will rough-in the first tier of pavilion facets using either a 240 or 320 grit lap, depending on the stone’s size and hardness. Usually the first tier on the pavilion forms a permanent or temporary center point on the stone, though if you actually establish a true “point” on the stone using the larger grit sizes you’re wasting a little bit of gem material.

I will definitely have some waste on this rough anyway, as the block is somewhat rectangular and the design is round (I didn’t have a good size square chunk to use), but always try to minimize loss no matter what I’m cutting as I strive for that “80% or less weight loss” goal when cutting rough stones. Even though this was a “pre-form” piece and not a rough stone, my weight loss came in at 71%, but that still could have even been less if I had started with a square block (most of my gems cut from pre-formed pieces have come in around 67-69% loss, which I understand is respectable for a novice faceter like myself, especially since I cut and pre-formed them before even faceting my first stone).

It’s better to establish the actual points on one of the smaller grits (600 or 1,200), using the same rule applied to Emerald cuts that have their corners lopped off for example. It makes no sense to form a perfect square or rectangle on a rough form only to later grind the corners off when you can possibly increase your gem size/weight by bringing the edges in close enough to the corners to accommodate the corner facets if the material allows for it. Same goes for center points. Bringing them in with the finer grits means less material that gets ground away and dumped in the back yard.

Clear Quartz after pavilion facets roughed on 320 grit lap for the Frost Star Hex design.
Clear Quartz after pavilion facets roughed in on 320 grit lap for the Frost Star Hex design.

Following that I then usually move on to the girdle to establish the gem’s size, coming back to the pavilion for working the facets with the finer grits. That also decreases the amount of surface area that you have to work (especially on larger stones), as when it comes time for the finer pre-polish and polish grits, polishing a large flat surface takes a lot longer, and you increase the chance for “new” scratches from swarf or tiny pieces of the stone coming loose from the face of the facet and leaving a gouge in its wake, too (which usually happen right when you think “One more swipe should do it!” and make what you thought would be that facet’s final swipe across the polishing lap). 😕

Clear Quartz after girdle facets roughed on 320 grit lap to establish stone size for the Frost Star Hex design.
Clear Quartz after girdle facets roughed in on 320 grit lap to establish overall gem size.

Once I have the stone’s first pavilion and girdle facets cut with the 320 grit lap, I move on to 600 grit to tighten things up, then to the 1,200 grit and/or 3,000 grit pre-polish grits. Remaining facets can then be initially cut with 600 grit, though many times they can also be cut with the 1,200/3,000 grit laps (depending on gem’s size) to where things are “almost there,” then finally working in the meet points to be as perfect as I can make them with the polishing lap as I’m polishing the facets.

My biggest concern with cutting this design was what lap to use for the “frosting”. Mr. Brown mentioned in his design notes that he used a “worn 800 grit bronze sintered lap [which] produces a good frosted finish”, but I have no such lap. I do have a worn 600 grit metal “topper” lap, but the “topper” laps I have are inexpensive thin metal laps purchased on Amazon that were imported from overseas.

These thin metal topper laps are placed on top of a much thicker (and truly flat) machined aluminum “master lap” to provide stability, and are popular for roughing in facets to some degree, but they are also known for NOT being the flattest laps, nor having consistent diamond grit size embedded in the surface and is why they are not used to pre-polish or polish facets that need to have clean, sharp edges. But, for hobbyist faceters on a budget like myself, they are a good choice for at least getting gems to those steps.

I have a 1,200 grit resin-bonded topper “D’Lite Lightening Lap” that is 1/8″ thick and sturdier than the thin imported metal topper laps (though it still needs a “master lap” under it as well). It was purchased a couple years ago and most of its surface is also very well-worn, too. As it’s certainly a lot flatter than the metal toppers I figured that might work, but it left the facets too polished to look “frosted”, even when using the inner-most diameter of the lap that has seen the least use.

As the frosted facets in this design are somewhat small and intricate, I thought that pretty much ruled out using the metal topper laps, but that’s all I have to use at this time. The 1,200 grit metal topper leaves a more “frosted” appearance than the 1,200 grit D’Lite Lightening Lap, but it also leaves deeper scratches than it should on areas of the lap due to the inconsistent grit size embedded in its surface (but not near as ugly as what the 600 grit leaves behind).

Side view of the pavilion's frosted facets on the Quartz Frost Star Hex.
Side view of the pavilion’s frosted facets on the Quartz Frost Star Hex.

So, as I was faceting the second tier pavilion facets on the stone I tested various areas of the 1,200 grit lap and marked off an area about 5/8″ wide within the diameter that didn’t seem to leave deep scratches, and luckily avoided them when it came time to frost the actual facets that needed to be frosted. I found that spinning the lap at around 500-600 RPM and using a fast water drip set right before the stone to wash away the particles, as well as using a very light touch seemed to keep those rogue deep scratches away while working in that “safe” zone.

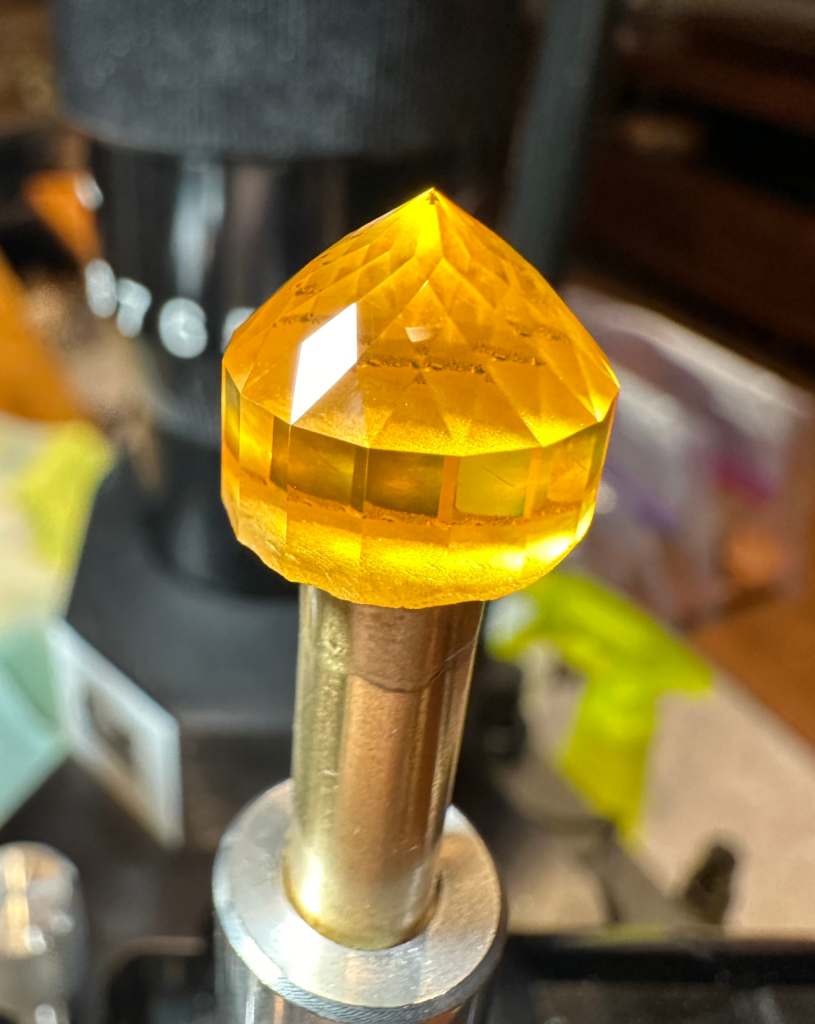
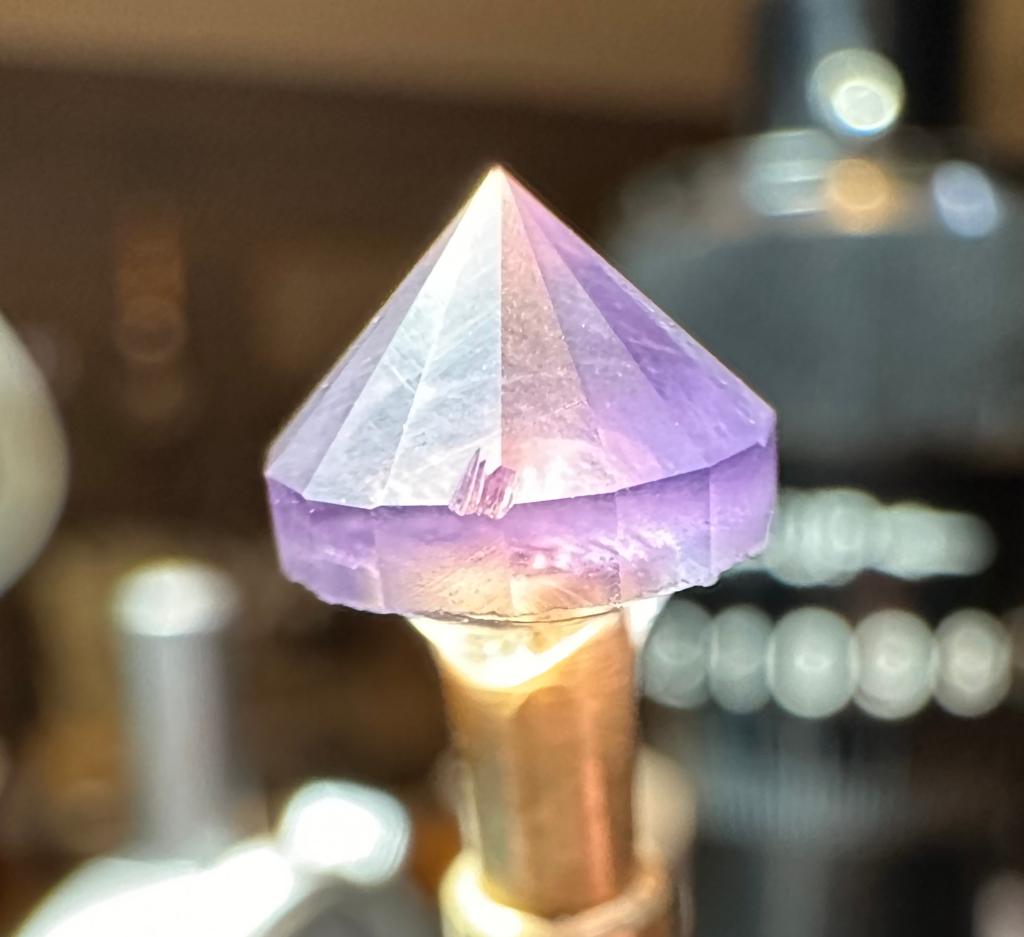
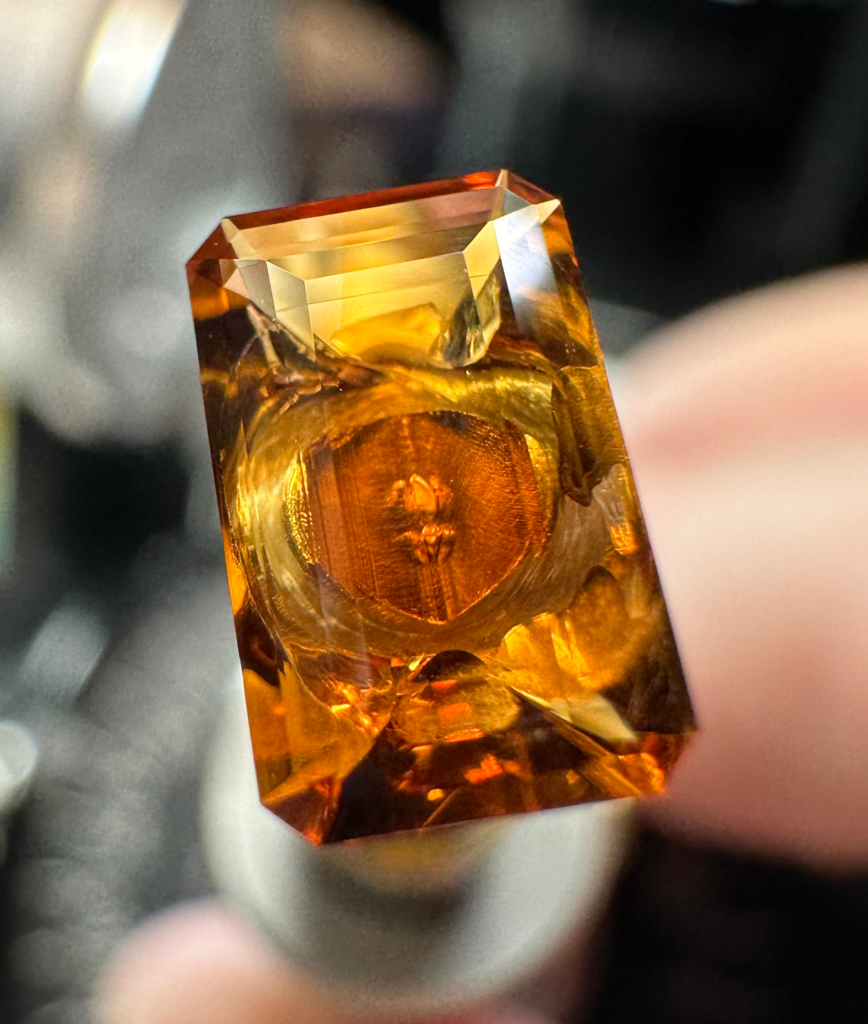
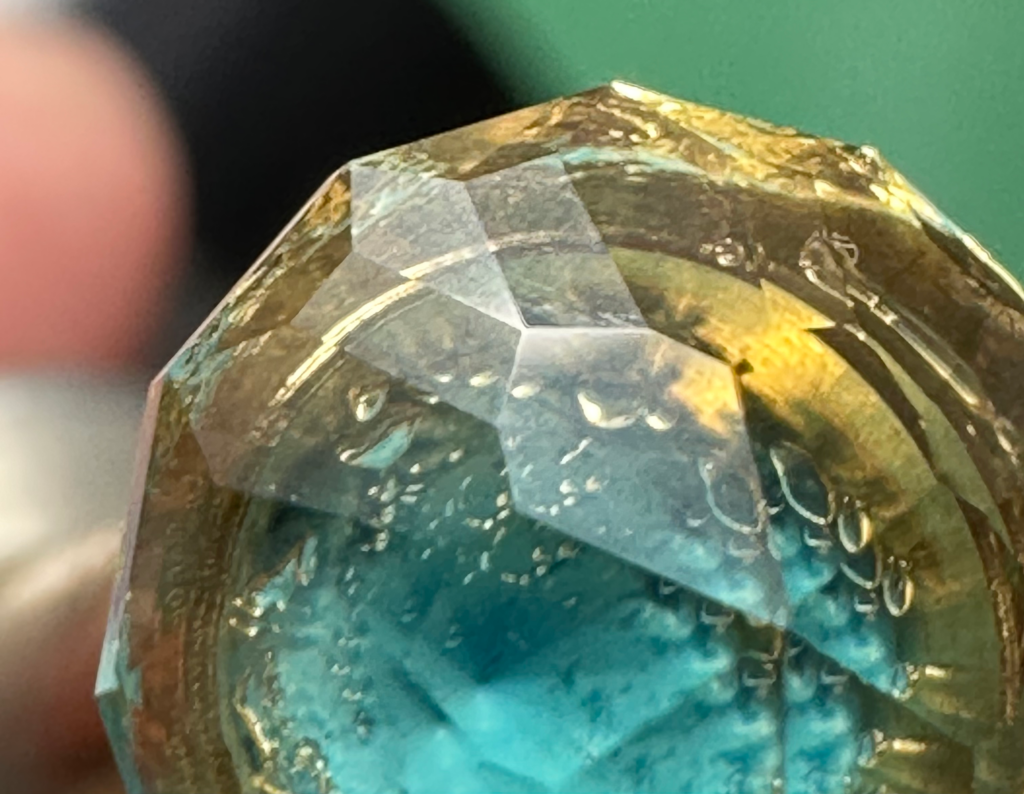
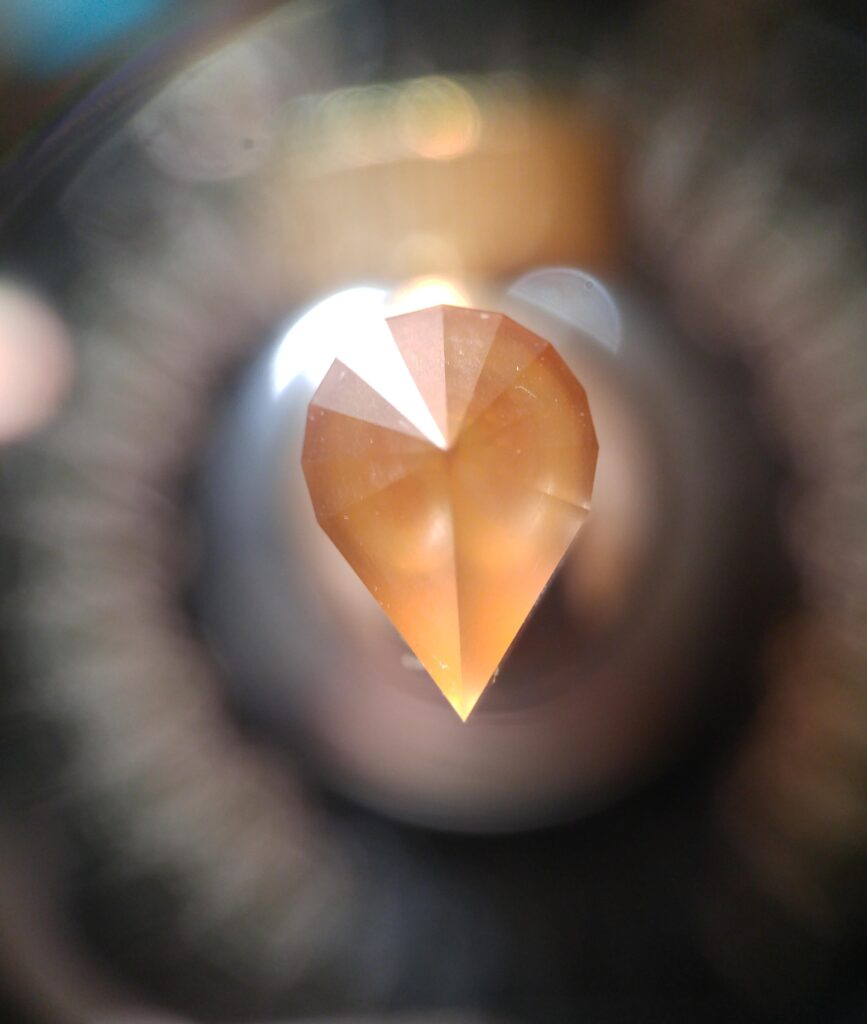
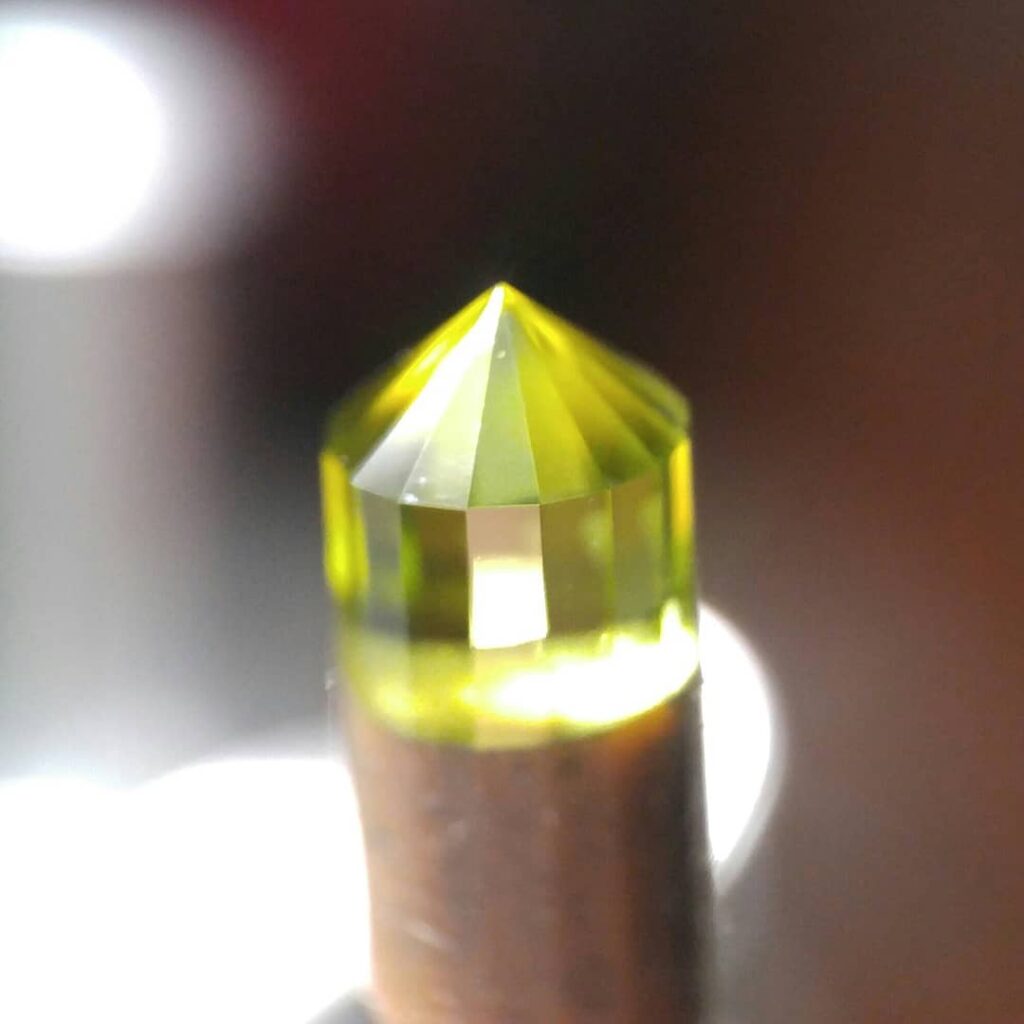
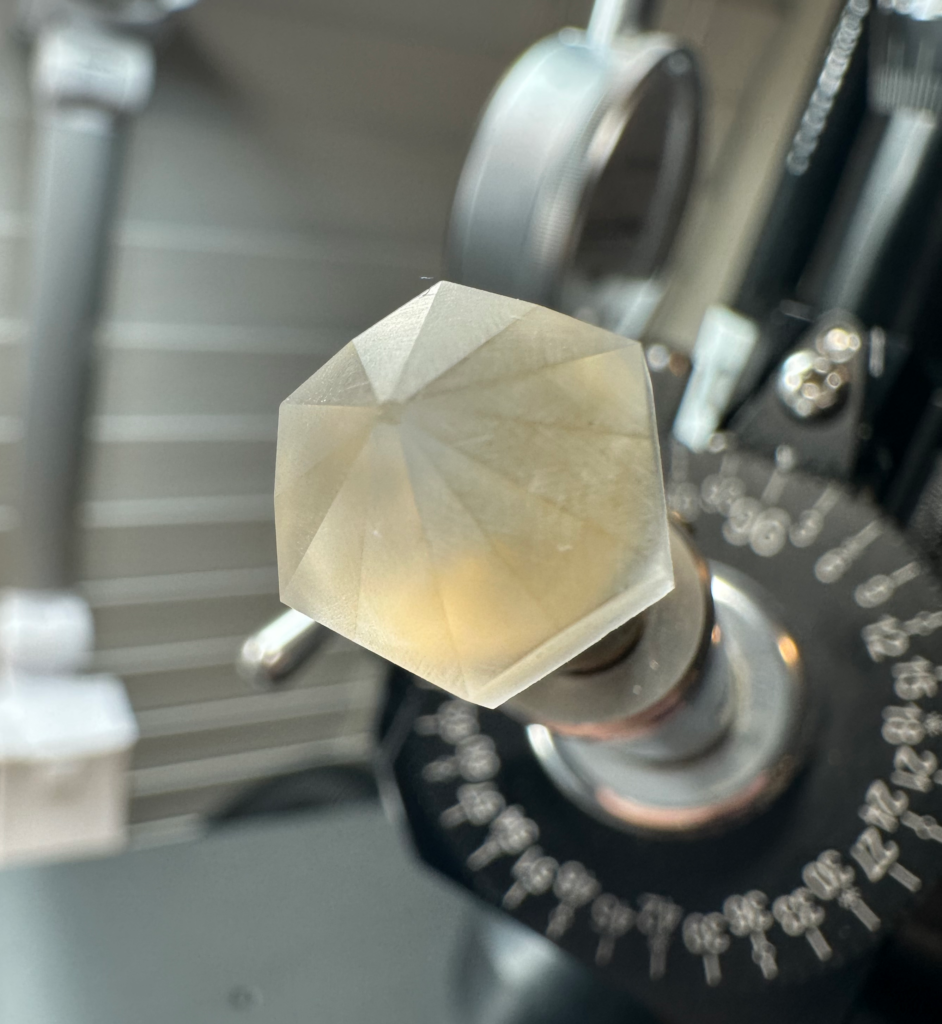
The worn 1,200 grit topper lap, using the “safe” zone area, did an excellent job with the frosting. I thought it might be too lightly frosted, as even though they showed up well when looking at the facets on the pavilion, they almost completely disappeared in the super glue when the gem was transferred to the other dop so the crown could be faceted. I was really hoping for the best, but in the end they turned out well. Here’s a view of the pavilion from the culet showing the frosted pattern in its entirety…

Bottom view of the pavilion's frosted facets on the Quartz Frost Star Hex.
Bottom view of the pavilion’s frosted facets on the Quartz Frost Star Hex.

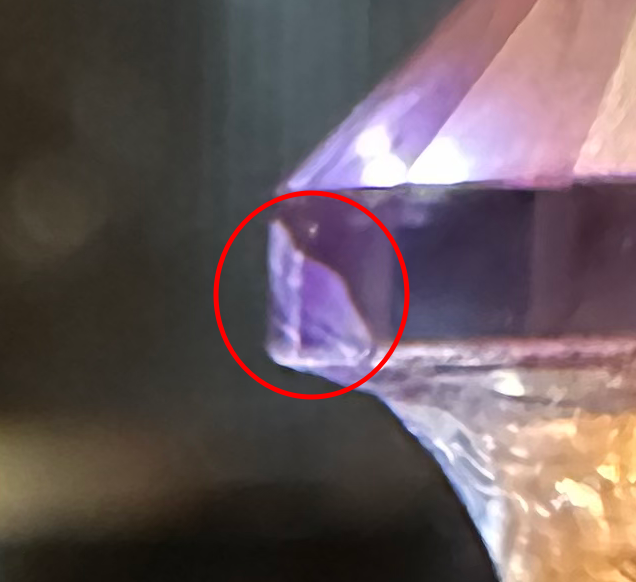
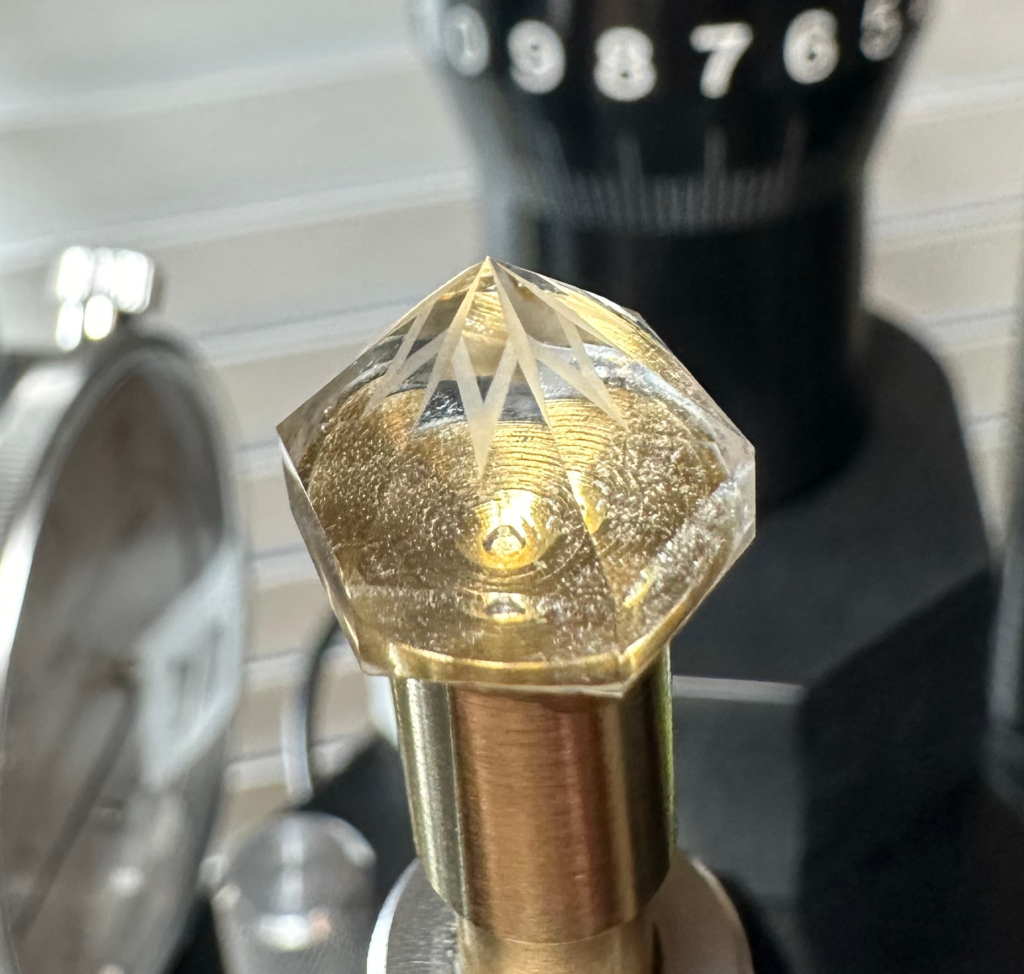
The crown facets were rather simple with three tiers, the last being step facets to “frame” the table, and they all came together nicely. In the side view displayed further down you can see the frosted facets in the pavilion near the culet. I had mentioned that large flat facets take a long time to polish, and the table on this stone was definitely one of them. I used my favorite lap for polishing Quartz, the Creamway™ lap from Gearloose with a spritz of Cerium Oxide solution every now and then, but even though it did a relatively quick job on the other facets, polishing the table seemed to go on, and on, and on, but eventually a really nice polish was left.

I learned a good deal on how frosted facets are created by cutting this design. For example, on this gem an entire facet tier was cut at a particular angle to meet at a point where two other facets met, leaving six facets that were frosted and formed the culet center point. Then, using a slightly steeper angle, I polished those same six facets slowly until I was left with a frosted “outline” of the same width on each facet, creating a six pointed star. I followed that with setting the angle even a little steeper and frosted the edges of where two facets meet, leaving behind the six frosted spokes that radiate from the culet on the final tier of the pavilion.

So basically, you can “frost” the edges of facets to highlight the faceted design (I’ve seen that done a lot in many designs), frost entire facets (such as petals on a flower design, or where a row of step cuts, such as the third tier of crown on this design, could be frosted to create a literal frosted “frame” for a frosted pattern within it), or frost facets and then go back at a different angle or index and polish the interior portion of the frosted facet to create a wide frosted area like was done in this design.

By using one or more of these techniques for frosting, many beautiful designs “pop” and can be clearly seen reflected up from the pavilion or even created on the crown, and become the highlight or focal point of the gem, not the sparkle and flash it could give (though I’m quite pleased with this gem, as it has nice sparkle, too).

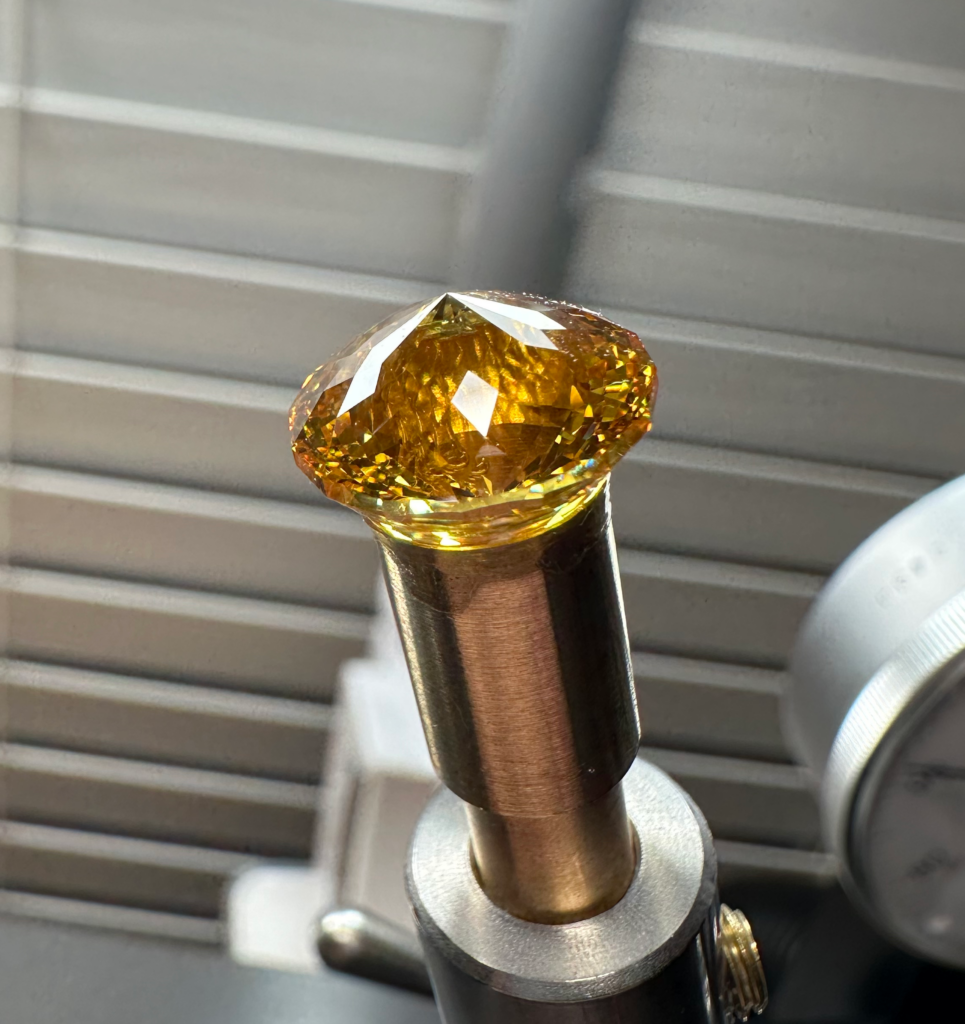
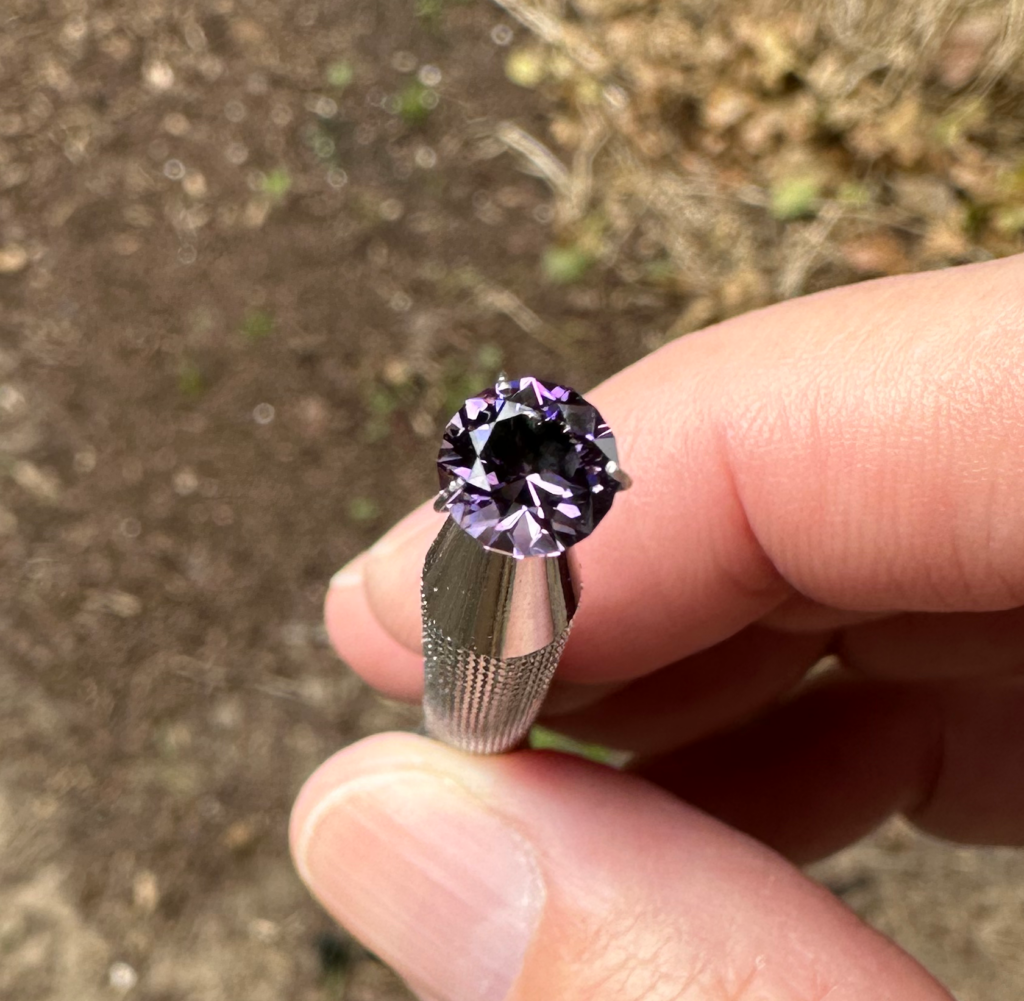
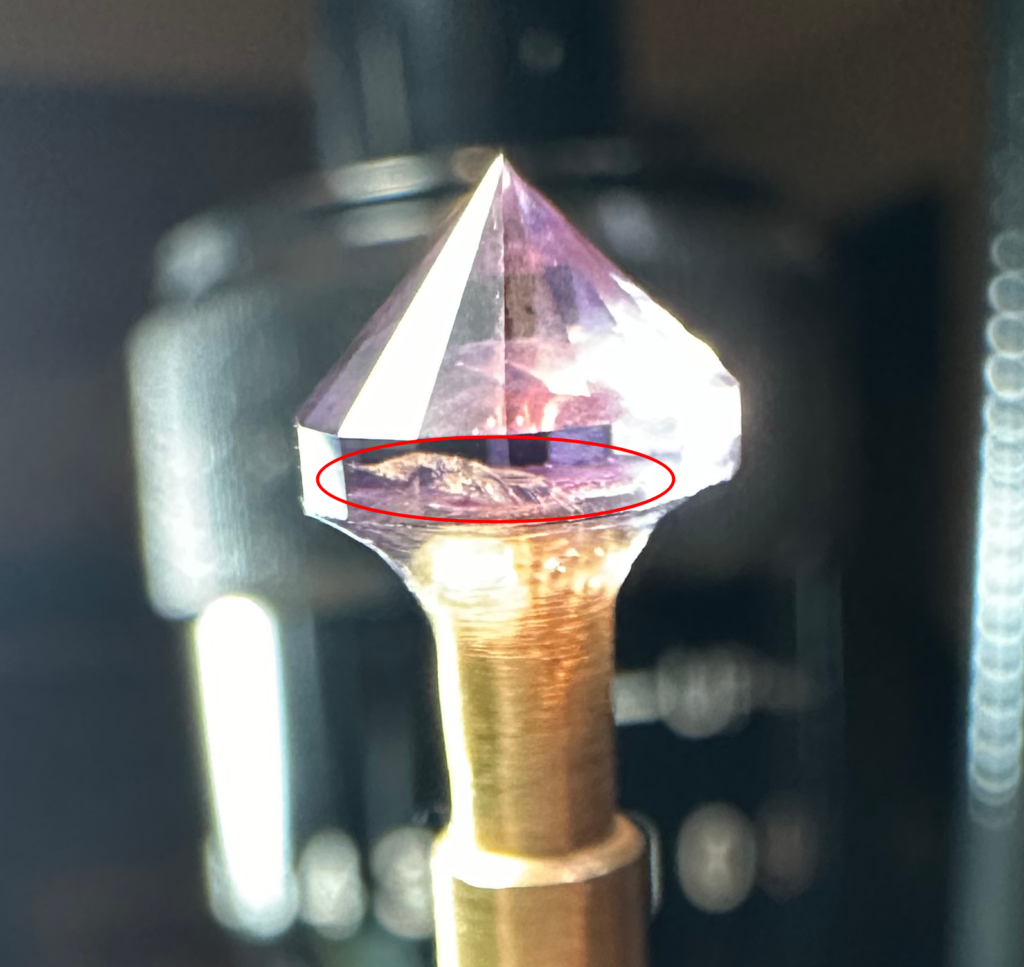
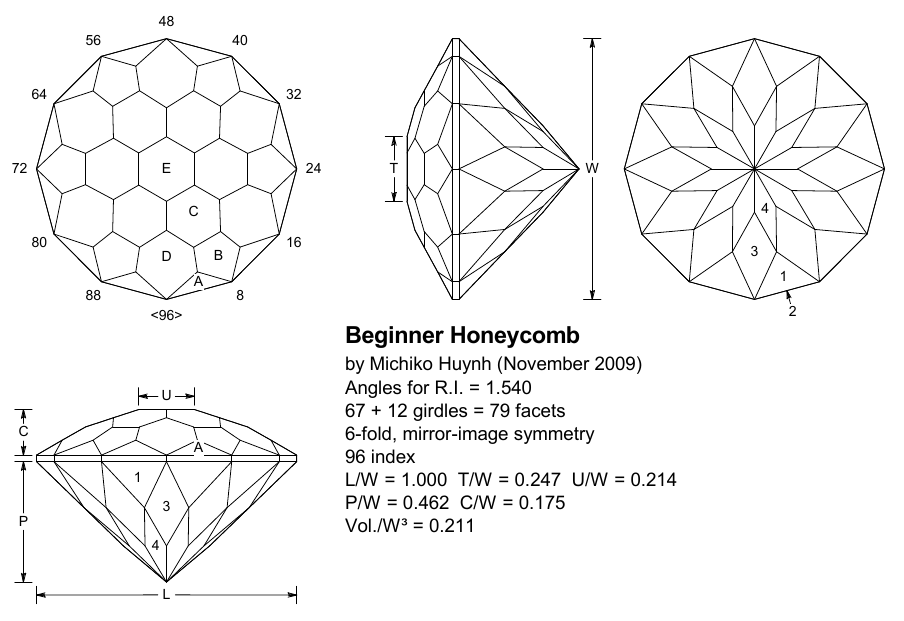
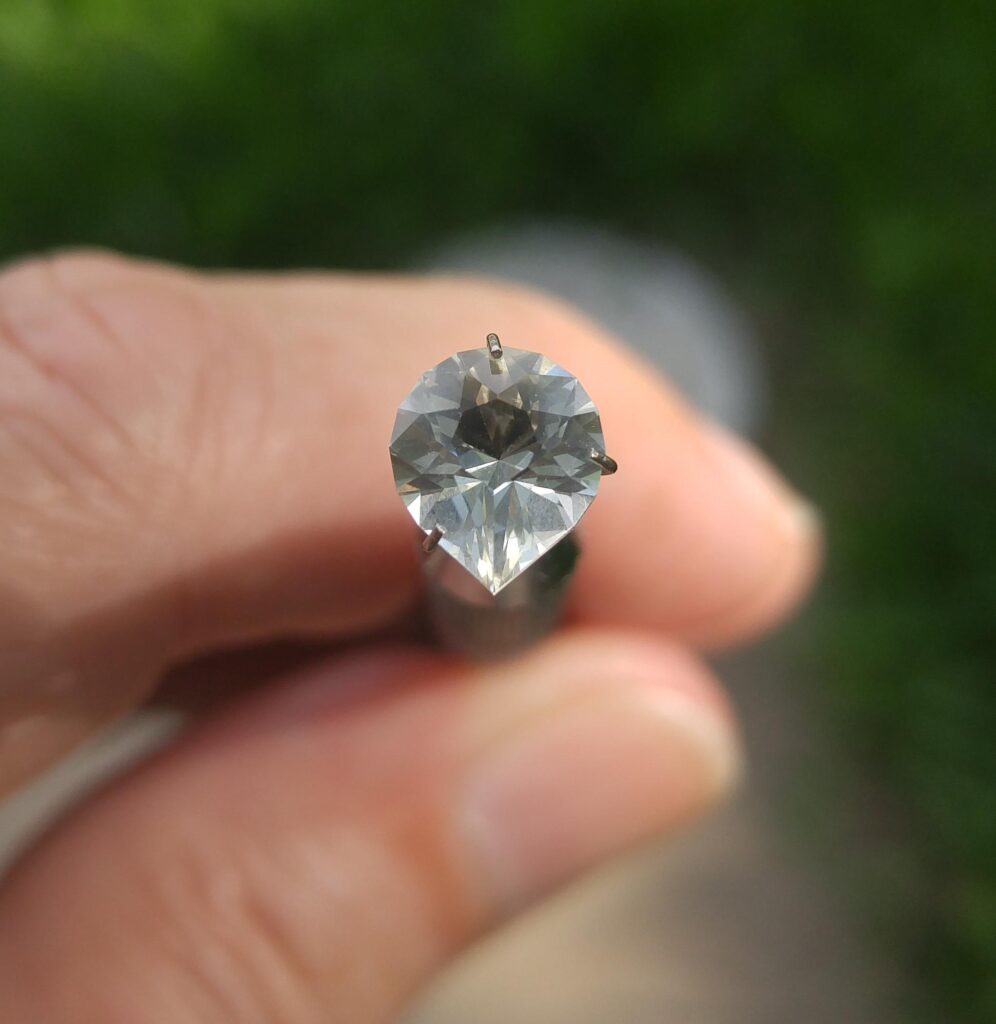
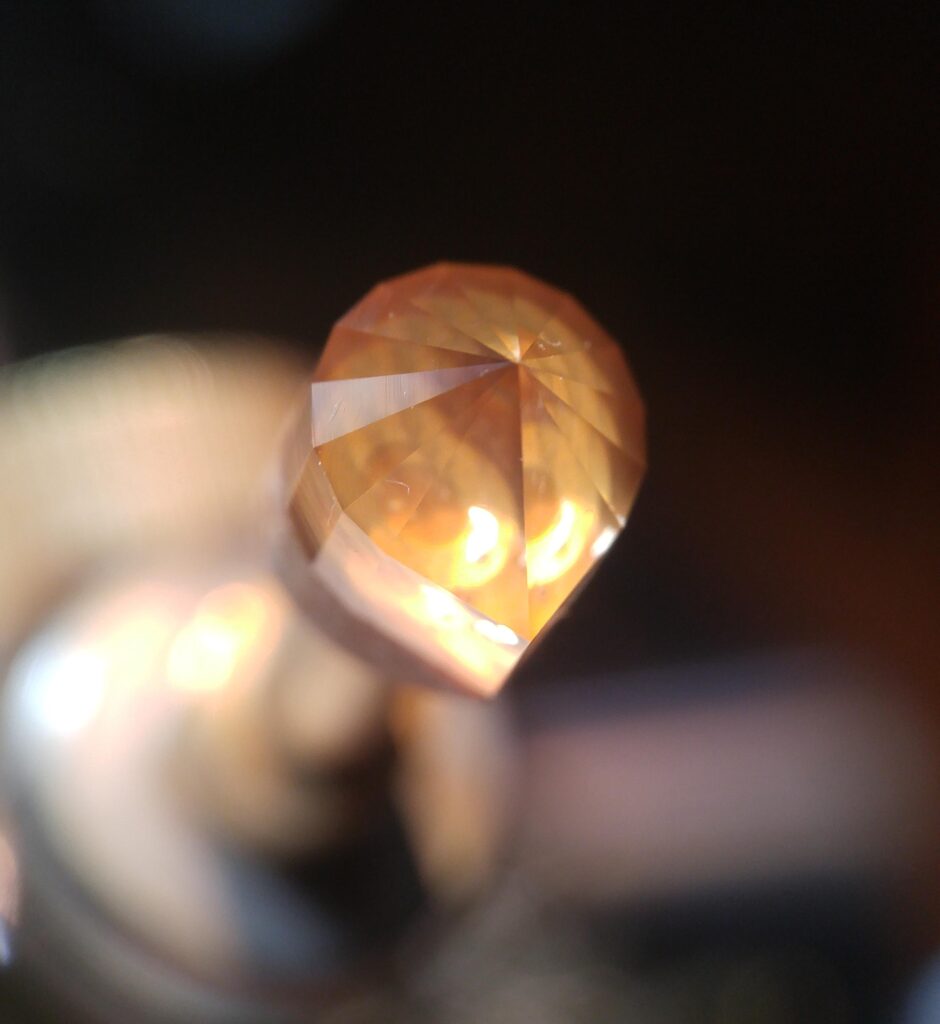
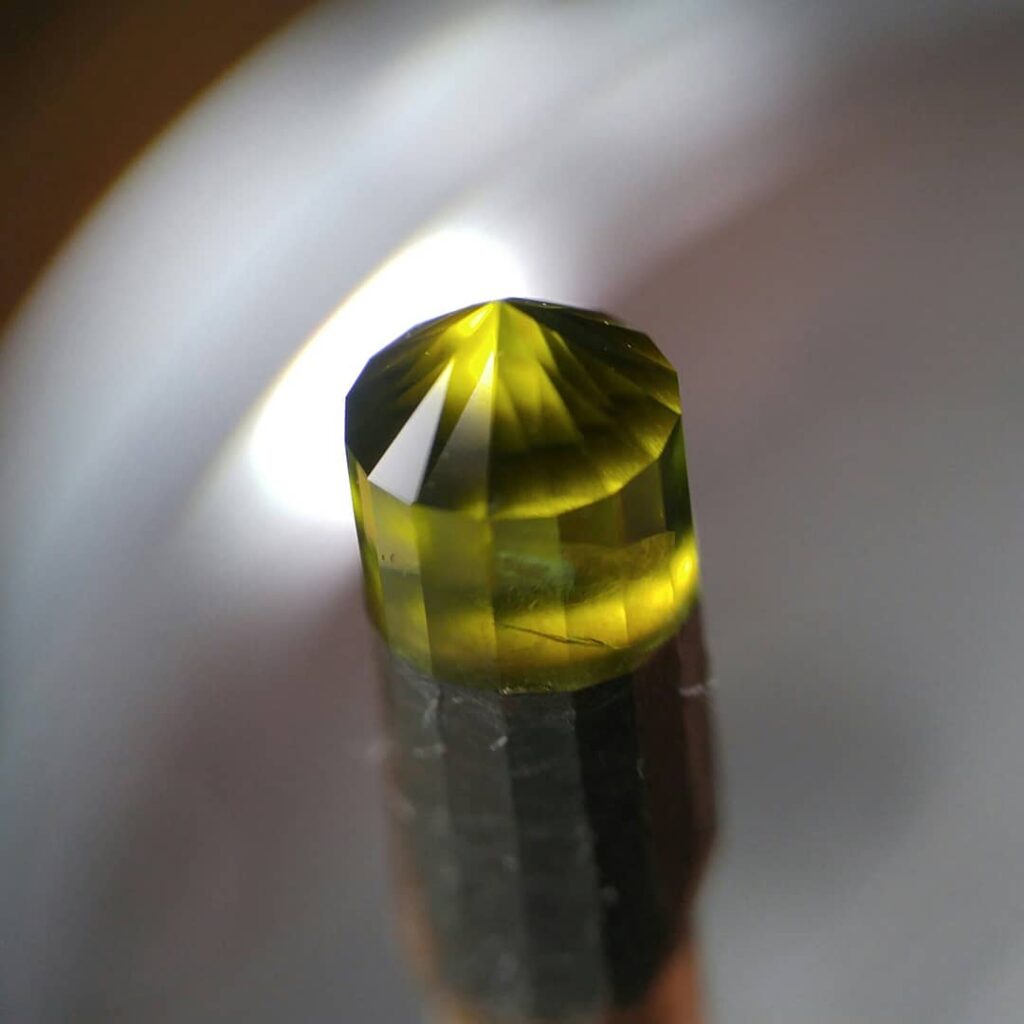
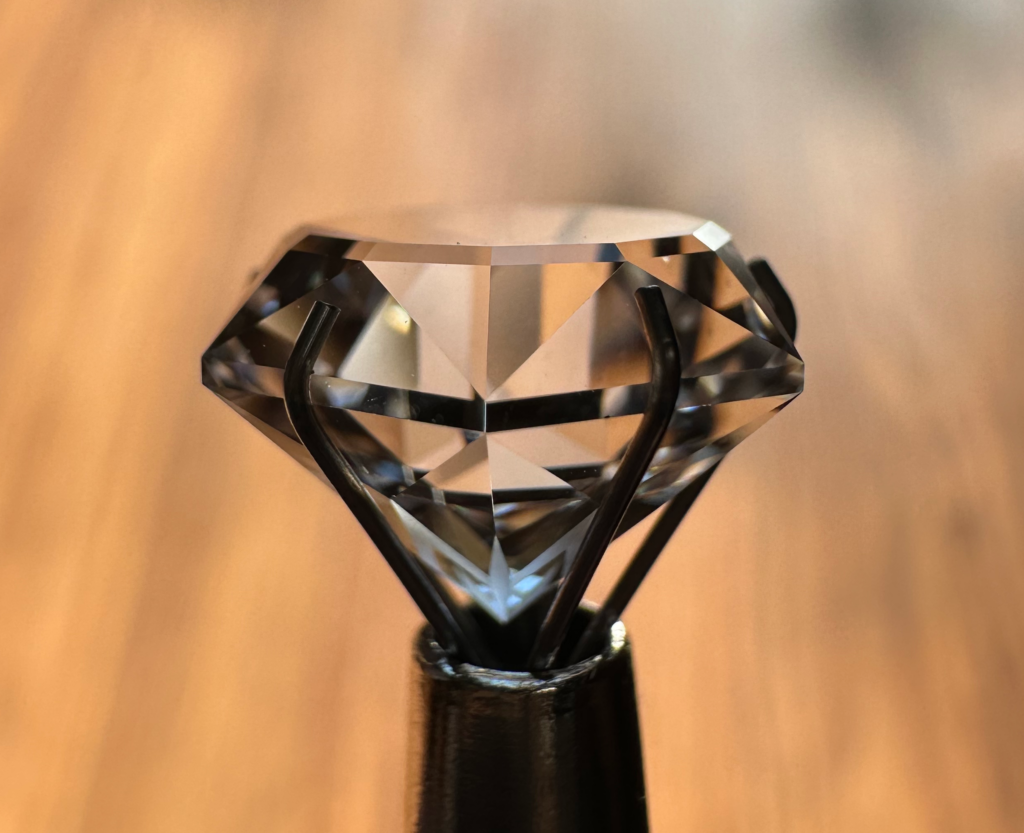
Below is a side view of the completed gem. You can see the frosted pattern down at the bottom of the pavilion, and can easily see that this piece of Quartz, without a single inclusion, is optically clear and provides a perfect medium for a frosted design. With a total of 79 facets (42 pavilion, 31 crown and 6 girdle), the gem wasn’t difficult to facet and I was very pleased that my frosting, as well as all meet points, are pretty much right on the money.

Side view of the crown facets on the Quartz Frost Star Hex.
Side view of the crown and pavilion facets on the Quartz Frost Star Hex.

I think going forward, at least until I can find a lap that would be good to use for frosting facets, I’ll have to avoid that “safe” zone on the 1,200 grit topper lap when using it to facet stones and keep it reserved for those facets that will be frosted. I had already downloaded and saved a good number of designs that use frosted facets a couple years ago, so at least now I know I can use an area of that lap until I find a decent replacement that won’t cost me a body part or two. 😉

In all I really had a lot of fun working this design. As mentioned I had seen other frosted designs and knew I would facet one of them one day, and this design seemed to “fit the season” very well. The design name uses “star” in its title, but it really could be a snowflake as well (which are also hexagonal). I already have a design for a silver pendant in mind that I will use this stone in, and if it comes together how I imagine it to look like, I think it will be an awesome looking pendant!

Yellow CZ Graham Portuguese

Below is a piece of yellow Cubic Zirconia (CZ) cut and faceted in the “Graham Portuguese” design by Jeff R. Graham, weighing in at 13.50 carats and 11.75 mm diameter.

Yellow CZ cut in the Graham Portuguese design with 161 facets. The gem came in at 13.50 carats and 11.75 mm diameter.
Yellow CZ cut in the “Graham Portuguese” design with 161 facets.

The traditional “Portuguese” cut has been around for a very long time and has been cut by numerous faceters around the world, but Jeff Graham improved on the design in 2002, revising it especially for gems with refractive indexes between 1.76 (Sapphires and Rubies) and 2.14 (Phosgenite and Mimetite), which would include many Garnets (1.77-2.02) and Zircons (1.81-2.02) . With the refractive index for Cubic Zirconia being so close at 2.15-2.18, the improved design cut using that material would really enhance it, too.

Mr. Graham mentioned in his Cutting Remarks included with the design that “YAG*, CZ, and man-made Sapphire are all good materials for this design” and suggested “a light colored material and obviously larger stone”, so yellow CZ it was. There are 161 facets on this stone (including the girdle), so this stone sets a new personal record for the most facets on a single stone that I’ve done to date.
*YAG: Yttrium Aluminium Garnet, a synthetic material developed for use in optics and lasers, but also provides a good faceting material alternative.

I was beginning to have a love/hate relationship with CZ, at least with this particular piece. I love CZ in that, being a synthetic lab-created stone, it makes for some very inexpensive material to facet with. I purchased two kilos of the stuff a couple years ago comprised of six different colors for $80, shipping included. That equates to a cost of less than $0.01/carat ($0.00814/carat to be exact). Two kilos sounds like a lot of Cubic Zirconia, but it is some very heavy stuff… you could easily substitute fishing weights of CZ with those of the same size in lead I think, it’s that heavy. But, I wanted some very inexpensive material that I could learn to facet with, and CZ fit the bill nicely.

After the chunks of material arrived from overseas they were cut up on my trim saw, and a good number of pieces roughly pre-formed on my cabbing machine while I anxiously waited for my faceting machine to arrive. I estimate that it likely cost me about $0.02/carat after taking into account what was lost in the sawing and pre-forming process, which still makes it very inexpensive material to facet. This piece for example (which which looks like a lemon gum drop), weighed in at 42.95 carats pre-formed and cost me $0.86 at that rate. What’s not to love about that?

Yellow CZ rough ready to be faceted into a Graham Portuguese design.
Yellow CZ rough ready to be faceted into a “Graham Portuguese” design.

Once Cubic Zirconia is faceted, it really does have some of the most “bling” of any stone I’ve seen, with flashes of color that even diamonds can’t mimic. Diamonds reflect more pure white light, whereas CZ, due to its excessive light dispersion, reflects a much more noticeable rainbow-colored light and is one of the ways you can actually tell the difference between the two. It’s not near as hard as diamonds either, coming in on the Mohs scale even behind corundum (Sapphires and Rubies) at 8.5.

My “hate” relationship with this particular stone however was due to just how easy (and constant) it got scratches when working the pavilion. Scratches are a part of faceting and cabbing, literally. You start out removing stone by scratching it away, and then subsequently remove those scratches with finer and finer material until you seemingly remove the visible scratches, leaving behind a mirror polish. If you were to look at that mirror finish under a high-powered micron-scope, the scratches are still there, but just so tiny so they can’t be seen with the naked eye (or even a jeweler’s loupe). So in reality, you didn’t “polish away” the scratches, you just made them too small to see. 😉

However, when faceting stones, sometimes a piece of the material will just dislodge itself from the facet you’re working on and leave a scratch on your nicely faceted plane as it grates across the surface. Quartz is known for this trait, and my first thoughts on this piece of CZ was that it was putting Quartz to shame. Not only did I have to use an extremely light touch when faceting the pavilion, but I also had to drop the RPMs on the machine down to about 250 on the pre-polish and polish grits (I normally pre-polish anywhere from 300-600 RPM, and polish at about 300-500 RPM).

I also had to take it all the way through from the 3K, to the 14K and finally 60K diamond grits to get it polished, and even then I still had a couple facets that I just could not completely clear of a scratch (or I would have over-polished that facet and ruined the meet-point). The scratches might not be visible to most with just the naked eye, but they can definitely be seen with a 10x loupe, however I preferred that trade-off over sloppy meet-points which I think are more readily noticeable.

Combine a SLOW lap with needing an extremely light touch and having to progress though three different grits just to get a polish takes a lot of patience, but when you have your facet almost completely polished and then suddenly a scratch appears across its surface, it’s not only frustrating but even more time-consuming. You have to stop and clean the gem and lap of all diamond compound and swarf (the “mud” that is created from the diamond grit, oil and particles of the gemstone that are removed during the faceting process). If you don’t, you might have the culprit that caused that first scratch connect with your stone again and cause another! 😱

I didn’t recall having had this problem with the other CZ stones I’ve faceted, as three of my first four stones I ever faceted were in CZ (and one of those in this same yellow material). I think if I had, I may have given up faceting before I even got started! Seriously though, working the pavilion on this stone certainly tested my patience. If I didn’t enjoy the craft so much, I think I might have just thrown this one in my tackle box, willing it to be snagged and lost in the murky depths at the bottom of some pond or lake and chosen another stone to work on. Don’t think the thought didn’t cross my mind!

Here’s a shot of that lemon gum drop now, with the pavilion and girdle facets completed. There are 96 facets cut so far (16 for the girdle, and five tiers on the pavilion, each with 16 facets as well). The rough stone was formed on a 320 grit lap followed by a 600 grit lap for the girdle and first tier to establish a center point, but the other tiers, due to the decreasing size of the facets, were cut when working the stone on the 1,200 and 3,000 grit laps, followed by the 14,000 and 60,000 grit pre-polish and polish laps. That calculates to having worked each facet between 4-6 times, for a combined total of 448 facets worked (so far). Whew!

Yellow CZ with girdle and pavilion cut for the Graham Portuguese design.
Yellow CZ with girdle and pavilion cut for the “Graham Portuguese” design.

After transferring the stone to the another dop to work the crown and stepping through the 320, 1,200 and 3,000 grit topper laps to get those facets in place, I decided to stop and thoroughly clean the splash pan that the laps spin in, wipe down the spindle, gears, mast and generally the entire machine.

I usually clean up the machine after faceting a stone before moving on to faceting another, but I was wondering if perhaps some of the fine CZ dust clinging to the splash pan or equipment after cutting down the stone on the courser 320-3000 grit laps was getting knocked or blown loose, and that dust may have played a role in all the scratches I was getting on the pavilion.

That appeared to have done the trick, as I was able to work the crown without the frustration and hassle that I was experiencing with numerous scratches suddenly appearing on facets I was polishing on the pavilion, which was a tremendous relief! I was able to proceed straight to the 8,000 pre-polish and 60,000 polish grits, saving myself the time in having to work the facets on the 14,000 grit lap, and all with the regular minor scratch to remove here or there as usually incurred while faceting.

There are four tiers on the crown, again with 16 facets per tier, for a total of 64 facets (not including the table), and already this gem is sparkling and flashing every color in the rainbow (which CZ is so well known for), even without the table having been cut yet…

Yellow CZ with crown completed and ready for the table to be cut for the Graham Portuguese design.
Yellow CZ with crown completed and table ready to be cut for the “Graham Portuguese” design.

The color of the gem looks a little different from previous pics as I moved the printer cart that the faceting machine is seated on out of the living room to another area (had to make room for our Christmas tree!), so the different lighting is the reason it looks less bright lemon-color and more golden.

Here is a side-view shot of the completed gem showing the numerous facets on the pavilion and crown, which makes for a very flashy gem no mater what material it’s cut in practically, but especially when Cubic Zirconia is used.

Yellow CZ side-view of the gem cut in the Graham Portuguese design.
Yellow CZ side-view of the gem cut in the “Graham Portuguese” design.

Cutting the “Graham Portuguese” design with its 161 facets was certainly a challenge, and this piece did try my patience getting the pavilion cut, but it definitely won’t be the last gem I cut in this design. Overall it’s not a difficult gem design to cut, just tedious as each tier has 16 facets and the indices alternate between tiers, so really the only thing that changes is the angle the tiers are cut at.

With all the work that went into it, and the fact that it actually did turn out very well in the end, I guess it won’t be relegated to the tackle box after all. 😉

Brazilian Amethyst SRB

This Amethyst from Brazil is cut in a Standard Round Brilliant (SRB) design called “Charles Schlagel Quartz”, which was in an article by Jim Perkins included in one of the newsletters published by the United States Faceters Guild (Vol. 23, No. 4; December 2013).

Amethyst SRB faceting completed. 6 mm diameter, 0.85 carats.

The article, titled “The Quartz Study,” included four Standard Round Brilliant designs, the first design being this one, and based on angles for the crown and pavilion “main” facets determined to be best for quartz by Charles Schlagel, and published in an article by Charles Parsons in Gems & Minerals Magazine, March 1966.

Even though the design is called a “Standard Round Brilliant”, I’ve found that about the only thing “standard” about it are the count and placement of the facets (somewhat), not their angles, so there’s a score of “SRB” designs out there that were created for various gem types with varying crown height and angle, pavilion depth, etc., either to maximize the brilliance of a particular stone, or because the designer thought it needed to be that way.

The original round “brilliant-cut” is attributed to Marcel Tolkowsky, who developed the cut in 1919 especially for diamonds to show off their exceptional brilliance. The facets in the original design included 8 star facets, 8 main (or kite) facets, 16 girdle facets and the table on the crown, and 8 main facets and 16 girdle facets on the pavilion for a total of 57 facets.

The "Standard Round Brilliant" cut.

The “girdle facets” mentioned are facets either on the crown or pavilion that meet the girdle, not the girdle itself. A faceted girdle was not actually calculated into the original design as they were usually ground smooth around the stone, and did not include any facets of its own. Many commercially faceted stones in today’s market also don’t have faceted girdles, and are ground smooth but not fully polished.

Even though I had inspected the rough in Benzyl Benzoate (a liquid with a refractive index of 1.568 that closely compares to that of a lot of gems so you can more easily see “into” the stone) to check if it had any inclusions, fractures or areas of color separation, sometimes they just get missed and a tiny fracture in this stone was one of those exceptions.

I was able to see that the deepest violet-purple in the rough was at a particular point which I planned to place at the pavilion to maximize the gem’s color (even though most of it would be removed in the faceting process), but I didn’t see any inclusions or fractures until I started grinding down the what would be the top of the stone that gets attached to the dop.

Amethyst from Brazil dopped and ready to facet.

The fracture didn’t appear to extend far into the stone, and I was thinking that due to the pattern of the fracture which would be on the edge and extend up to the top at an angle, it likely wouldn’t affect the crown since the design I’m using for the SRB has a shallow crown, so I attached the dop accordingly and started forming the gem on the 320-grit lap, getting rid of the big pockets and roughing in the facets.

Amethyst SRB roughed in to get an approximate pavilion center point with 320-grit lap.

Smaller pockets, inclusions or imperfections can be almost completely taken out with the 1,200-grit lap (leaving only very slightest imperfections to be removed with finer laps), as well as the bigger scratches left behind from the 320-grit lap, but all the while your reducing the weight of your stone, so that is why it’s better to work the smaller stuff out with the higher grits.

Working out pockets and other irregularities in the Amethyst SRB with the 1,200-grit lap.

However, by the time I got the the 3,000-grit pre-polish lap I could see the internal fracture more clearly, as seen in the pic below (the fracture is circled in red). That is one of the problems faceters face when trying to minimize loss of their gem’s size or weight… sometimes you just don’t know what’s in the box waiting for you until you open it up. 😉

A close-up of the fracture, front-view.

When you see the fracture in the interior of the stone from what I call the “front view” above, it’s hard to tell just how much of the crown would be affected, but when you rotate the stone so you can see the fracture from the “side view”, you see that it clearly is just on the edge and is sharply angled so it shouldn’t affect the crown. But, where the fracture actually comes out to the girdle’s edge it does not leave much room for the girdle at all.

A close-up of the fracture, side-view.
A (not very clear) close-up of the fracture, side-view.

I knew I would have to bring the girdle in just a tad more, otherwise after polishing I would be left with a razor-thin girdle which would too easily chip when set in a mounting. This brought my hopes of having a 7.5 mm diameter stone to an abrupt end, but I would much rather have a good girdle on the stone than have it chip when setting (which when re-cut to remove the chip would no doubt leave me with a stone a LOT smaller in diameter, for sure!).

I originally brought the girdle in to give me what I thought would be enough material for a nice girdle thickness, which would leave me with a stone around 7.0 mm in diameter, but after finishing the pavilion and transferring dops to start on the crown, I found that I was right and the fractured piece was only held on by the superglue.

Unfortunately there was a “pit” that was left behind that I just couldn’t grind out. I took the girdle as low as I could, and even adjusted the angle of the crown “girdle facets” from 43.50° to 43.00°, and even tried 42.50° but still couldn’t get rid of what I called a tiny “snowflake” with an attached “micro-canyon” that would have been clearly visible on the polished facet. And, it wasn’t in a position that could have been ground out for one of the “kite” facets, either. 😕

So, I bit the bullet and transferred the gem back to the other dop and re-ground the girdle again, ruining the “main” facets I had in place on the pavilion, but insuring I had plenty of girdle to bring the first tier of table facets down enough to grind out the “snowflake” and “micro-canyon”. I started to just cut the pavilions “girdle facets” back a little, which would have allowed me to re-cut the “main” facets with girdle meet-points, but I wound up getting some deep scratches on one facet that had me almost take it to the center point. Calling it fate, that’s what I decided to do with the rest, and basically re-cut the entire pavilion from start to finish for a second time.

After transferring the stone (again), the first facet I re-cut (at the correct angle) was the one with the damage, which was removed, leaving me with plenty of girdle to spare. I could have scrimped on enlarging the girdle, but the last thing I wanted to have happen was to have to go back and grind it down even more, so instead of taking the stone down to just 6.5 mm (which likely would have worked), I took it down to 6 mm.

Amethyst Standard Round Brilliant, table completed and polished.

The rest of the table facets were cut-in just fine, and in the end I had a beautiful 6 mm diameter Amethyst weighing in at 0.85 carats that sparkles with purple, rose and blue hues so much I’m in awe. Seriously, I didn’t expect this kind of sparkle and flash to be coming from a quartz gem, and if I didn’t cut it myself I would have guessed it to be Cubic Zirconia, not Amethyst!

The picture of the completed gem at the top of the post doesn’t do it justice by a long stretch, and although I have a few other “Standard Round Brilliant” designs that were altered for quartz’s refractive index that I’ll be cutting in the future, I am already certainly very impressed with the “Charles Schlagel Quartz” design.

Two other designs highlighted in “The Quartz Study” article (also by well-known master faceters) highlight changes in angles that came about with advancements in technology… the “Quartz Round Brilliant” design by Edward J. Soukup (“Facet Cutters Handbook”, December 1986) and a design by Glenn and Martha Vargas, the “Glenn & Martha Vargas Quartz” design (copyright 2002) from their book “Faceting for Amateurs”, Fourth Ed., pg. 76.

However, the next Standard Round Brilliant I cut in quartz will use the “Jim Perkins Bright Quartz” design, which is also included in the article (and the highlight of his study). The design was created in 2012 using CAD and ray tracing in determining the best angles for quartz, so I am very eager to try that design, too, which should result in even better pizzazz and sparkle with the improved angles for the 1.54 refractive index! 🙂

Santa Ana Madeira Citrine Golden Steps

Santa Ana Madeira Citrine "Golden Steps" Emerald Cut (0.80 carats, 5x8 mm).
Santa Ana Madeira Citrine “Golden Steps” Emerald Cut (0.80 carats, 5×8 mm).

I know that I had mentioned in my last post that I planned on re-cutting the Beginner Honeycomb design in Santa Ana Madeira Citrine (and still plan to!), but I had been wanting to facet an Emerald Cut design for a while now and had a design that I thought would be a great match with that stone called “Golden Steps”, a design by Greg Glenn.

Santa Ana Madeira Citrine is sourced out of Brazil, and is prized for its darker honey-orange-red color named after a fortified Portuguese wine made in the Madeira Islands, and less than 2% of Citrine comes in this color. Brazil is a great source for a lot of various quartz material, from Amethyst, Citrine and Ametrine (which has both of those colors together in the same crystal), to Prasiolite (a sea green color), Lavender, Rose, Lemon and a host of other types of quartz.

I should have taken a pic of the rough piece before I started working on it, but here it is shortly after I got the sides basically formed, and I think you can see that a gem faceted in this material will look great in practically any design that is chosen.

Santa Madeira Citrine roughing in for an Emerald Cut.

Emerald Cut designs are usually not too difficult to facet, and were really used to maximize an Emerald’s weight. Since most Emeralds, due to their crystal structure often naturally taking the form of a hexagonal block, rectangular or square cuts are very common for these stone as there is no set width or length that needs to be used for the design, which makes it easy to fit the design to the stone.

Here is a shot taken of the stone after having its girdle and pavilion roughed in on a 320-grit “topper” lap (cheaper imported thin metal laps placed on a much thicker “master” lap base). The shape at this point doesn’t need to have corners meet, as the corners will be faceted, too. The next step after this is changing out the lap with a 1,200-grit lap to get rid of the scratches the 320-grit lap left behind.

Santa Ana Madeira Citrine Emerald Cut after forming on a 320-grit lap.

After taking it from there onto a 3,000 grit resin-bonded pre-polishing lap, and with the stone’s pavilion shaped in, it almost looks like a little Monopoly game piece. It’s at this point that you can see the crystal’s interior color zoning, where a “misty cloud” of darker orange color seems to be floating in a sea of lighter Citrine quartz. Seeing these in gems and imagining the formation of the crystal as it occurred in nature eons ago never ceases to amaze me.

Santa Ana Madeira Citrine Emerald Cut after 3,000-grit pre-polish.

The rectangular and square cuts are so commonly used with Emeralds that these designs became known as “Emerald Cuts”, with step-cut facets on the crown coming together with a rectangular or square table, and step-cut facets on the pavilion forming a keel. As natural Emeralds almost always have inclusions, the pavilion wasn’t formed to maximize light reflection as much as to just complement the crown and retain weight.

However, these cuts look great on other stones, too, even those with higher clarity and are very popular with other varieties of Beryls such as Aquamarine and Heliodor, as well as Tourmaline, Amethyst or just about any gem, really. This is especially true if the gem is dark in color or semi-transparent since the pavilion’s cut usually isn’t made to maximize the light reflected back up through the crown.

Out of my natural rough, I had two pieces that I thought were the perfect form for an Emerald Cut, one being a piece of Arizona Peridot, and the other being the Santa Ana Madeira Citrine I cut this gem from. You don’t need to have a block form to cut an Emerald Cut, but to minimize the loss of stone if you have one, an Emerald Cut in one of the many designs out there of that type is a good choice.

However, as things sometimes go, a small chip came off one of the end girdle facets, right at the corner that required me to bring the girdle in, so I had to go back down to my 1,200-grit lap to take that out, then bring in the opposite girdle by the same amount before getting back to the 3,000-grit pre-polish lap.

As the pavilion’s tiers, or steps (which only increment by 2° for each step) and the corners don’t take much at all to facet or cut, I then progressed to my copper lap charged with 14,000-grit diamond powder and “polished” those facets in. Although 3,000-grit is considered a pre-polish grit, 14,000-grit really is, too, but can be more precise when bringing in meet-points or facets that only take a very light touch to get into place on smaller stones.

I polish the stones after that using a lap with one of the polishing oxides (cerium or aluminum), or 60,000-grit diamond powder, depending on the material being polished. With some stones (such as quartz), I can often go straight to polishing after using the 3,000-grit lap. But, as the pavilion facets on this stone might be cut too quickly or aggressively with the 3,000-grit lap, I opted to take it a bit slower and use the 14,000-grit lap to bring them in, and then polished.

Completed pavilion on Santa Ana Madeira Citrine "Golden Steps" Emerald Cut after laying light facets in with 14,000-grit diamond powder.
Pavilion of the Santa Ana Madeira Citrine “Golden Steps” after pre-polishing with 14,000-grit diamond powder.

With the pavilion completed the gem is now ready to transfer to another dop and have the crown completed. There is a HUGE amount of stone left for the crown (more than I thought there would be, though not helped by having to reduce the girdle), and with experience if there is a better design for a particular stone’s shape I might be able to save more weight, but I had already committed myself to this design.

With the gem transferred to another dop so the crown could be cut, things started taking shape and the beautiful color of the Santa Ana Madeira Citrine stone really is something. I hated to grind most of that top block off as it drastically reduced the weight of the stone, but sometimes it just can’t be helped, especially when someone like me lacks experience.

Here, I have all the crown facets cut in and polished, with the exception of the table. The reason for that is because tables are cut using a 45° “table adapter” that is provided with the faceting machine, as aligning the faceting machine’s spindle perpendicular to the lap could be dangerous to both the machine (since there’s no angle, all force would go straight to the mast and could damage it) and the stone, should the stone bind on the lap.

The crown of the Santa Ana Madeira Citrine "Golden Steps" Emerald Cut polished with Cerium Oxide right before the table is faceted and polished.
The crown of the Santa Ana Madeira Citrine “Golden Steps” Emerald Cut polished with Cerium Oxide right before the table is faceted and polished.

Also, with mast-type faceting machines which have the index gear and spindle mounted on a mast or pole, once you have aligned the stone in the spindle to the index gear, removing it and then re-attaching it makes it even more difficult to match angles that have already been cut, or still need to be cut, and will likely require the use of the micro-adjuster (aka “cheater”) to work slight adjustments into the angles on possibly every facet, which greatly adds to the complexity in faceting a stone.

Barring a stone falling off the dop, you really only want to remove the dop from your spindle three times when cutting a stone if at all possible… once when you have completed the pavilion and need to transfer the stone to a new dop, again when you remove the dop after polishing the crown facets and attaching the table adapter to cut the table, and lastly when the table has been cut and polished, as at that point the gem is completely faceted (for those that cut pavilions first that is… there are some faceters that cut the table and crown first and the pavilion last, but they usually use alternative faceting devices than a mast-type faceting machine).

Below is how the gem looks after the table has been cut and polished. The color and clarity of this stone is almost flawless, and with no inclusions, though you can easily see color zoning in the completed gem. You can clearly see the bottom of the “V” dop used to hold stones with pavilions cut with a “keel” shape, such as Emerald Cuts, as well as the superglue I used to anchor the stone to the dop, attesting to its clarity.

With the table cut and polished, the Santa Ana Madeira Citrine "Golden Steps" gem is ready to be removed from the dop.
With the table cut and polished, the Santa Ana Madeira Citrine “Golden Steps” gem is ready to be removed from the dop.

Speaking of attaching a stone to a dop, I usually use Tom Herbst’s method of using dopping wax for the initial dop, and then when it comes time to transfer the stone to a new dop for cutting the crown, use epoxy glue for that dop. The reason being is that when it comes to remove the first dop from the stone after the epoxy had cured, very little heat is needed to pull the dop attached with the wax away from the stone (which could be detrimental to heat-sensitive stones should they get too hot). Removing the stone from the dop that was attached with epoxy after the crown has been completed is taken care of by letting it soak in acetone over night, and no heat is needed.

I will likely continue using that method for larger stones, but for smaller stones there’s a superglue out there now that is cured by UV light. When I use epoxy glue, I leave it to fully cure overnight. Even when I’ve used regular superglue for cabbing small stones, I leave it for an hour or so to completely harden (even after spritzing it with an “activator” that immediately hardens it). If I don’t, there’s a risk of the stone coming off the drop. I haven’t had that happen with epoxy, but I have with superglue when cabbing tiny Peridot using a carpentry finishing nail as a dop stick.

Other faceters have commented that the UV light hardens the superglue in seconds, and it’s safe to immediately start faceting the stone right after that. As no problems have been reported with it from what I’ve heard, I decided to give it a try, too. The glue actually included a small UV flashlight to use (which certainly did cure it fast), and I didn’t have any problems using it on this stone and am eager to try it with other stones.

One of the benefits besides being able to get to faceting sooner after dopping the stone (such as when using dopping wax) is that it also takes far less time soaking in acetone to remove the glue from your stone or dops. As mentioned I usually let a stone dopped with epoxy soak in acetone overnight to remove it, but with this superglue it only took a few hours or so before the stone and dop were ready to clean up.

This gem started out at 8.15 carats rough, but finished up being .80 carats in weight and with dimensions of 5×8 mm. That’s a loss of 90% of my rough material that went down the drain hose and got dumped in the back yard, so I definitely have a ways to go in learning what designs are best suited for a particular rough stone’s shape! Most faceters try to have a loss of 80% or less of their material, which is considered quite average as even very experienced professional faceters rarely get more than 35% back out of their material in a cut stone.

At least with this stone (which cost me less than $5), I got way more than its cost out of it in experience, the resulting gem is beautiful in cut and color, and I know I’ll be able to recoup its cost if I were to ever sell the faceted gem or a piece of jewelry I use it in, so I consider it a win-win even with only 10% of it being the finished product out of that chunk of stone I started with.

By the way, “standard” rectangular gems of this size are usually cut to 5×7 mm and are sized for use in ready-made mountings, but as I am my own jeweler and make my own mountings, I can use whatever size stone I want, and I’ll take another non-standard millimeter of gem any day! 😉

Citrine “Beginner Honeycomb” Turned “Custom Hybrid”

Wow… how have I missed faceting! Over two years ago I actually had this Citrine Quartz stone on my my faceting machine’s spindle. It started out as a “Beginner Honeycomb” design by Michiko Huynh. I remember that I was working the facets on the crown and pulled a beginner snafu and started pre-polishing a facet where there wasn’t one. 😱

Custom Hybrid Citrine, 2.75 carats at 9.50 mm diameter.
Custom Hybrid Citrine Quartz, 2.75 carats at 9.50 mm diameter.

It’s easy to do if you’re not paying attention to what you’re doing, as on a faceting machine’s index gear there are notches that go around the diameter of the gear, and what notch you lock your spindle into determines where on the stone the facet is cut.

On this particular index gear (which is the standard “96” that the majority of faceting designs use), there are 96 notches, and in the picture below you can see that the main “tooth” is fixed at the 96th notch. That means that if I were to lower the spindle with the stone seated on the dop onto the lap, with “96” at the top position the facet would be cut on the opposite side of the stone, and at whatever angle you have your spindle set to.

One notch too far to the left or right and you miss your mark. Or, if you look at the wrong line on the design’s instructions that list the indices to use for a particular facet and the index is different from the facet you’re working on (which is exactly what I did), the results can be disastrous. Needless to say I learned real quick that a blank sticky note to mark what line you’re working on is a good thing to have when you’re faceting. 😉

As my heart sank I was wondering what to do since a new facet had been made (literally, and it would definitely be noticeable, even when done with a pre-polish grit). I was faced with a couple choices… one, re-cut the entire stone (which would reduce the size of finished the gem), or two, see if perhaps I could somehow work the mistake into the design.

As I had done what I considered to be a really nice job (for me) on the pavilion, I was not wanting to re-cut the stone as it was 9.50 mm in diameter with the pavilion and girdle already polished. Besides, I had already cut my “A”, “B” and “C” crown facets in and was working with the pre-polish grit when I made the mistake, so all the facets with the exception of the table had been cut.

I opted instead to see what I could do to work the mistake into the design. If you take a look at the original design below (and see how it should have been cut), you will notice that at the tip of the “A” facet, the “B” and “D” facets have a common edge leading to a point on the “C” facet. Well, right on that edge is where I dropped my new facet, and at the same angle of the “D” facets (since that is what I had been working on). Instead of locking in on the 96 index, I looked at the wrong line in the instructions and locked in on the 92 index (which is where one of the “A” facets would have been cut on).

Beginner Honeycomb diagram
Beginner Honeycomb diagram.

My “fix” was to repeat that same “mistake” on the other side of the “D” facet with the same indices and increments used for the “A” facet, working around the stone doing the same on both sides of every “D” facet and with a width that brought some points together, and disposed of others (basically a “freehand” job, but hoping for the best). If the spirit of Bob Ross had been standing over my shoulder at the time, he would have whispered that it wasn’t a mistake, but a “Happy Accident”. 😉

This actually gave the crown a very unique cut, with the tops of the “A” triangle facets having a flat top, the “B” facets extended up and becoming kite-shaped (“with wings!”). The “D” facets also extend up into the “C” facets, and with no table cut yet the “C” facets appear as a six-petal flower pattern that you can somewhat make out in the pic below.

That destroyed the original honeycomb design, but at least it wasn’t a total loss or having to be re-cut smaller than it was. By the way, the “bubbles” are not in the stone, but in the epoxy used to mount the stone to the dop with, and the blue color is actually a tiny amount of adhesive putty down in the bottom of the cone dop to protect the tip (culet) of the pavilion.

I picked up the trick with the putty from a YouTube channel to prevent the pavilion’s culet from breaking off when removing the stone from the dop, but from what I’ve found, no one else I’ve seen bothers doing that so I doubt I’ll be bothering with it again going forward either (hopefully I didn’t just jinx myself by saying that!).

Right about that time we had relatives coming to visit and stay with us for several days, so I had to take a break from faceting and move the faceting machine out of the living room where I usually facet and into a room I use for my office. After they left I was then hit with multiple BIG projects at work, all in succession, and together with everyday life many of my hobbies had been put on a back-burner since then.

With the faceting machine tucked away in an office corner, and combined with the fact that I forwent spending $39 on a frosted vinyl cover for the faceting machine when I purchased it and instead use a large black garbage bag (which works just as well and is a LOT cheaper), that kept the stone conveniently out of site and didn’t help one bit in reminding me of an unfinished faceting project, either. 😕

As working on the stone took a back seat to life and then was forgotten for a time, I am so glad I kept notes! One of the things I picked up in Tom Herbst’s book “Amateur Gemstone Faceting Volume 1: The Essentials” is to ALWAYS take notes on your faceting projects, and it’s so true. This turned out to actually be a testament to taking good notes when faceting stones, as I had to go back and final-polish those facets after a two-year memory lapse.

If I hadn’t noted what indices to set my gear on or what angle to use for those freehand facets, etc., there would have been a lot of trial and error (and at my skill level, more error than trail I’m sure!) when trying to go back and match the facet’s planes to the lap, and would have likely ruined some of the meet-points when working in the final polishing.

Although I still have a lot to learn about Gem Cut Studio, I was able to mock up a design that incorporated the changes that I had made to the crown pretty closely and gave it a new name of “Custom Hybrid”, crediting Mr. Huynh for the pavilion taken from his “Beginner Honeycomb” design.

Custom Hybrid diagram.

One thing to note is that Mr. Huynh’s design was created with GemCad (an older gem design software program that set many of the standards for faceting software) where pavilion and girdle facets are numbered, and crown facets are lettered. With Gem Cut Studio facets are numbered, but also identified with “P” for pavilion, “G” for girdle, “C” for crown and “T” for table.

After polishing all the crown’s facets, the next step was to cut and polish the table, but I adjusted that, too. When I imported the original design into Gem Cut Studio, one of the tools it offers is a rendering of light refraction for a given stone’s refractive index (Quartz is 1.54). What gives faceted gems their sparkle is light coming into the crown, going down and hitting the angles in the pavilion and being reflecting back up through the crown.

With the new facets I had added to the crown’s design, I found that adjusting the table size just a tad smaller than what was displayed in the original “Beginner Honeycomb” design maximized the amount of light emitting from the crown, so that’s what I incorporated into this “new” design.

However, as things turned out the table still came out slightly larger than I had planned, as in the final polishing a scratch became visible (which sometimes happens with quartz, no matter how gentle your touch is). Working that scratch out took the table to a larger size than I had wanted, although it still looks similar to the center of a flower and not too much sparkle was lost.

I have seen some stones cut with designs where portions were left “frosted” so they stand out, as the focus of the design is the frosted facets more than their sparkle. I figure that could definitely be a possibility with the petal-shaped facets on this design, but since I had already taken them through the pre-polish phase I didn’t want to over-cut them by backing down to a lower grit just to frost them.

Anyway, the stone started out at 16.27 carats rough, and ended up being finally completed over two years later at 2.75 carats (9.50 mm in diameter), and with 91 facets instead of 79 as in the originally planned “Beginner Honeycomb” design (43 crown facets instead of 31). In all, the light yellow Citrine Quartz with not a single inclusion and cut in the design with the “Happy Accident” turned out very well. 🙂

The color in this Citrine stone is a very light yellow, so I think I will try cutting the Beginner Honeycomb (correctly) in a slightly darker golden Santa Ana Madeira Citrine, which would definitely look pretty cool with that stone being more of a real honey color!

Sunstone (Labradorite) Brilliant Pear

A Sunstone (Labradorite) cut in the Brilliant Pear design by Jeff R. Graham. Well, I should say “almost cut in the Brilliant Pear design”. The pavilion was cut virtually perfectly with all meets right on point, but apparently the transfer alignment was off and I had to burn up the cheater (a wheel on the faceting machine to push the angle just a smidgen in one direction or the other) to get meets even close on the crown.

Below is the rough Sunstone I began with, on the dop and ready to start working it. It appears “golden” in color not because of the color of the stone (which is clear), but because the dops used on the faceting machine are made of brass.

Other things can affect the color of the transparent stones when dopped are things such as the color of the dopping wax (I use a harder brown dopping wax for faceting (versus a green dopping wax for cabbing stones), and actually only use the brown wax for dopping the stone the first time (for faceting the pavilion).

You can see below that there was a very big “notch” that had previously broken out of the stone. Sometimes when you’re buying rough on the Internet you don’t have the option of inspecting individual pieces all the time, so if the price is good sometimes you just have to hope for the best. In this case, I decided a pear design would be the best choice, giving me the most usable material out of the stone.

When I transfer the stone to the second dop for faceting the crown, I use either 5-minute epoxy or super glue, a tip I picked up in Tom Herbst’s book (mentioned in my first post on faceting, The First Four Stones I Faceted). The reason behind that is that you have to get the wax hot enough to melt so it will stick to the stone, and if you use wax for the second dopping the heat transferred through the stone may soften the wax of the first dop, allowing it to every so slightly alter the stone’s angle when using the dopping block to accurately transfer the stone (and which could be disastrous in getting correct meets).

In the pic below, I’ve completed 12 of the 14 pavilion’s first facets. I was wishing that I could almost stop here, as it’s a very pretty teardrop design, but with faceted stones each facet in the design is critical in maximizing the play of light reflecting off each facet as it makes its way down into the pavilion and back up through the table. As I am only a beginner, I have a LONG way to go before I would be able to successfully create designs or modify existing designs that would improve those things, but the software application Gem Cut Studio mentioned in my previous post (“Smith Bar” Cubic Zirconium) can be an exceptional tool for that.

This is the stone with the first round of pavilion facets and girdle meets completed, which is where you have a very close approximation of what the finished stone’s size will be (providing the crown and table facets go well).

And lastly, here is a pic of the completed pavilion and girdle, with all grinding and polishing completed for all the facets…

Remember when I mentioned that I used brown dopping wax on the first dop, followed by either epoxy or super glue on the second dop to decrease the chance of messing up the transfer? Well, even that technique is not foolproof!

My problem was that, using a regular cone dop, when you look at the pavilion of a pear-shaped stone you will see that it won’t “fit” nicely in a cone dop really, so you have to be extra cautious in your alignment so that it seats well and level in the dop (there will be more epoxy on the round side of the stone than the side with the point, but you still need to make sure you get good adhesion all the way around).

Unfortunately I didn’t get any pics of my work on the crown. I mentioned that I had to “burn up the cheater (a wheel on the faceting machine to push the angle just a smidgen in one direction or the other) to get meets even close on the crown”, and that is why… I was just WAY too busy trying to make things meet correctly that I overlooked taking pictures. 😕

I did my best, but when it came to the table I knew I wasn’t going to meet each of the “C2/C3” facets like it should, so I cut it small as I think it looks a little better without missed meets being so noticeable. This one kicked my butt, but on the next pear I’ll be cutting I’ll be taking extra care during the transfer to make sure I (hopefully) don’t have a repeat.

Here’s a close-up of the finished stone and if you look closely, you can see that the table facet does not meet the “C2/C3” facets at their corner, as if I had taken the table grind down that low you would clearly see some corners were met, and others were not. It’s much easier to see one or two meets missed by a fraction than it is to see all meets missed by a wide margin. 😉

Anyway, the stone actually turned out pretty nice overall, and has plenty of sparkle, even with a table that’s not cut all the way to the main and star facet meets. The gem started out rough at 9.75 carats and finished up at exactly 1.00 carat (7 x 8.15 mm). Although there were inclusions that had to be worked around, an almost 90% loss of material certainly isn’t good, but it was the best I could do for this stone considering it’s original shape and the chunk that was missing from the get-go.

I did learn something however (after the fact), and that was when I was trying to find a good way of dopping pear-shaped stones I ran across a post on the United States Faceters Guild web site where someone mentioned they had good results using a V-dop with wax (so I could possibly start with epoxy or super glue on the first dop, and end with wax on the second dop), and another had mentioned getting a second set of cone dops and using a triangle needle file, cutting a V-notch on one side to accommodate the pear-shaped stone’s extended point. I might have to try one of those two techniques next time!

“Smith Bar” Cubic Zirconia

A clip of my wife holding a yellow Cubic Zirconia I faceted in Jeff R. Graham’s “Smith Bar” opposing bar-cut design showing the pixelating effects the facets play on light, as well as the colorful flashes that CZ is known for…

The “Opposed Bar” design that Jeff R. Graham came up with was also named “Smith Bar” as one of the gems he cut in that design found its way into the Smithsonian Institution. According to an article on the International Gem Society’s web site, Mr. Graham cut the design in a forest-green tourmaline that was “tension mounted in a white gold bracelet by third generation artisan Sam Patania.”

“A curator from the Smithsonian Institution saw the piece at the show and spoke with Mr. Patania about submitting it (and two other pieces by his father and grandfather) to the museum. It’s now on display at the Renwick Gallery.”

Because the gem has a home in the Smithsonian, it has also acquired a name known as the “Smith Bar” cut, but has also lately become known as the “Pixel Cut” by some due to the way the opposed bar cuts creates a series of square reflections similar to the pixels used in modern digital displays.

I have a really cool piece of Ametrine (a bi-color quartz with half of the stone violet-purple and the other half golden-yellow out of the Anahi mine in Bolivia) that I had purchased from TheRoughStuff on Etsy that I want to cut in this design of about the same size, and wanted to work through a practice cut with the design first, but am really stoked at how this one turned out.

I’m actually glad I did cut the design in CZ first, though, as I think the “C2” corner cut angles on the crown really need to be altered based on the length/width of the stone, so I plan to import the design in Gem Cut Studio (a great software application for working with and designing facet diagrams/instructions) and use the length/width of the Ametrine girdle so I can have them meet at the “C3/C4” meet as the original design shows, instead of halfway into the “C4” facet as it turned out on this stone.

Cut on an ULTRA TEC VL Classic using preformed Cubic Zirconia rough I had previously worked of about the same size as the Ametrine I’ll be cutting at a later date. The CZ (which is much heavier than quartz) started out at 36.95 carats, and finished up at 11.50 carats (11.8 x 9.2 mm).

Arizona Peridot

This Arizona Peridot cut as a Standard Round Brilliant actually started out to be a lot larger than it finished up being, going from 4.6 carats rough down to 0.5 carats finished, but that’s the way the fractures crumble sometimes. 😕

At 5 mm in diameter it’s the perfect size for a small 4-prong ring, or accent to a larger stone. Hmmm…

Grinding down the girdle to its new width made this the smallest stone I’ve faceted so far, but it finished up really nice with lots of sparkle, a beautiful green color and not a single inclusion. The Standard Round Brilliant cut is comprised of 73 facets… 33 on the crown (including the table), 24 on the pavilion, and 16 on the girdle.

Each facet goes through several processes, from grinding to polishing in various grits until the final polish is achieved, checking and re-checking with the loupe along the way to make sure that the facet meets are on point and all scratches from the previous grit are removed. It’s not a quick (or easy) process, but when a gem that has gone through all those steps comes out looking like, well, a “gem”, you can’t help but be proud and thankful.

Below is a pic of the rough stone that weighed in at 4.6 carats. I did my best to inspect the gem for any fractures with Benzyl Benzoate (a good refraction liquid for testing gem stones with) and my 10x loupe under strong light, but I didn’t see the interior fracture that would take its size down so drastically (perhaps I’ll get better at spotting them with practice)…

Here I had just started with the rough grind of the pavilion. Even after going through the the other grinding and polishing phases of cutting the pavilion’s facets I didn’t see the fracture…

It wasn’t until I was cutting the girdle when a circular fracture became exposed, and when it popped out of the side it looked just like a (green) apple that someone had taken a bite out of. Even at this stage of polishing the girdle facets I didn’t see it until it was too late.

Internal fractures are often times not visible or detectable until you actually start cutting the gem, and is one of the things you just have to take into consideration when buying rough stock. The dealer I got this gem from, TheRoughStuff, has always provided me with exceptional gems and had no way of knowing, either, as I couldn’t detect the fracture until well into the cutting of the gem (and Peridot as a gem is well-known for having “feather” inclusions that have a tendency to fracture… I’ve cut enough cabochons with Peridot to know!).

The following pic is when the stone was sized down to remove the chunk that had broken out of its side, and massively reducing what would have been a much larger stone. Here you can see that the girdle and pavilion facets have been polished. You can actually see that there’s another fracture there near the bottom of the stone (which will actually be the top, or crown area), but that will be removed when the crown is cut anyway, so it’s not a concern.

With the stone transferred to another dop, work on the crown is progressing well, and with no more surprises!

With all but the very last crown facet ground and polished, the next step is the table. This is the last step in faceting (for most… some faceters, especially those in eastern countries that use hand-held facet devices start with the crown and end with the pavilion). It’s also the most “telling” facet as it’s easy to see just how well (or not) your facets “meet” at the right points.

Overall it was a somewhat challenging stone to cut, not so much because of the fracture that forced me to regrind the girdle (which is not hard, especially if your pavilion facets are accurate), but due to the new and much smaller size stone than I had never cut before.

It did turn out quite beautiful though (which I’m very happy with), and will someday be included in a silver piece that Kathy will likely treasure since every bit of it will have been completely handmade by me. As Peridot is the birthstone for August, and August is when we were married, I think an Anniversary present is in store. 😉

Brown Topaz Floater Trillion

Next up for my work faceting stones is another of Jeff R. Graham’s designs, a Floater Trillion in Brown Topaz…

The stone mounted on the 3 mm dop just had its pavilion finished and is ready for transfer (a process where the stone is placed in a jig that aligns it with another dop and attached with dopping wax, epoxy or super glue so that this dop can be removed and the crown cut and polished). The stone, which should finish up around 6.5 mm in diameter, has a couple veils in its interior but they don’t detract at all (I’m still stoked!).

The completed Floater Trillion in brown Topaz turned out nicely at 0.85 carats (and actually came in a tad smaller than I originally thought at 6.35 mm in diameter).

The delicate veils actually add far more character to the gem than I thought they would, with the tiny bubble-like veils mirrored and reflected throughout by many of the 52 facets, each giving off a golden glow. I really hadn’t thought about it before, but the way the veils appear in the cut gem seem to fit appropriately with the design’s name “Floater” Trillion. 😎

The First Four Stones I Faceted

The very first four faceted stones I ever cut and faceted…

These first two are cut in the GeM101 design by Tom Herbst in Clear Quartz and Amethyst Cubic Zirconia (CZ), weighing in at 1.6 carats (9.5 mm diameter) and 3.75 carats (9.15 mm diameter) respectively. Mr. Herbst created the pinwheel-style GeM101 design specifically for beginning faceters specialized for the common quartz gems, but I also think it looks great when cut in CZ (which is well-known for its flashes and sparkles with light).

Again, I’m not the greatest photographer by far and should have made a better effort to clean the quartz stone a little better, but was happy how they turned out. The design was created by Mr. Herbst to be a “first design to cut” in his book “Amateur Gemstone Faceting Volume 1: The Essentials” (which by the way is an excellent book on faceting).

Then these second two are an Easy Eight in Yellow CZ (9.25 carats, 11.85 mm diameter) and an Easy Cushion in Violet CZ (5.40 carats, 8.65 mm square). Both designs also by Jeff R. Graham, and all cut on an ULTRA TEC VL Classic Analog. Loving it ULTRA TEC, thank you!

Jeff R. Graham was a great and skilled gemstone expert and faceter that created many original designs, authored books on the subject and wrote scores of articles for the International Gemstone Society. Today, many of his excellent designs have been made available to the public for free and which can be downloaded, for which I am extremely grateful for!